
If you have questions, then you can select one of the following three options:
Search through FAQs
Find answers to your questions, which already others have asked.
kundenservice@avendoo.de
Write to our project and support team for getting more information.
Call the hotline
You get under the phone number (+49) 05251-698899-6 our support hotline.
Author backend
How do I embed content (files) of a zip medium in learning objects (for example: animations)?
- Upload the zip medium in your category via Learning content → Media.
- Via a right click on the line of the medium a contextual menu opens:
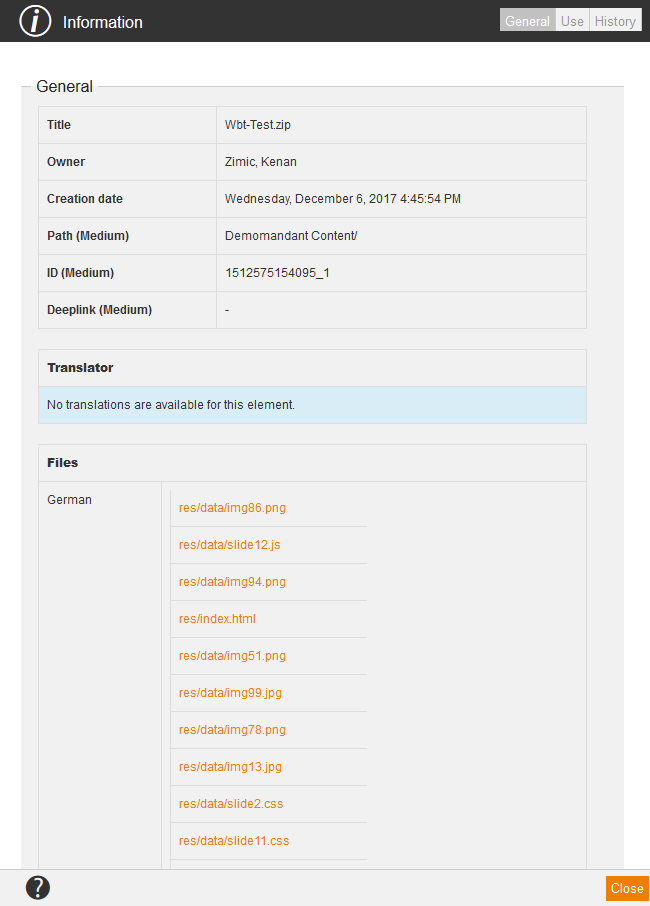
- Select Information.
- You are on the tab General. Here you find the ID of the medium and the included files. Because you need also information, let this dialog window opened.
- Copy the Medium ID on the clipboard.
- Go to the favored learning object for example via Learning content → Instructional material.
- Open the Instructional material wizard via click on the title and open the page, on which you want to embed the file from the zip medium.
- Insert via the editor an Iframe (
 ). The following dialog window opens:
- You have to note the following structure of the link in the field URL: media/XXXXXXXX,X/de/zip/file/story.html

- “media” is always a fixed element.
- You enter the Medium ID from the clipboard for the “X” (for example “1512575154095_1”) ein. Important: Replace the underscore (_) with a comma (,).
- “de” (German) represents the language of the medium. This can be adjusted of course.
- “zip/file/” is also a fixed element of the link.
- The ending of the URL “story.html” represents the file name from the zip medium. This file name you can see in the information about the medium. Therefore go to the still opened dialog window with the information about your medium and search for the name of the file.
- Enter the width and height. These are in pixel or percent. Ideally you select the size, in which the content of the selected file was created.
- Confirm your entries with OK.
- You have to note the following structure of the link in the field URL: media/XXXXXXXX,X/de/zip/file/story.html
- Then save your changes in your learning object.
- You have successfully embedded your file from a zip medium.
Note: This instruction can be used for example for embedding SCORM content. The transmission of results can be only in web-based trainings, because only there are interface functions. You can only display the content in other learning objects.
How do I embed YouTube videos in Avendoo®?
To embed a video from the platform YouTube at any place in Avendoo® (for example Instructional material or Course starting page), you can use the editor plugin Embed iFrame.
URL
Enter here the URL address of the video, which you want to embed. Select first Share below the YouTube video and then the tab Embed. Copy now that part of the URL address, which is after scr=.
How can the access rights be restricted for certain categories?
The category tree serves as navigation in the single categories. It shows the filing system of the learning content in Avendoo®. The name of the client is also the name of the highest category. You can create any sub categories in the client. Thus the learning content has a better structure.
How can I use the report subscriptions?
You receive automatic e-mails for an efficient educational controlling via report subscriptions. You create a report subscription by clicking the button Subscribe to report in the appropriate report (Dynamic reporting as an exception). You get an overview of the reports you are subscribed to in the widget Reports to which I am subscribed on the dashboard.
More information about Create and manage report subscriptions
How do I add a document list to an event?
To add a document list to an event, do the following steps:
- Choose Learning content → Events → New event. The Event wizard opens.
- Click on Create event date on the tab Dates.
- Select a coordinator, speaker and location and then select the tab Documents.
- Click on the button Add document. The media center opens and you can select the already uploaded file or you can upload a new file via the button New medium.
- You can do the configurations for the document (More information) and then click on the button Apply and close.
- Now you find the uploaded file on the tab Documents in the Event wizard. To see to which event date the document belongs to, select the file and click on Show event dates.
- Go to the tab Description and select Empty page or a favored design template.
- You find now the icon for Insert documents in the editor. Define how the event documents should be shown to the learner when he/she displays the event (Width*Height/scroll bar). Important: If you don’t add this area, no documents are shown, even if they are existing. Only if you are registered the documents are displayed.
- Click on the button Save and close the Event wizard.
How can I adjust the e-mail templates in Avendoo®?
There are several standard e-mail templates available in Avendoo®. You can individually adjust them. To edit an e-mail text, choose User management → Clients → Messages. Note that if you adjust text regarding language you have to edit the mail texts for events for example in the content client, but you have to edit course activation texts in the user client.
More information about: Adjust e-mail templates
How can I let a course permanently opened and it doesn’t change to the completed learning units at the learning place?
If the course ends at an instructional material, you can define the Status of the instructional material under Preferences on the tab Content editor in the Instructional material wizard. Here you can select Completion impossible, this means the instructional material can’t be completed. Thus the course also can’t be completed.
What happens when the author creates a new notification in Avendoo®?
When the author creates a new notification in Avendoo® ,
- the notification is available in all languages, which are licensed in Avendoo® and
- translations can be edited via the translation management by the author.
What happens when an existing mail template is reconstructed into a notification?
During a reconstruction (conversion) of an existing mail template to a notification:
- this notification will be implemented for further use within the framework of the system update.
- contains this notification only the standard text.
- adjustments of the customers in the mail template text are transferred.
- the texts from previous sources are transferred and integrated into a new Individual notification.
- If there was no translation, there will be no translation after the conversion.
- There can be differences individually per message type regarding of special reqirements of each notification to be transferred.
How do I transfer training inventory entries and certifications of an existing user account into a new user account?
Function of the attribute Previous login in the user account
Basically, the user should have only one personal Avendoo® account as user (learner). This account should be created in an appropriate client by the author, this means in companies to which the user belongs to.
Based on organizational issues it can happen that a user doesn’t need his account anymore in the current client and it’s required that this user gets a new account in another client.
Examples for this can be the founding of a new company from an existing company or the job change of internal employees to a franchise company. In these cases you can use the attribute Previous login in the user account for transferring training inventory entries and certifications from the previous (old) account to a new user accout in another client.
Step-by-step procedure
- You create a new user account and enter the user name of the old user account in the attribute field Previous login of the new user account.
- You maintain the expiration date in the past for the old user account or mark the old user account as Deleted.
Thus the old user account is inactive.
- An hourly cronjob checks for each user account which got the information of an old login in the field Previous Login, if the old user account is expired or marked as deleted.
If this matches, a data transfer is processed, this means all training inventory entres and certifications are transferred to the new user account, but the course activation IDs are not transferred. If there are several certifications for the same certificate only the newest certification is transferred.
Furthermore the transferred training inventory entries are marked, this means during the copy process of the training inventory entries the ID of the origin training inventory entry is saved in the copied entry.
How can I define an additional language for showing a national flag in the user frontend?
Prerequisite
The language is available in Avendoo®.
- You define your favored language in the system setting “author.languages.available”.
Example: abbreviation “lv” für Latvian. - You define the favored language in the system setting “system.languages.available”.
- You add the national flag to the system setting “flag.image.locations”, for Latvian for example.
Event management
How can I generate links in the e-mail templates?
If you have opened the tab Communication in the Event wizard, choose first the sub tab E-mail templates. Via the button New behind the single templates you can create a new e-mail template. To insert links you have two options:
Choose for example Learning content → Events → Event wizard → Communication → E-mail templates → New/edit.
Insert links via buttons
Link (this event)
Set the text cursor at that position, at which you want to insert the link. Then click on the button Link (this event) and the link will be generated and entered at the cursor position. Via this link the participant gets to the event.
Link (Learning object)
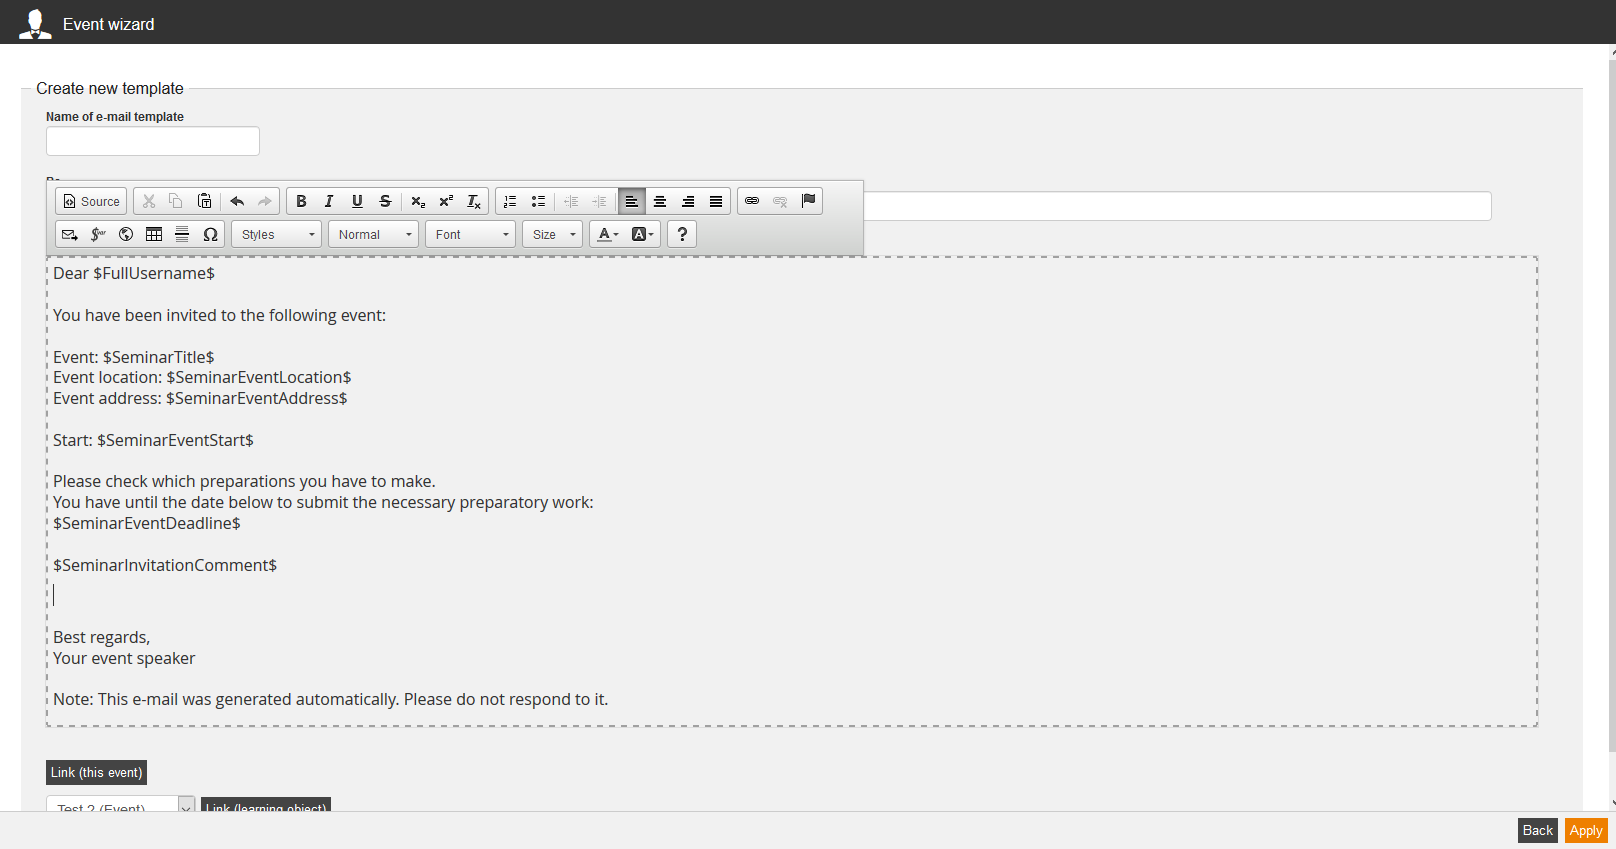
If you want to inform the participants about another learning object on the learning path, you can generate a link of the appropriate object. Therefore set the text cursor to the appropriate position. Then you have to select the learning, which you want to link, in the drop down menu below, for example a knowledge test, which is to be completed before participating an event. After that you click on the button Link (learning object) to generate the link directly in the text.
Set link to a depending feedback
The link to a depending feedback is already set in the standard template by the variable $SeminarDependentFeedback$. This link always looks like that:
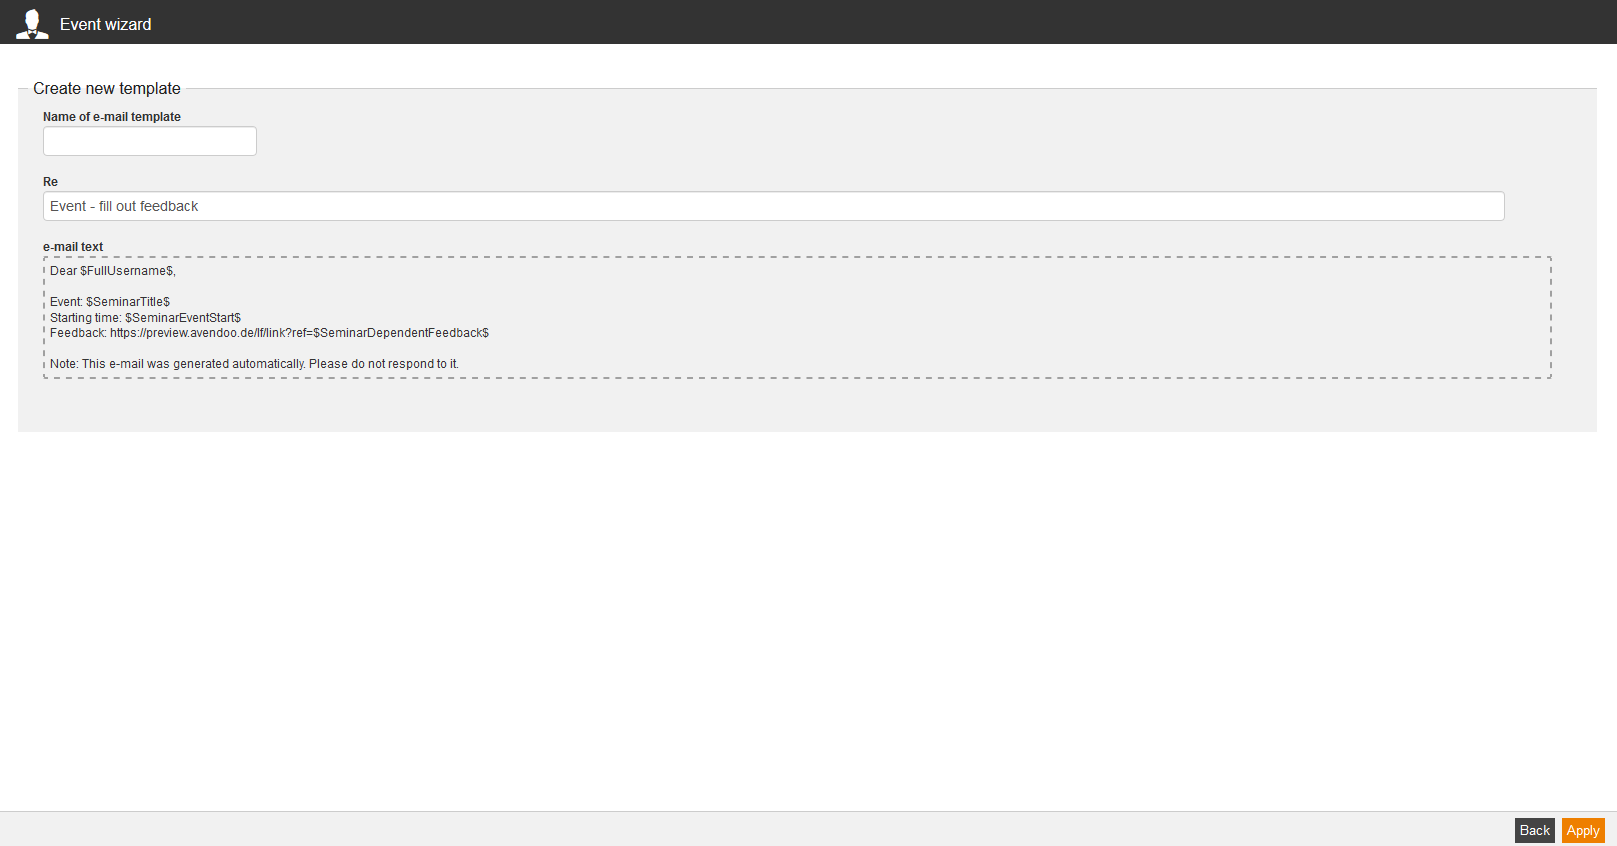
http://YourServername/lf/link?ref=$SeminarDependentFeedback$
If you use Avendoo®, this will be as follows:
http://avendoo.de/lf/link?ref=$SeminarDependentFeedback$
If your server name shouldn’t be entered, contact the Avendoo® support.
You can insert the variable $SeminarDependentFeedback$ via the symbol in the editor. You only have to add your server address:
http://YourServername/lf/link?ref= + $SeminarDependentFeedback$ (without blank and +)
How you set the dependency of a feedback on an event on the learning path, you find here.
Link with the variable: $SeminarAnnouncementLink$
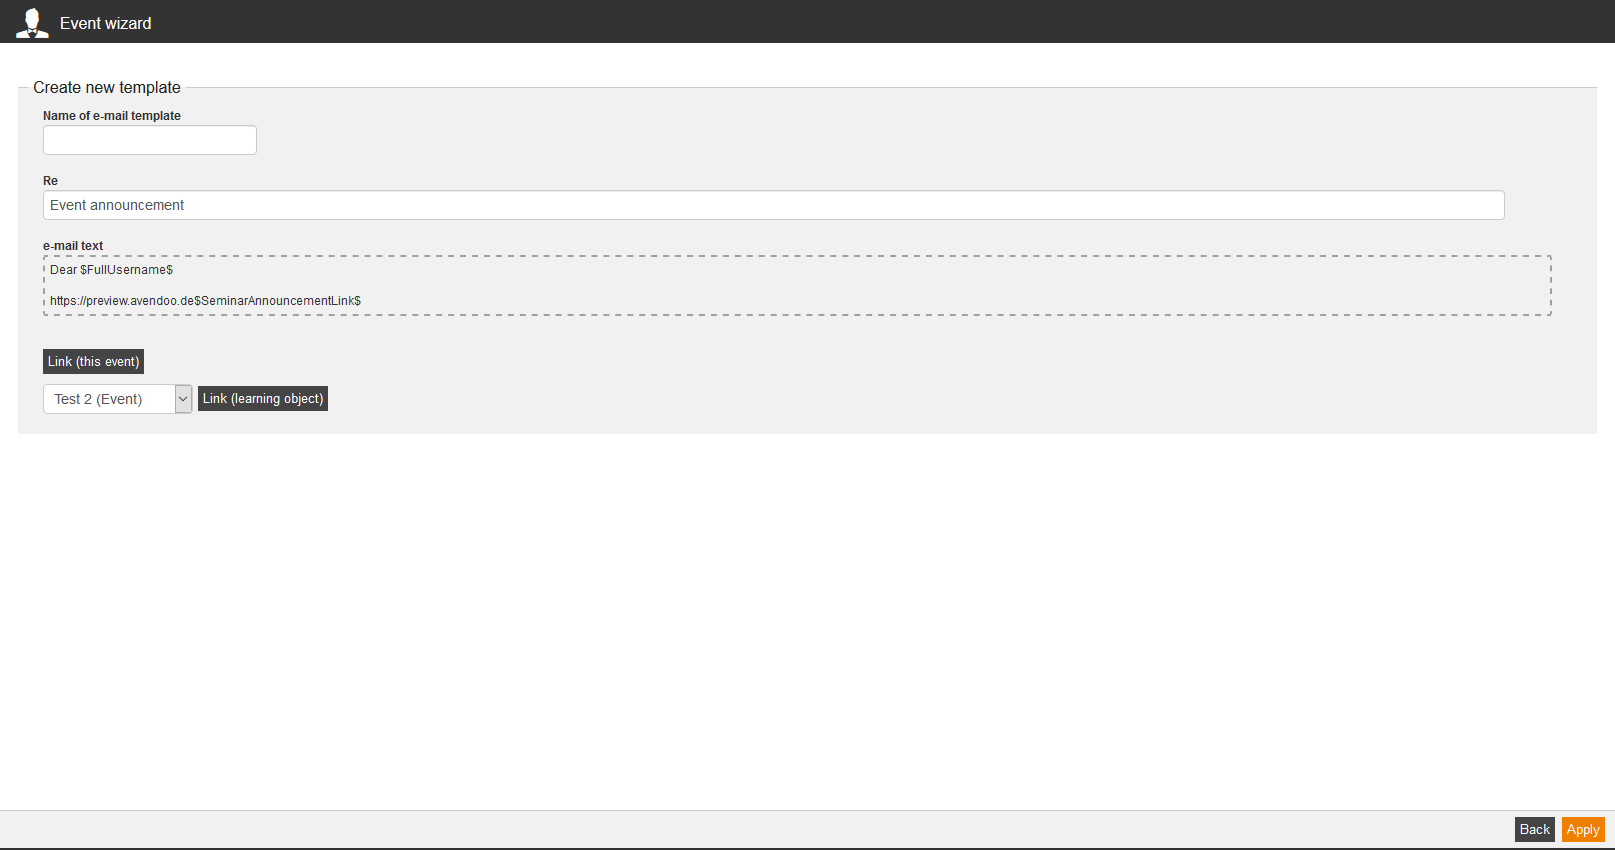
There is already a link to the announcement for you generated in the standard template. If your server address shouldn’t be before the variable $SeminarAnnouncementLink$, contact the Avendoo® support.
Basically you can insert the variable also via the symbol in the editor. Then you have to add it with your server address:
http://YourServername + $SeminarAnnouncementLink$ (without blank and +)
An example for an announcement link from Avendoo®:
http://avendoo.de$SeminarAnnouncementLink$
How do I adjust e-mail templates for events?
There are basically the configured standard templates of Avendoo® used for communication with the event participants. These you can individually adjust of course. If you want to adjust the mail text for a new language, note that you change the mail texts in the content client if existing. To create a new e-mail template, choose Learning content → Events → Communication → E-mail templates.
More information about: Adjust e-mail templates for events
How are the controlling of the type of registration and the approval procedure linked?
If the author has selected the option External registration only or Only authors are entitled to register in the Registration management, the user can’t see these courses in the catalog. But if the approval procedure for the course activation is activated (via the Course activation wizard or via the rule on participant), the user can see the course activation in the catalog and he/she can send an approval request.
More information about: Approval procedure (course activation)
LTI
What’s LTI?
If you use LTI 1.3 that guarantees you a smooth and safe flow between the Learning Management (LM) and the Provider System caused by the direct switch of the user from LMS to Provider system when opening the LTI content. Thus the learning content isn’t stored in the LMS, but the user is anonymously forwarded to the Provider System and edits the content also in the Provider System. You can recognize this by seeing the changing URLs in the browser.
Using LTI 1.3 is a huge benefit, because the content provider can always keep the content up to date, and therefore you don’t have to exchange files or similar data with the LMS.
Prerequisite
LTI 1.3
This LTI standard is available in different versions. Note that Avendoo® supports only the new version 1.3.
Additionally, the 1EdTech consortium doesn’t recommend older versions.
Security settings and Sending user-related data
LTI 1.3 allows you an anonymous switch to the Provider System, this means there will be no user-specific data transferred. Only an internal ID for each user is generated. That ID is required for assigning a user between both systems.
It’s possible to send also user-related data on demand, if the content of user-related data is required for example. This has to be clarified between both parties.
Response from the learning status
The user edits the content on the providing system.
How to receive the learning status of the user for a content in the LMS is defined in the LTI 1.3 standard of „Assignment & Grade Service“. The Provider System sends the learning status of the content back to the LMS on the basis of the unique user ID via the separate interface.
Synchronization of learning content
The learnining content is based on the providing system. Thus the LMS reads only the “links” of the content. You can synchronize these “links” via the deeplinking between the systems. This deeplinking is also part of the LTI 1.3 standards.
Configuration of the Provider System and LMS
You have to create the corresponding configurations on both sides for connecting a Provider and a LM System. Additionally, the configuration data has to be exchanged.
We recommend you to contact our support team who gives you a consultation about LTI 1.3.
What’s the benefit of LTI?
The learners haven’t to authenticate in different systems, but open the content bundled via one system.
What can I analyze via LTI?
- If external content is integrated in Avendoo®: The author can see, how much users have und which user has used the content. Also the author can issue certifications.
- If Avendoo® content is integrated in external LMS: The content is covered completely in the source system via tracking.
Which permissions are valid for the learners?
The permissions of the LMS, which is called by the content, are valid. If you integrate external content in your Avendoo®, you can give the permissions.
How do you maintain LTI partners in Avendoo®?
The author creates an external content provider under Resources → Content connector. Then he activates the external content in Avendoo® under Course management → Remote content activations.
How is the external content shown in Avendoo®?
Via click on a course activation in Avendoo® basically opens a new dialog window. In this dialog window the external content is shown.
How is my Avendoo® content shown in an external LMS?
This depends on the configuration of the external LMS:
- Either the content is shown in an iFrame or
- it’s shown in a new dialog window.
Where are successful completions recorded?
The external content provider or the external LMS as well as your own Avendoo® system can process course completions.
Where do you find the contents of remote content?
The author with the access right Create and edit content connector defines via the content connectors, to whom he/she wants to connect, also the type of connection, this means LTI or Offline with XAPI feedback channel. This content connectors you find in the menu Resources.
The author with the appropriate access rights stores the single learning content under Learning content → Remote contents.
Which author can assign remote contents?
The author with the access rights Show, create and edit remote content activations and Manage remote content participants is allowed to activate remote contents, either with content connector LTI or Offline with XAPI feedback channel. Thus he/she can define, who sees which content in the user area.
The author assigns under Course management → Remote content activations.
Locations
Can I automatically create Teams rooms via Avendoo®?
Yes, therefore you configure Azure for Avendoo®.
You find the PDF document with the instruction on the page “New virtual location”.
Notifications
Can the notifications task reminder and escalation be repeated?
Yes, you can configure a repeated sending of these notifications as long as the course is completed.
You can activate and configure this interval in days for a repeat on the tab Communication in the Course activation wizard.
Which time is best when sending invitations?
This depends on your use case. Thus there is no general recommendation.
If you activate and configure an invitation mail as notification, you can configure 14 up to 28 days as point in time. You can also configure hours if you want to define it more in details.
Furthermore, you can send the invitation mail also at once at registration or automatically on registration deadline.
Additionally, it’s possible that there will be not send an invitation mail if the number of participants at minimum is not reached.
You configure this on the sub tab How the event will proceed of the tab Notifications in the corresponding Event wizard.
What can I do when I deleted a standard e-mail text by chance?
The notifications contain standard mail texts which you adjust in the Individual notifications.
If you have deleted a standard mailtext by accident, see for the text on page “Notifications, Individual notifications, Community and system messages”.
User management
Why can’t I create an accompanying person?
Check the following topics since Avendoo® version 17.59:
- Have you stored the registration code in the user client?
- Is the registration code valid?
- Is the limit of the registration code reached?
- Have you checked the quotas?
- Have you checked the area of the accompanying person in the user data?
- Is the location of the accompanying maintained in the user data?
- If it’s a new accompanying person, have you checked the location of the accompanying person from the registration code?
If you got further questions, feel free to contact our support team.
Can an accompanying person accompany her/himself?
Yes, since Avendoo® version 17.59 an accompanying person can accompany her/himself.
Can an accompanying person have also an accompanying person?
No, that’s not possible ( valid for Avendoo® version 17.59).
Can I enter the same accompanying person twice?
No, when you enter the first accompanying person there is a check if this person already exists, this means if the data is exactly the same. Variations are possible.
Note that regarding the quota fields in the user client the following facts are valid:
- The Double Opt-in function of the registration code is removed.
- To individually configure a user name, do the following steps:
- Choose User management → Registration codes → Title of registration code → Configuration → Create automatically user name.
- Enter the prefix and suffix you want for the user name to be generated.
To see for the registration code, do the following steps:
- Choose User management → Clients → Title of the user client → Options.
- Select your favored registration code under the option Registration codes for new accompanying persons.
Via this assignment the accompanying person is created as new user in Avendoo® after considering the user client. Example: Via the location there can be a check, if the new accompanying person is possible via the registration code when quotas are given.
This is valid since Avendoo® version 17.59.
System settings
Can I send and receive mails via the Graph API?
Yes, this is possible.
You find more information on the page “System settings”.
Avendoo® App
What is the Avendoo® App and for what do I use it?
The Avendoo® App is the version of the Avendoo® frontends (User area) and developed for mobile devices. You can use exclusive Avendoo® feature with your own mobile device.
How do I login to the Avendoo® App?
- Visit the Apple App Store or Google Play Store.
- Click on the magnifier and/or enter “Avendoo” in the search field.
- Click on the Avendoo entry in the Apple App Store or Google Play Store.
- Install the Avendoo® App.
- Open the Avendoo® App.
Is the Avendoo® App accessible for all operating systems?
The Avendoo® App is accessible for the operating systems Android, Harmony OS and IOS.
Do I keep logged in, if I close the Avendoo® App and can the Avendoo® App save my login data?
The login data is not directly saved on mobile devices. But via the register button I am directly logged in again, without the need of new authentification.
To prolong the session time and not being automatically logged out and not authentificating newly via the QR code, you define the validity period of the safety key for the App usage regarding the system setting ”avendoo.app.securetoken.validity”.
Do I get logged in automatically when opening the Avendoo® App?
Yes, when I got linked before and my token is not expired.
How do I register to the Avendoo® App?
- Go to your own customer system or go for example to the Avendoo® Academy.
- Go into your user area.
- Click on Personal settings.
- Choose Mobile Devices and Link devices.
- Scan via your camera of your cell phone the shown QR code.
- Register to the Avendoo® App.
Can I install the Avendoo® App on several devices and can I share my login data and use it simultaneously on several devices?
Yes.
Can I use the Avendoo® App also offline and can I also download the content and then using it offline?
No, the Avendoo® App is not available in the offline mode. To open the learning content, you need an internet connection.
How can I log out from the Avendoo® App?
- Click in the lower area on the symbol
. - Click below the options Calendar, Successes and Settings on the button Log out.
Where do I get messages or news in the Avendoo® App?
- Click in the middle of the lower area on symbol
.
You get to the page News, at which all messages and news are shown. - To show group messages under Groups, wipe to the right side.
How can I join a group in the Avendoo® App or how can I establish a new group to share messages and content with other users?
- Click in the middle of the lower area on symbol
.
You get to the page News, at which all messages and news are shown. - To show group messages under Groups, wipe to the right side.
- To share important content or news, you can join groups or you can establish new groups.
How can I search for course activation in the Avendoo® App?
- Click in the middle of the lower area on symbol
.
The last search history and suggestions are shown. - To search for certain course activations, click on the upper search bar and enter your favored title of the course activation.
What can I change in the settings?
Depending on the version you can change different personal settings like the authentification via biometric sensor technology.
In which countries and languages is the Avendoo® App available?
The Avendoo® App ist worldwide in the Avendoo® user languages available.
If a language isn’t maintained, there is a fallback to the english language.
How do I configure the correct language?
The language of the used system is used. You can switch this language in the settings on most mobile devices.
Does the Avendoo® App save my intermediate results and results?
The Avendoo® App doesn’t save your intermediate results and results, but Avendoo® saves your intermediate results and results.
How much is using the Avendoo® App?
The Avendoo® App is always free for users.
The Avendoo® App is contained in the Avendoo® license for our customers, but for further versions you have to contact our support team.
Can other users or organizers see my data in the Avendoo® App?
It is just like in Avendoo® generally.
Can I use the Avendoo® Messenger also in the Avendoo® App?
Not until now.
User frontend
How can I register to a course?
If you click on a course unit the info page of the course opens. Here is the appropriate learning path displayed, graphically or in table form. Thus you can get an overview before the registration, how many elements the learning unit selected by you have and what type it is (e-learning, blended learning, event). Furthermore on this page are displayed the course details, the available languages, given assessments and training coaches.
To register for a learning unit, click on the button Register below the preview image of the course. Now you are entered as participant of the course and you can pass it as usual. Via My learning place you find your new course under Optional learning units.
Note: If a course is subject to approval, you can click here on the button Request inquiry to request the participation to this course. The appropriate responsible person will then be notified about your approval request.
See also: Self-registration to courses and events
How can I register to an event?
By clicking on a learning unit, which only contains an event, you get automatically to the registration page of the event. Here you can set filters in a long list, which restrict the event location, the event language and the starting and end date. The filters expand via the ![]() icon. In the list below you see on the first tab Available event dates (number) all event dates in future, which correspond to your filter criteria if set. The list contains the exact event date, the registration deadline, the location, the event speaker, a price if applicable and the number of free slots. Via Details you can show further details to the event date.
icon. In the list below you see on the first tab Available event dates (number) all event dates in future, which correspond to your filter criteria if set. The list contains the exact event date, the registration deadline, the location, the event speaker, a price if applicable and the number of free slots. Via Details you can show further details to the event date.
You can register to the appropriate event date via click on the button Register. You get a direct message of the success of the registration.
List of interested parties
If there are no event dates offered and under Available event dates (number) it is shown Still outstanding (list of interested parties), you can be entered on this. Therefore click on Register and a new dialog window opens. Here you can enter you personal desired date for the event and a comment. Via the Register button you confirm your data and register to the list of interested parties.
See also: Self-registration to courses and events
Which texts are available if you’ve bought a new frontend langauge?
If you’ve bought a new frontend language you get the following texts in the bought language:
- all user interface texts in the user and teamleader area
- Bundle texts, which are also used in the Community or client mail texts
- If you then create a new client, the mails are initialized with the languages, which are existing at this time
- Few messages use fixed texts. This is covered by bundles. If needed you have to overwrite these bundle texts.
- If there are already existing notifications, these are not generated, but should be translated by you.
- Notifications are content and are handled like content. Thus an additional language does not create automatically translations.
Community
How can I leave a group?
To leave a group, click on the favored group and select top right beside the Settings icon (gear wheel) on the arrow and select Leave group.
Can I delete a group?
Yes, you can. Therefore click on the favored group and select then top right beside the Settings icon (gear wheel) the arrow. Select Delete group.
Is it possible to redo "Add friend" or to remove a pin wall?
Yes, you can. Therefore select the favored pin wall and click top right beside the Settings icon (gear wheel) on the arrow. Select Leave group.
Team leader cockpit
For whom is the team leader cockpit intended and which authorizations do you need therefore?
The team leader cockpit is designed for superiors, who are team leader for their employee. As team leader you are notified in Avendoo®, once there are approvals for a registration or deregistration for example necessary.
You should have the authorization User team leader as team leader, because the Author team leader has restricted rights. You can define team leader rights for the User team leader individually on the tab Functions in the User wizard. There are the following team leader rights: Manage course participants, Training needs, Task manager, Assess course participant, Edit approval requests, Show reports tab, Create certificate, Certification overview, Record certification, Assess essay questions, Training inventory, Create community groups and Show favorites tab.
How do I keep posted as team leader about the activities of my employee?
You are kept posted as team leader about the activities of your employee via My cockpit.