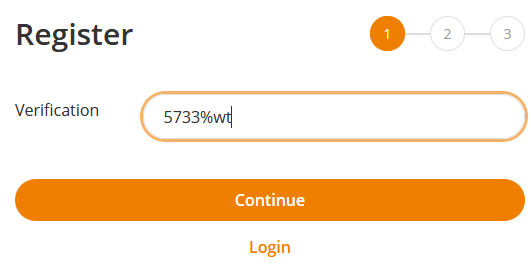
Users can register autonomous at the Avendoo® welcome page. This process is protected by a verification code. You can create these codes by means of the registration code wizard. The appropriate users enter these codes on the registration page (see screenshot) in the field Verification.
Further information about the selfregistration for users you find here.
You see in the blue box on the tab Master data in the User wizard of the corresponding user which registration code was used. Furthermore the expiration date and the expiration date extension is shown on the sub tab Master data. These can be maintained by the author if required.
There is the mass processing function Delete for registration codes. More information about this function you find under Registration codes: Mass processing functions.
The following functions are available via the context menu of the appropriate registration code title.
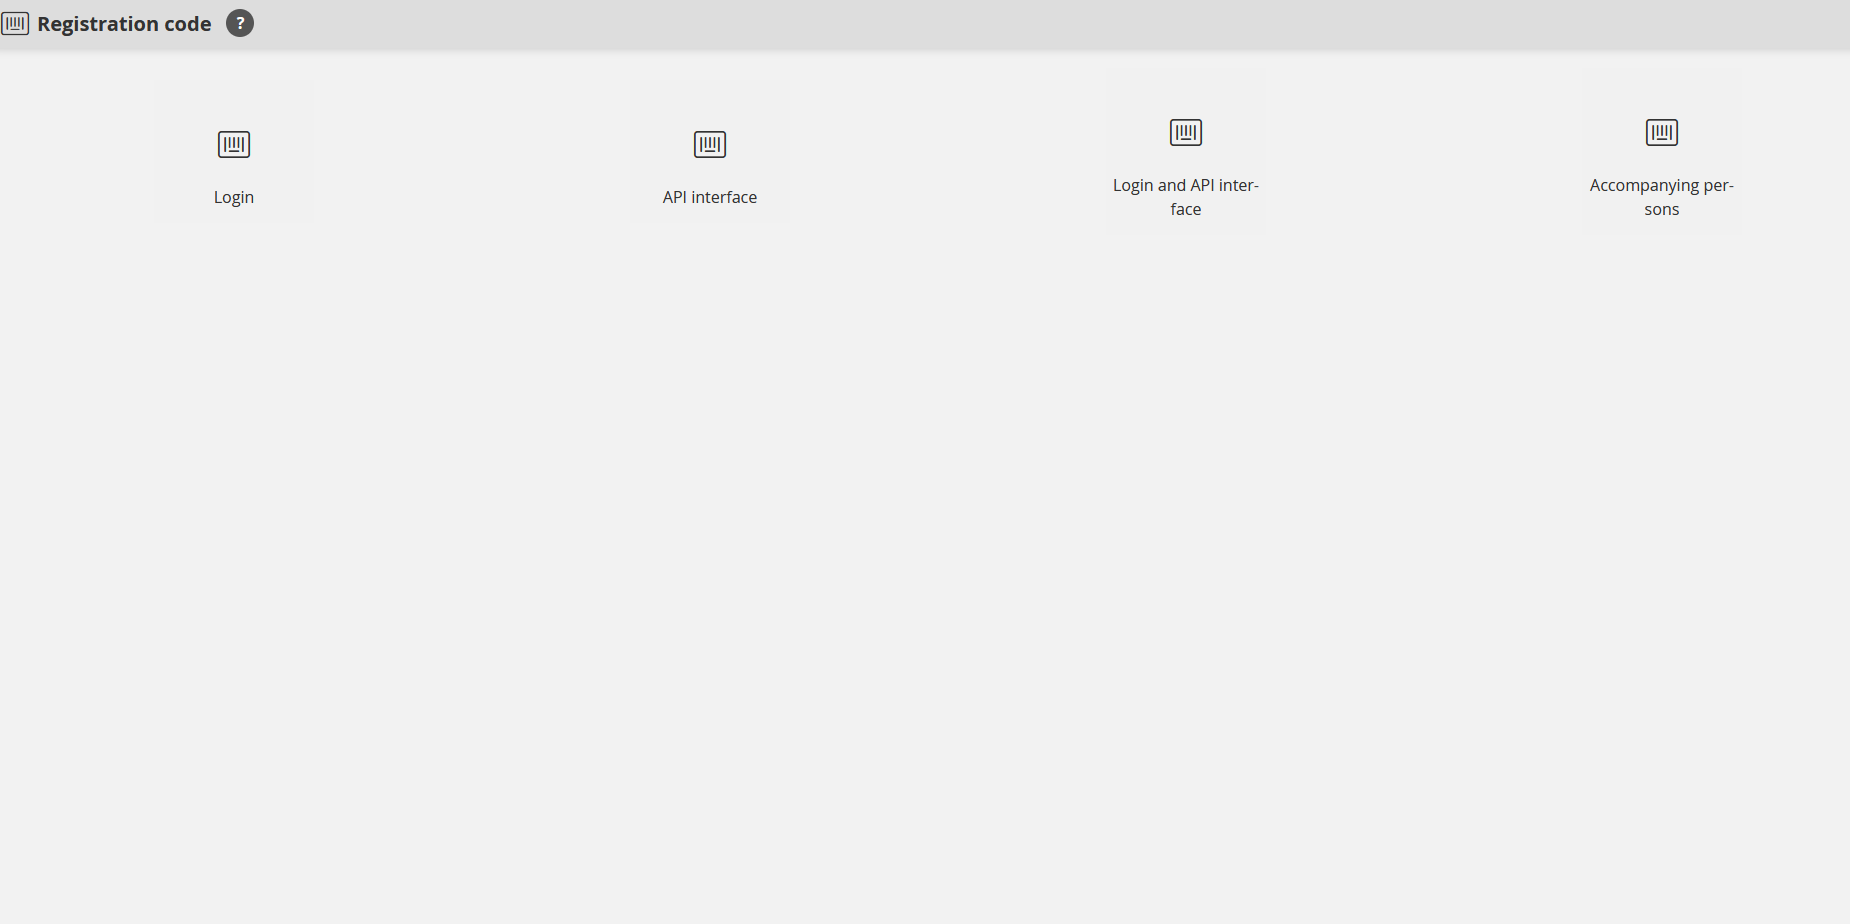
First, the introduction dialog window of the Registration code wizard opens. You can select between the following options:
- Login
You use this option only for login of users. - API interface
You use this option only for the API interface. - Login and API interface
You use this option for login of users and for the API interface. - Accompanying persons
You use this option for generating of users in Avendoo®, if you store then this registration code in the user client.
You create accompanying persons in the Event manager on tab Overview via the context menu in the List of participants. The frontend user creates accompanying persons in the course activation via the Details of an event date or run. You activate the accompanying person function in the Event wizard on sub tab Participants of tab Parameters. Additionally, you define the limit of the number of accompanying also in this wizard.
Login
Master data
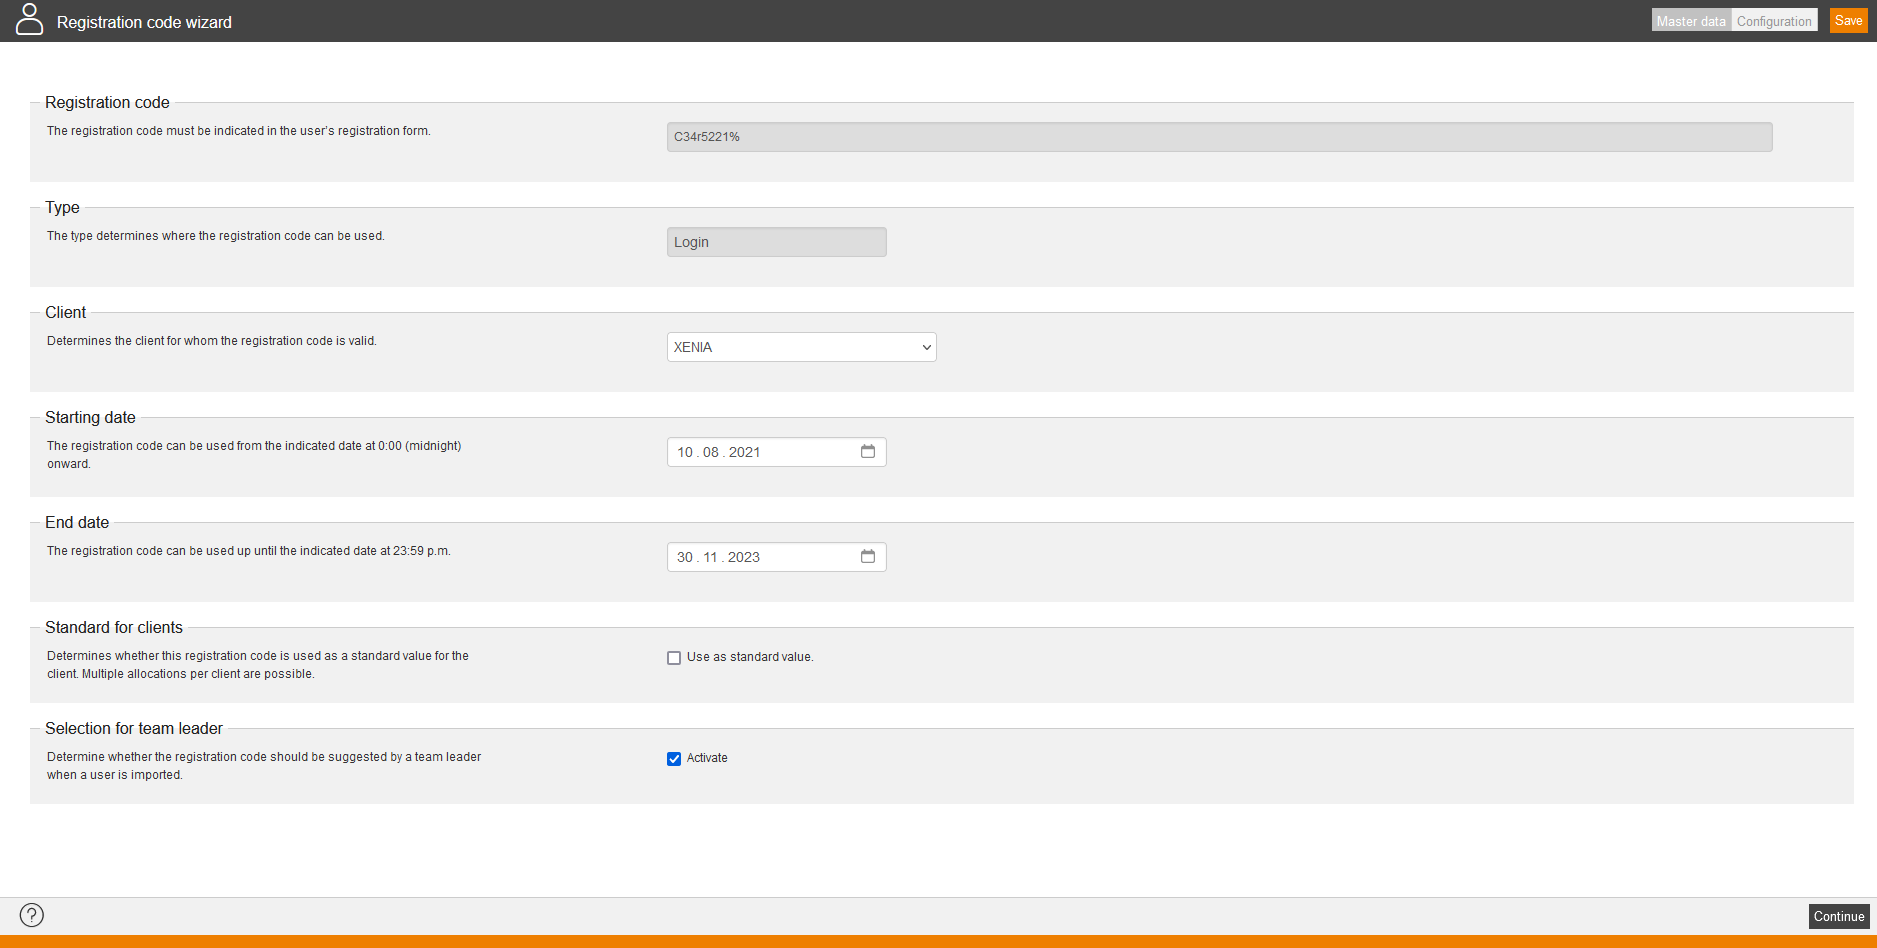
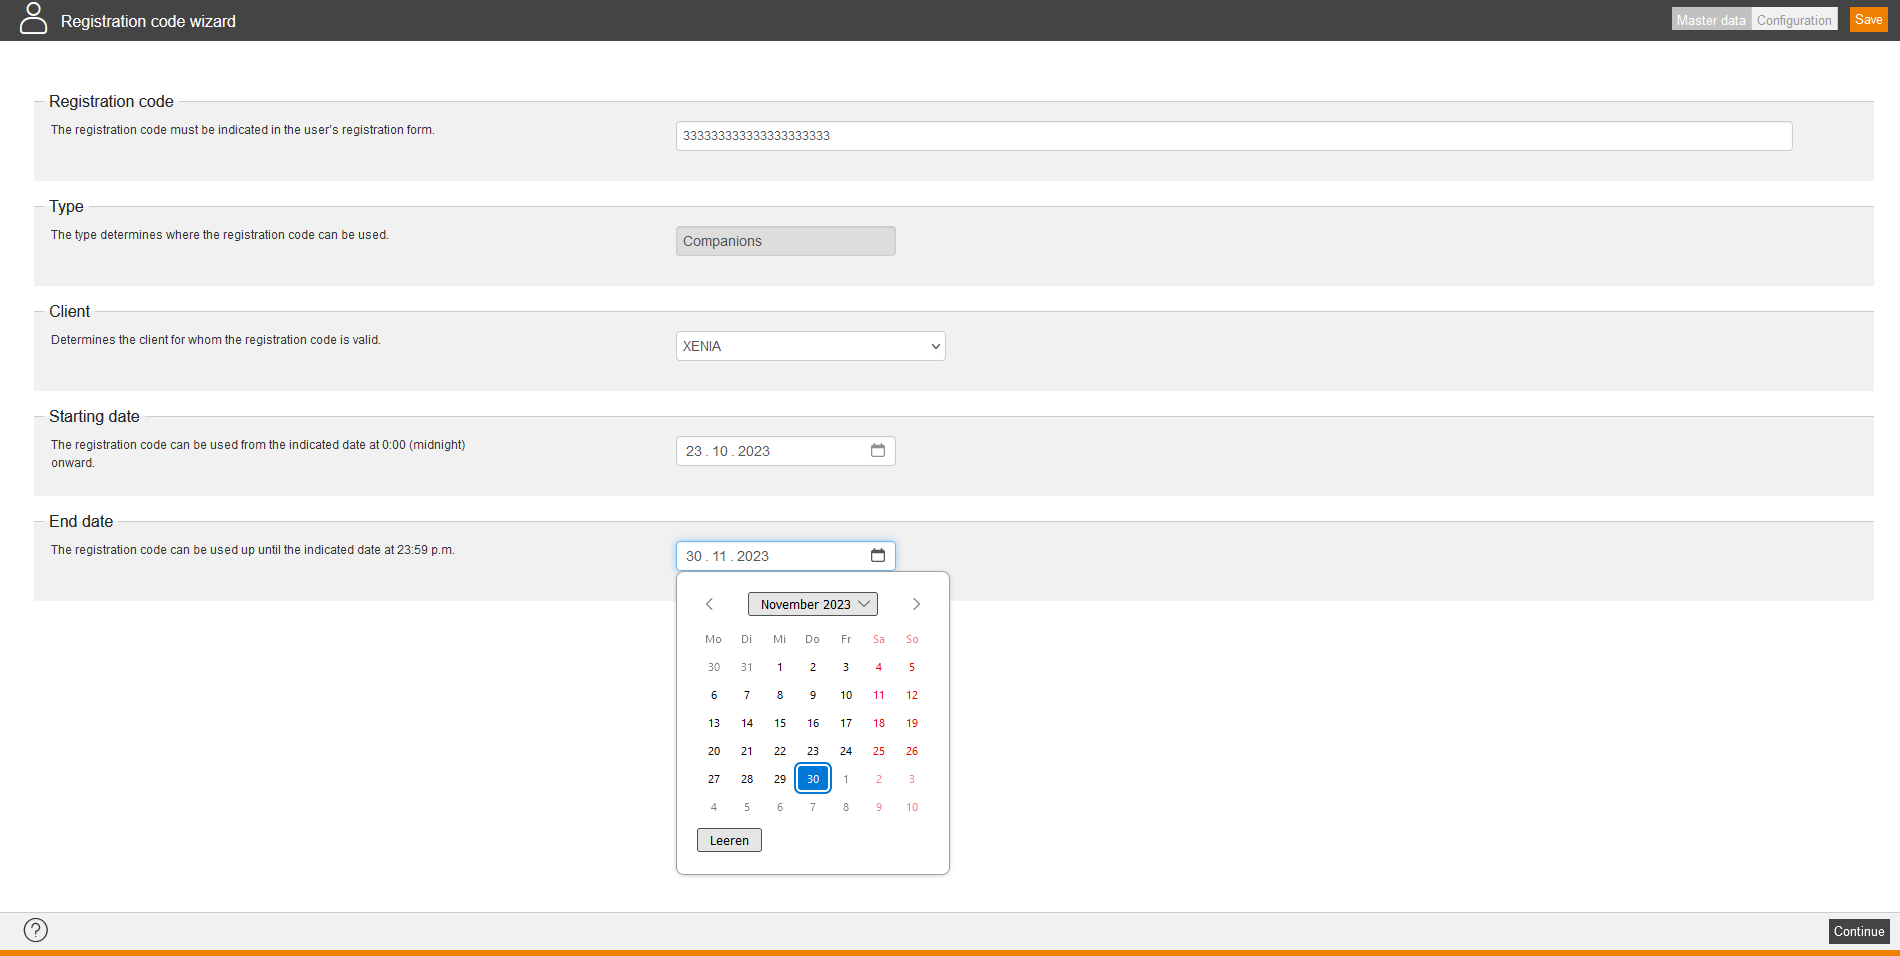
Registration code
Enter your favored registration code. You can use letters, numbers and special characters.
Type
The type is set per default (Login).
Client
Choose the client, for whom the registration code is valid.
Starting date and end date
The validity period of the registration code can be limited. The code is valid from the indicated starting date at 0:00 (midnight) onward until the indicated end date at 23:59 p.m.
Standard for clients
You define by selecting the check mark, that the code is used as standard value for the client. Multiple assignments per client are possible.
Selection for team leader
Determine whether the registration code should be suggested by a team leader when a user is imported. Therefore set the check mark.
Configuration
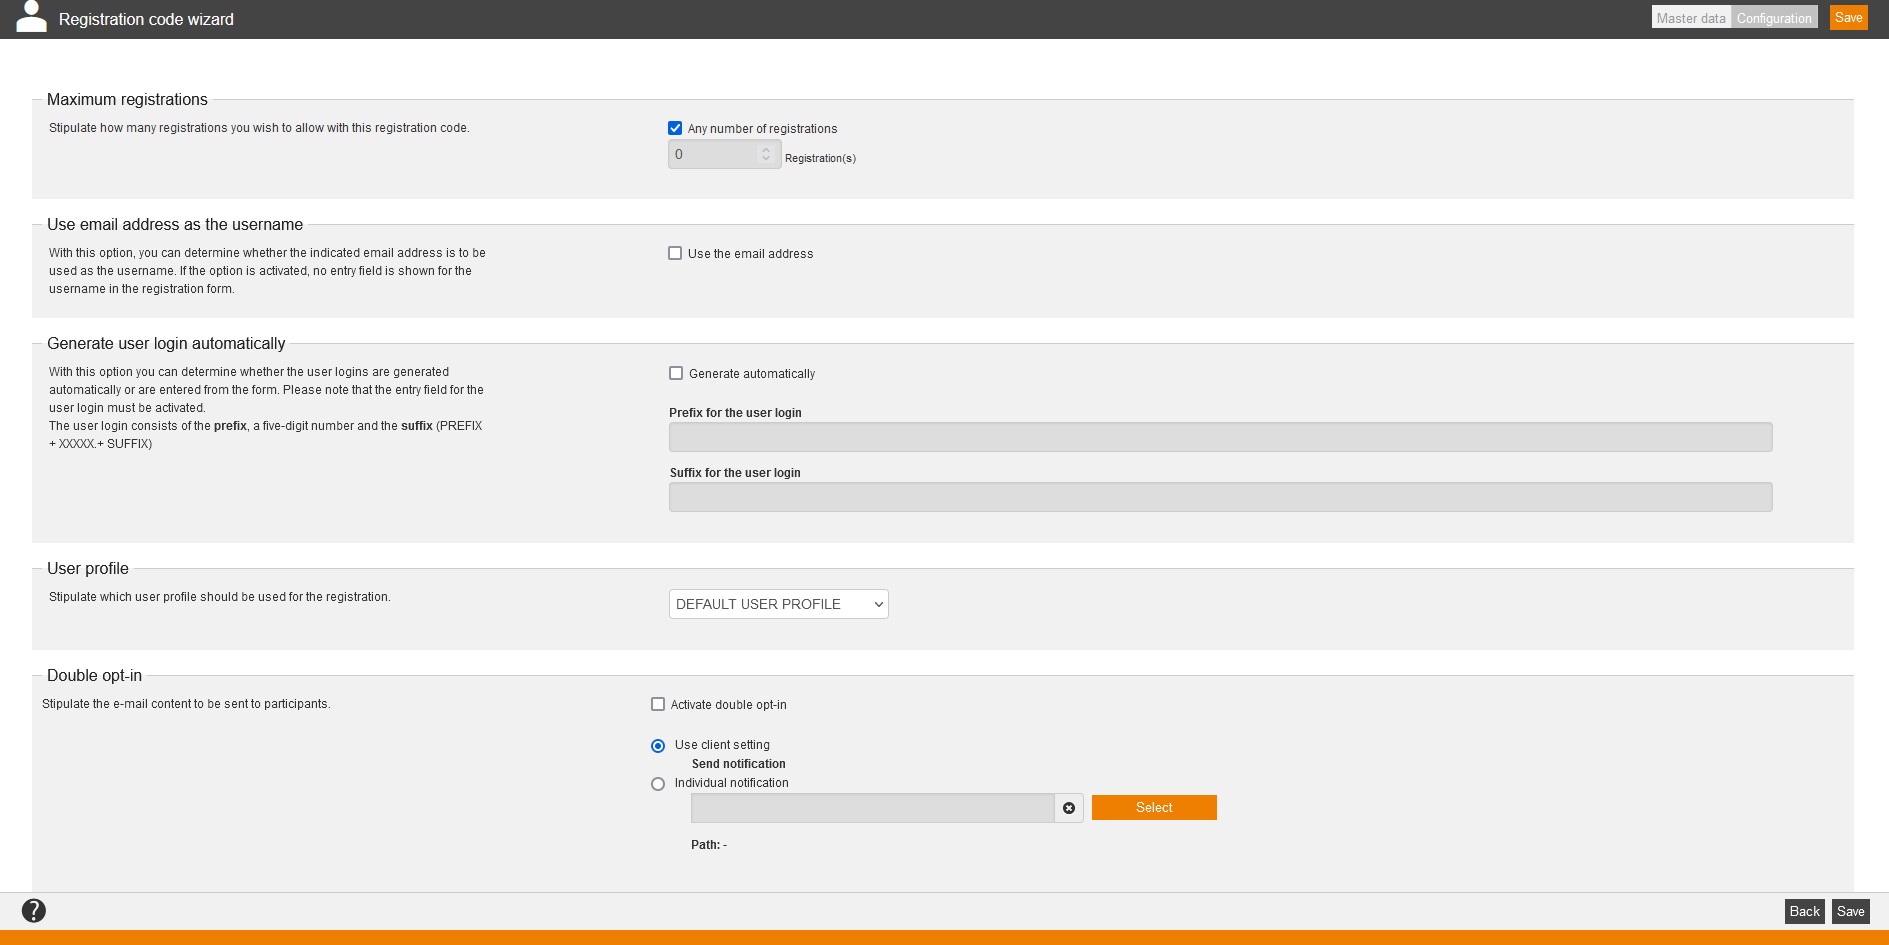
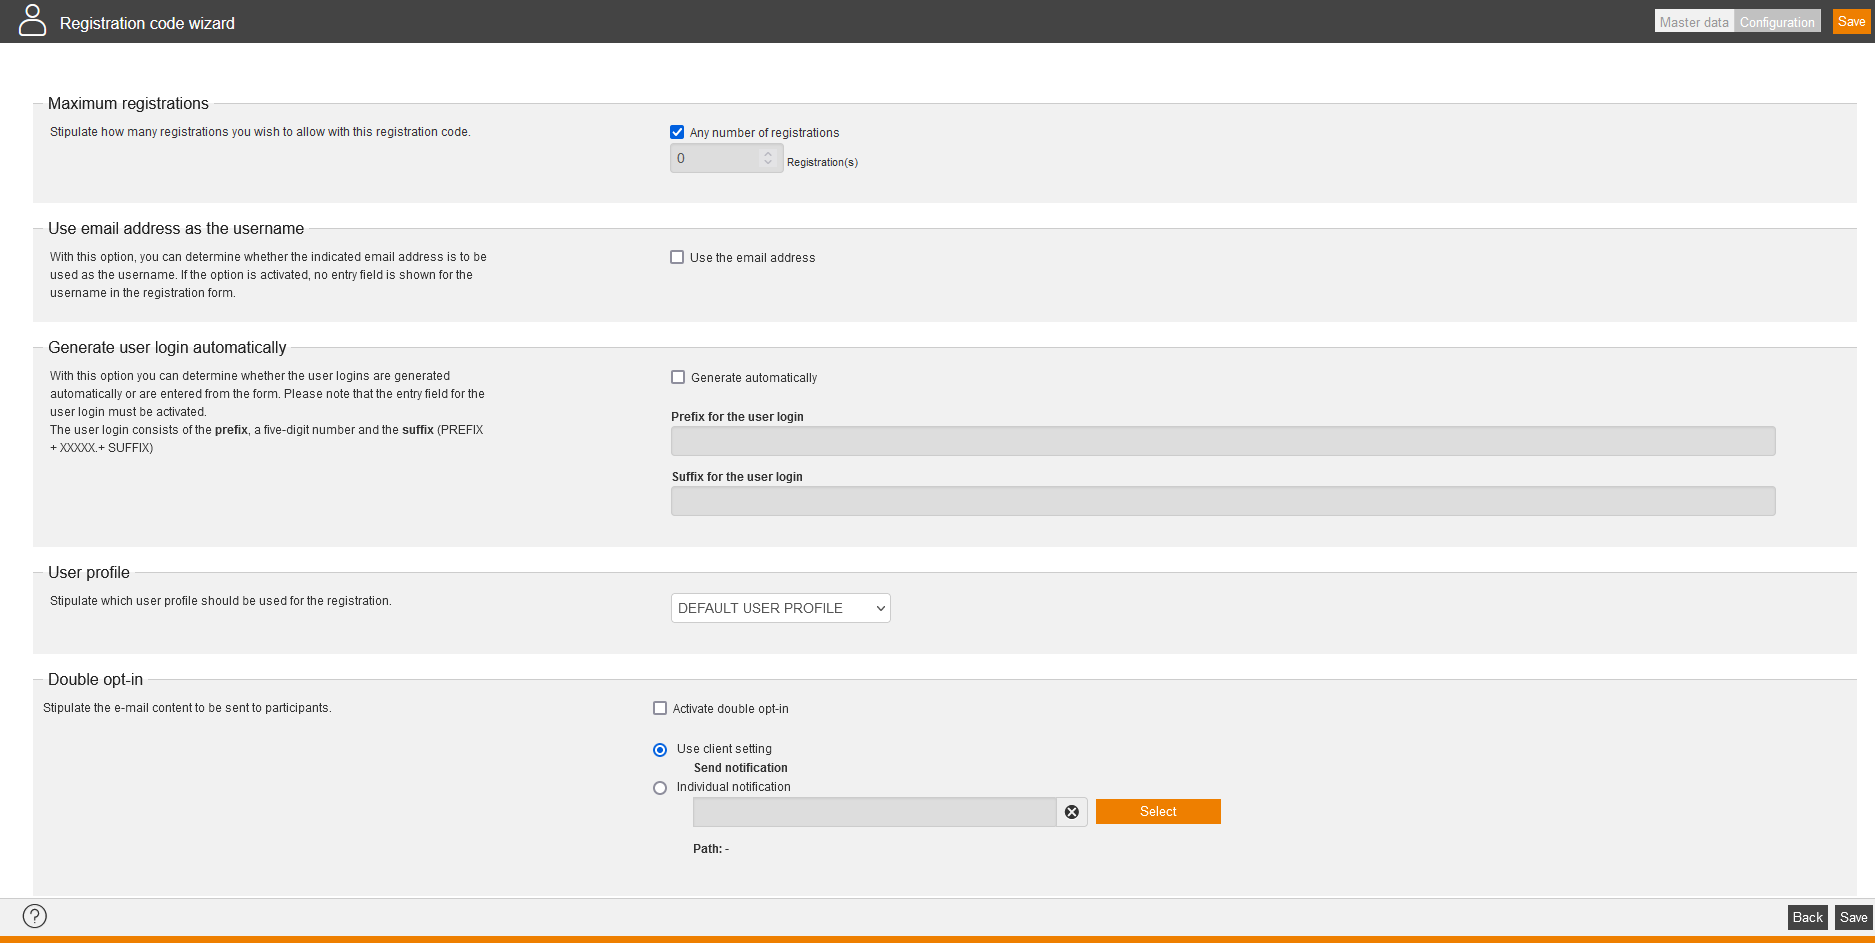
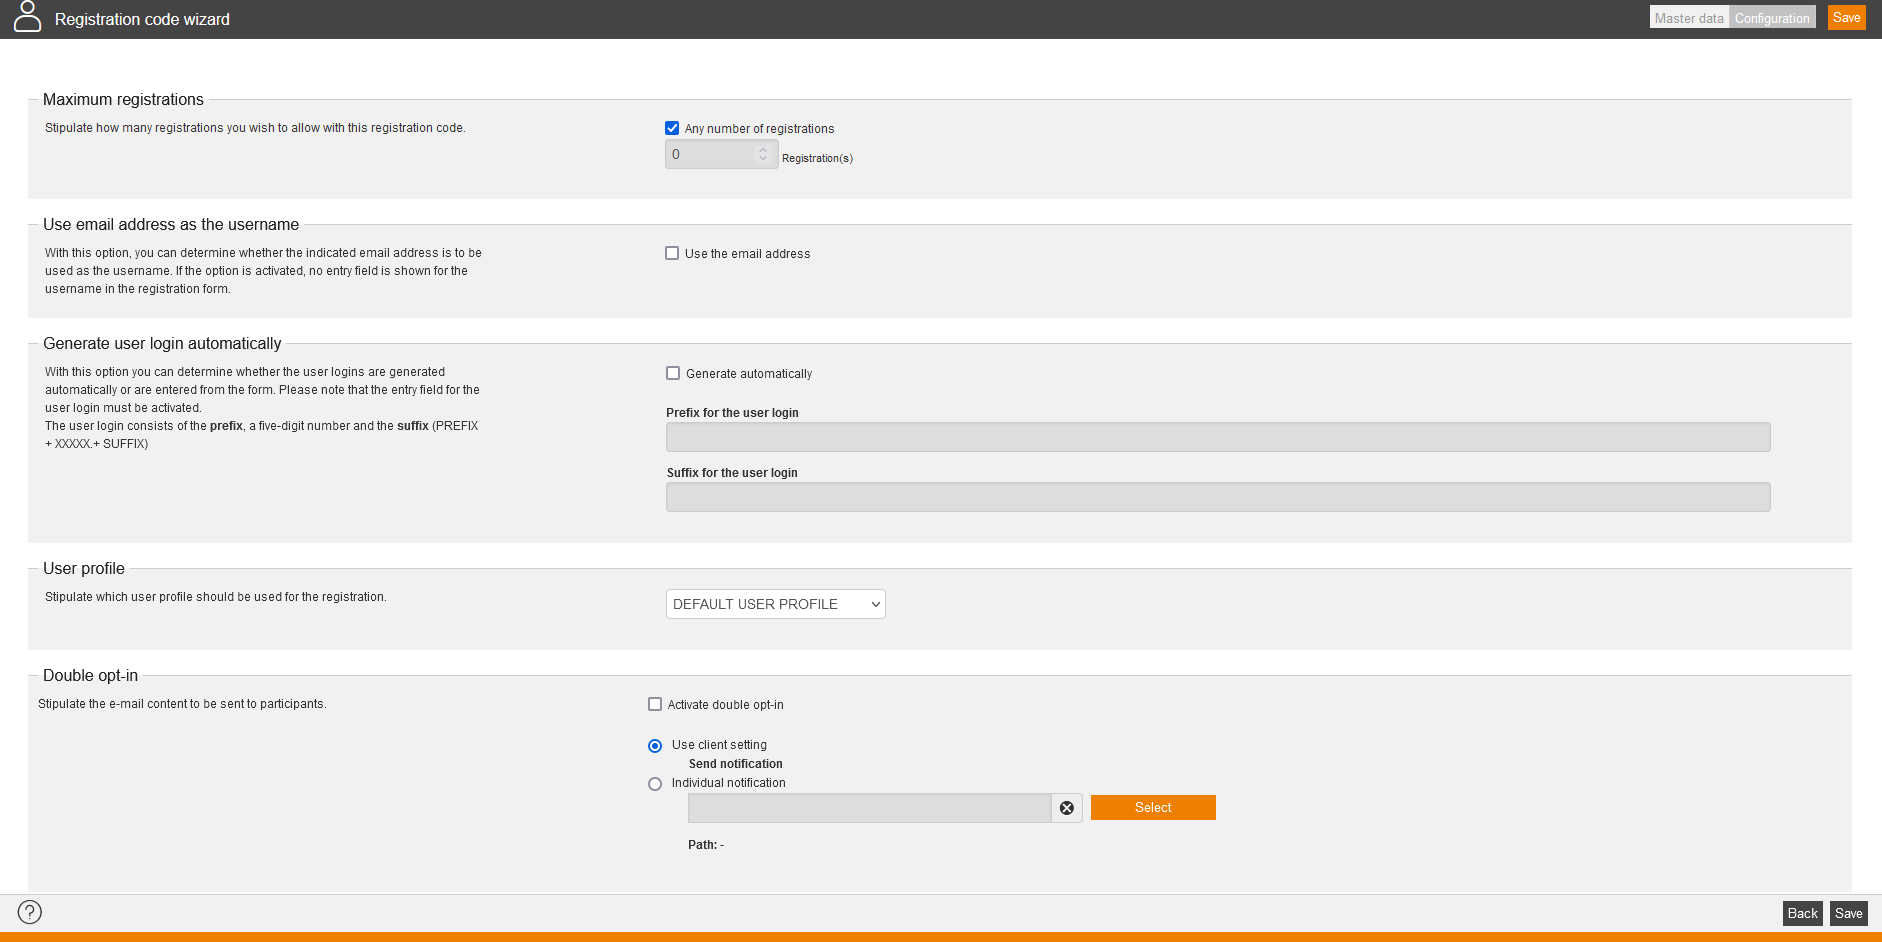
Maximum registration
Stipulate how many registrations you wish to allow with this registration code. You can select between the following options:
- Any number of registrations or
- Enter the number of registrations (if you’ve deactivated the check mark Any number of registrations)
How many registrations are already existing with a registration code you can see in the context menu of the corresponding registration code or in the last column Registrations in the overview of the registration codes.
Use e-mail address as the username
With this option, you can determine whether the indicated email address is to be used as the user name. If that option is activated no entry field is shown for the user name in the registration form. Additionally, a further note (“E-mail address is used as user name”) is shown under the entry field “E-mail”. Furthermore set a check mark at the entry field “E-mail”.
Without this option only the standard description (“E-mail address”) is used.
To use the e-mail address as the user name, set the check mark Use the e-mail address.
Generate user login automatically
With this option you can define if the user logins are generated automatically or are entered from the form. In this case the user can give the user login by himself. Please note that the entry field for the user login must be activated.
If the user login is generated automatically, it consists of the prefix, a five-digit number and the suffix (PREFIX + XXXXX.+ SUFFIX)
User profile
Stipulate which user profile should be used for the registration.
Double opt-in
Set the check mark Activate double opt-in, if the learner (participant) should receive a verification e-mail and if he/she should confirm it, before he/she gets a registration e-mail.
Stipulate the e-mail content to be sent to participants. Select Use client setting or an Individual notification (then the source path of the Individual notification will be shown. Further information about creating an Individual notification you find here.)
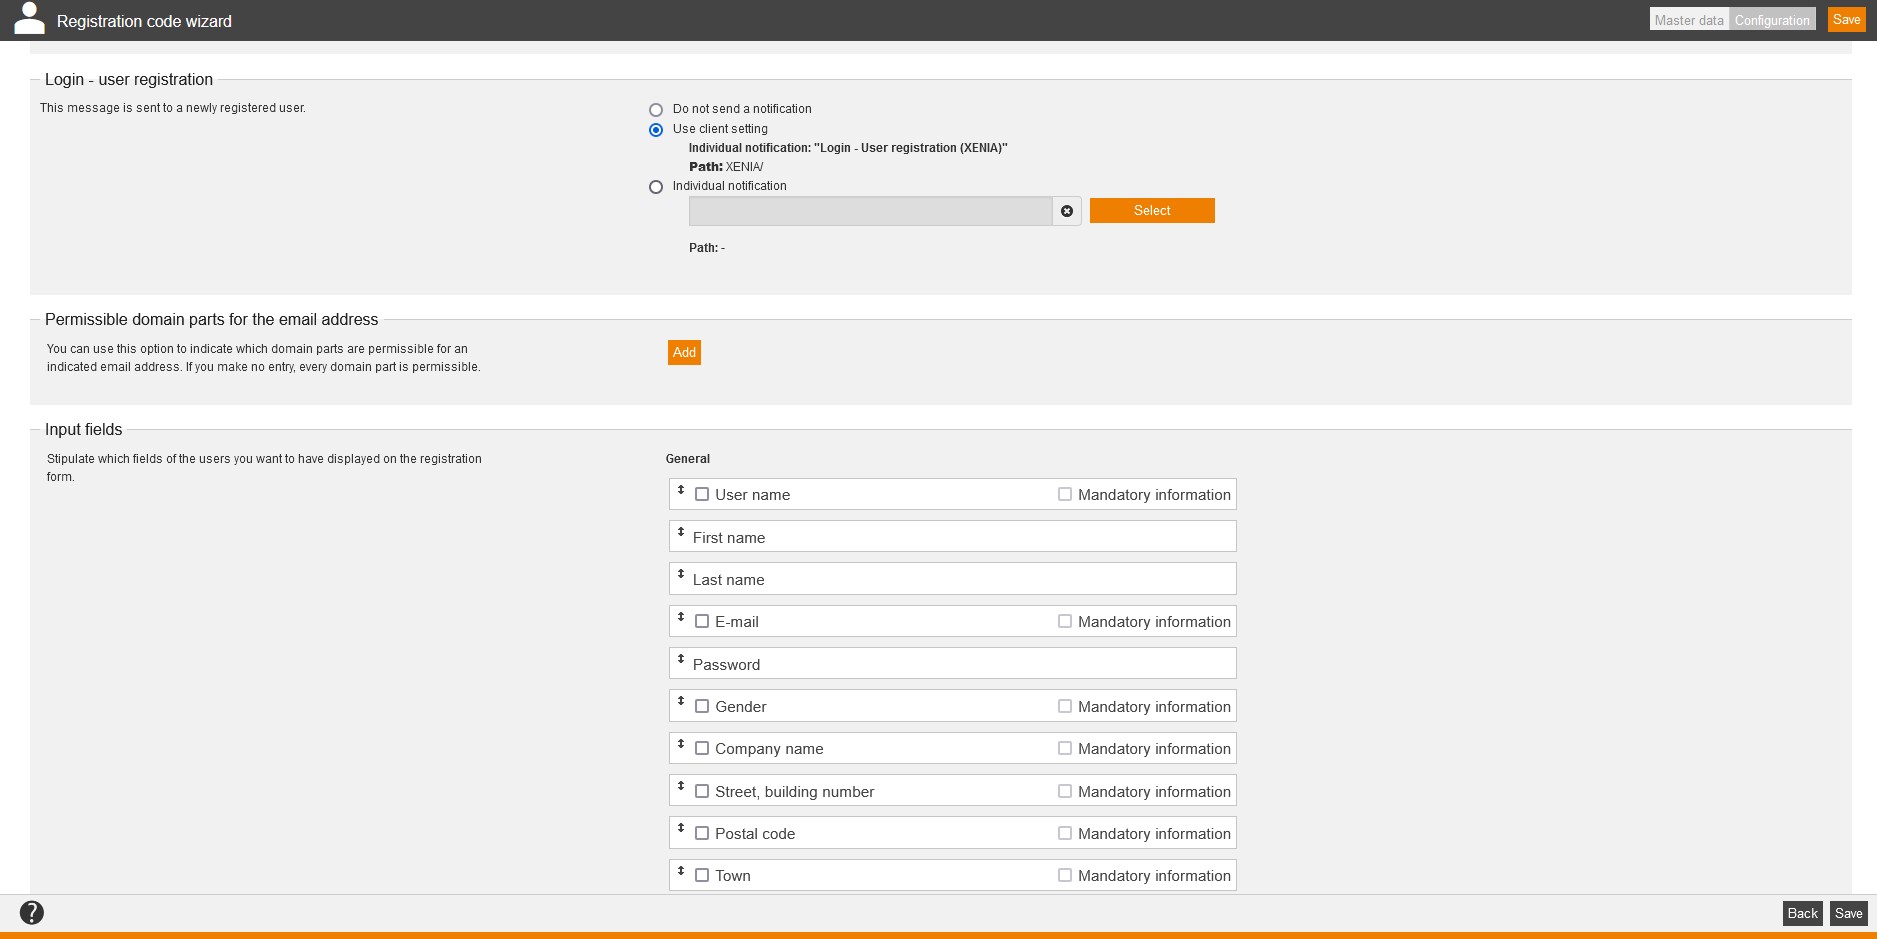
Login – user registration
This notification is sent to a newly registered user. Select between:
- Do not send a notification
- Use client setting
- Individual notification (therefore select the appropriate individual notification via the button Select)
Then the source path of the individual notification will be shown. Information about creating an individual notification you find here.
Permissible domain parts for the e-mail address (also type API interface)
You can use this option to indicate which domain parts are permissible for an indicated e-mail address. If you make no entry, every domain part is permissible.
To define the permissible domain parts for the e-mail address, click on the button Add and enter then the domain parts. If needed, you can delete these domain parts by using the button Delete.
Input fields (also type API interface)
Define the order of the input fields for the user via drag and drop. By setting a check mark you define, if this entry field is shown for the user when registering. By setting the check mark Mandatory you define, if the appropriate input field is mandatory for the user when registering.
These three categories with these input fields are available:
- General
- User name and you can set the check mark Mandatory information
- First name
- Last name
- E-mail and you can set the check mark Mandatory information
- Password
- Gender and you can set the check mark Mandatory information
- Company name and you can set the check mark Mandatory information
- Street, building number and you can set the check mark Mandatory information
- Postal code and you can set the check mark Mandatory information
- Town and you can set the check mark Mandatory information
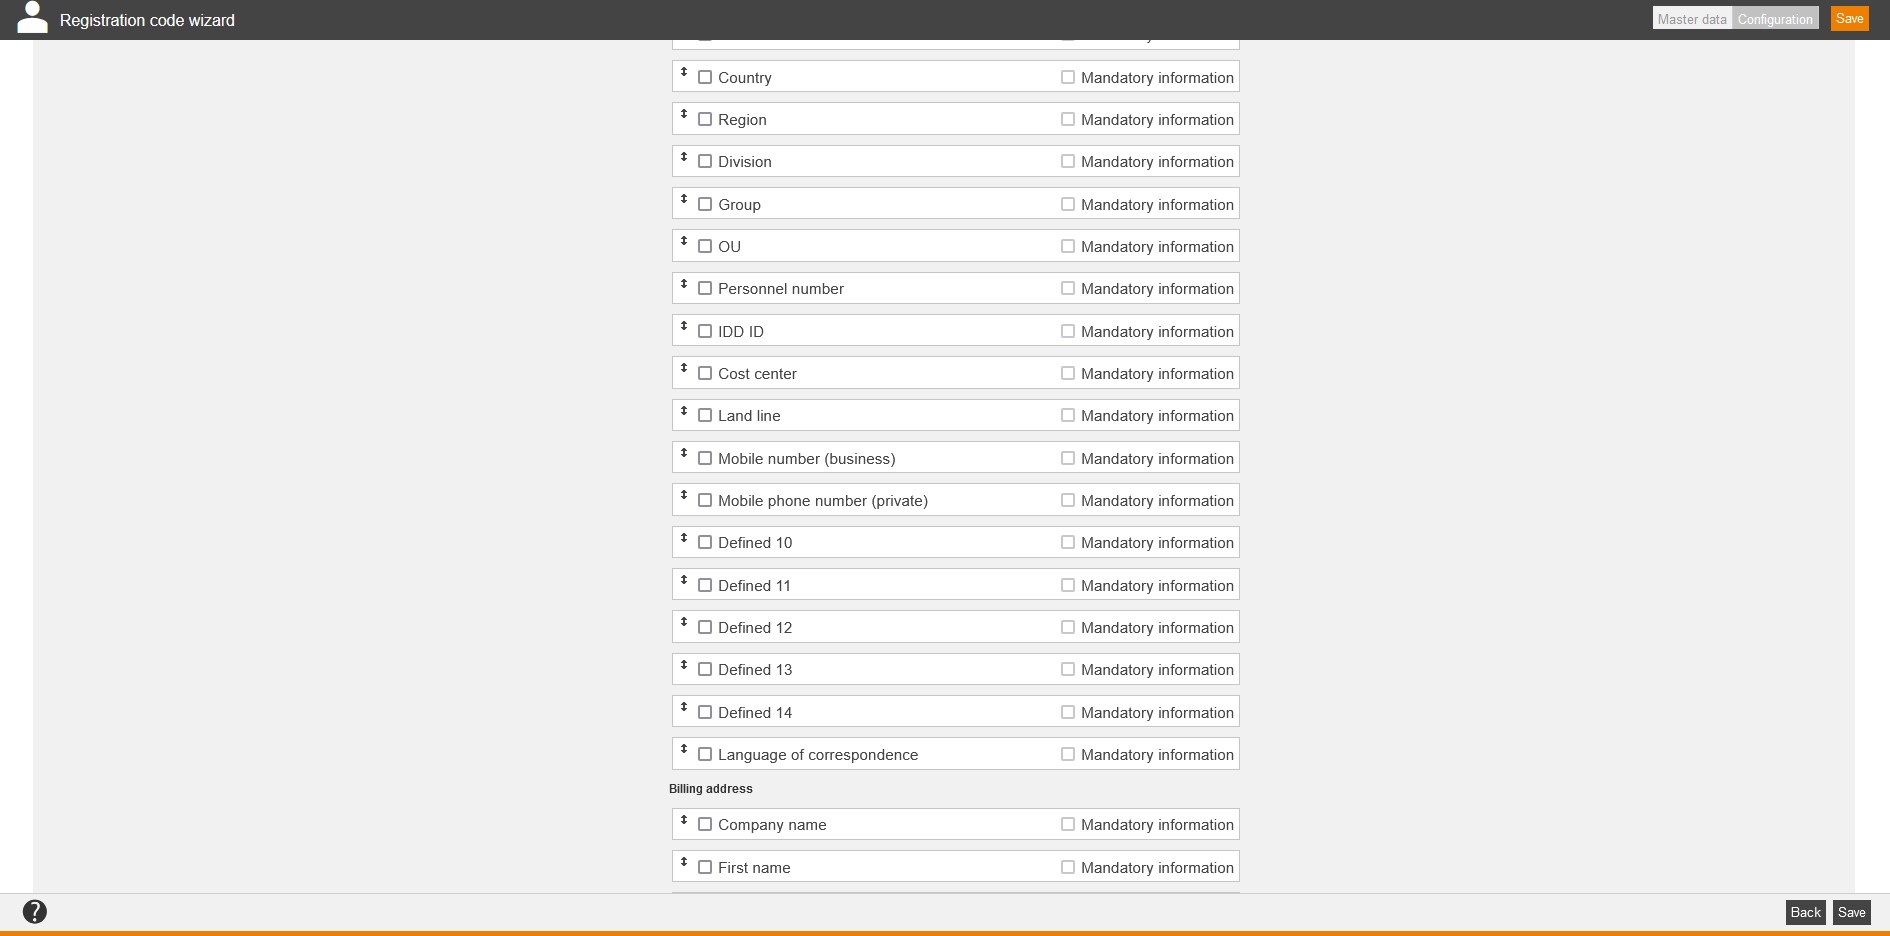
- Country and you can set the check mark Mandatory information
- Region and you can set the check mark Mandatory information
- Division and you can set the check mark Mandatory information
- Group and you can set the check mark Mandatory information
- OU and you can set the check mark Mandatory information
- Personnel number and you can set the check mark Mandatory information
- IDD ID and you can set the check mark Mandatory information
- Cost center and you can set the check mark Mandatory information
- Landline and you can set the check mark Mandatory information
- Mobile number (business) and you can set the check mark Mandatory information
- Mobile number (private) and you can set the check mark Mandatory information
- Defined from 10 up to 14 and you can set the check mark Mandatory information
- Language of correspondence and you can set the check mark Mandatory information
If you select this entry field the registering user can select the language of correspondence (within the user client) from the list of all available languages. The language of the user interface is listed first. Then the next standard language of the user client is listed.
- Billing address
- Company name and you can set the check mark Mandatory information
- First name and you can set the check mark Mandatory information
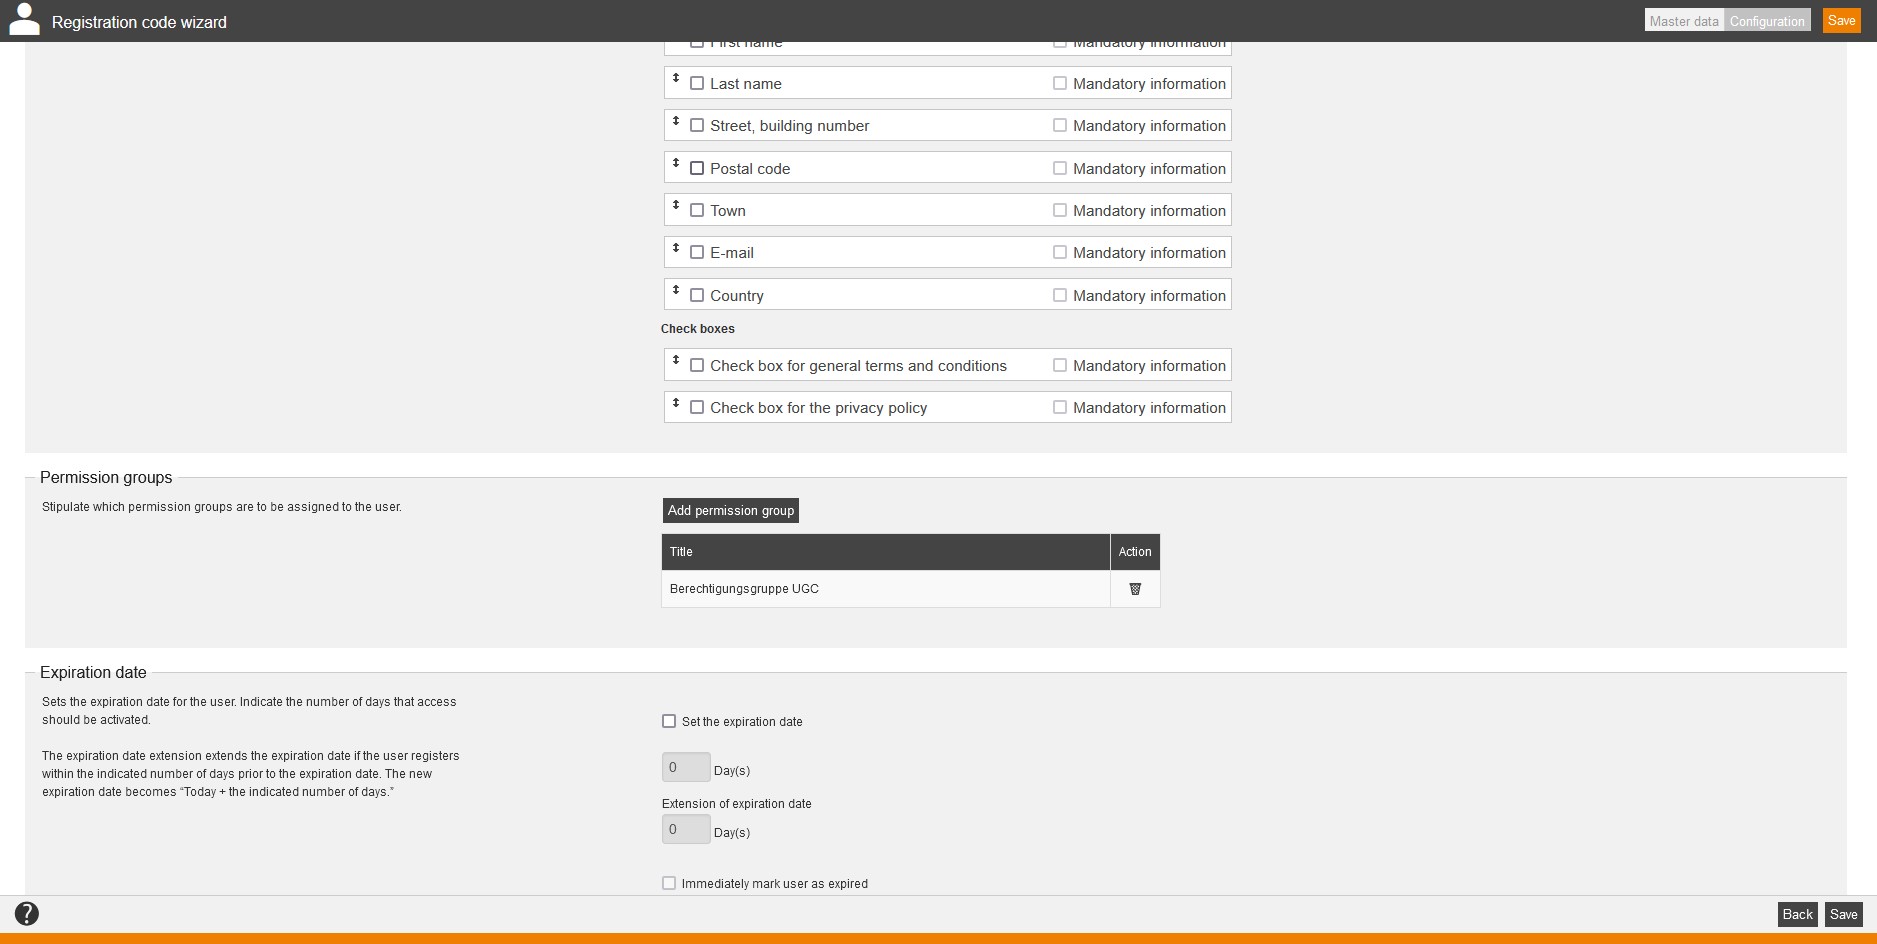
- Last name and you can set the check mark Mandatory information
- Street, building number and you can set the check mark Mandatory information
- Postal code and you can set the check mark Mandatory information
- Town and you can set the check mark Mandatory information
- E-mail and you can set the check mark Mandatory information
- Country and you can set the check mark Mandatory information
- Check boxes
- check box for general terms and conditions and
- check box for privacy policy
Permission groups
To stipulate which permission groups you want to assign to the user, click on the button Add permission group, select the favored permission group in the list and confirm your selection via clicking the button Select. The assigned permission groups are then listed in a table with the columns Title and Action.
Via clicking the recycle bin in the column Action you can remove the assignments.
Expiration date
You can define an expiration date not for the registration code only, but also for the user. Thus the user is timed. At the end of the number of days the access will be inactive. So users can register with the code within an optional period, for example three months, but the access is only 30 days valid.
You can define an expiration date extension under Expiration date. The expiration date extension extends the expiration date if the user registers within the indicated number of days prior to the expiration date. The new expiration date becomes “Today + the indicated number of days.”
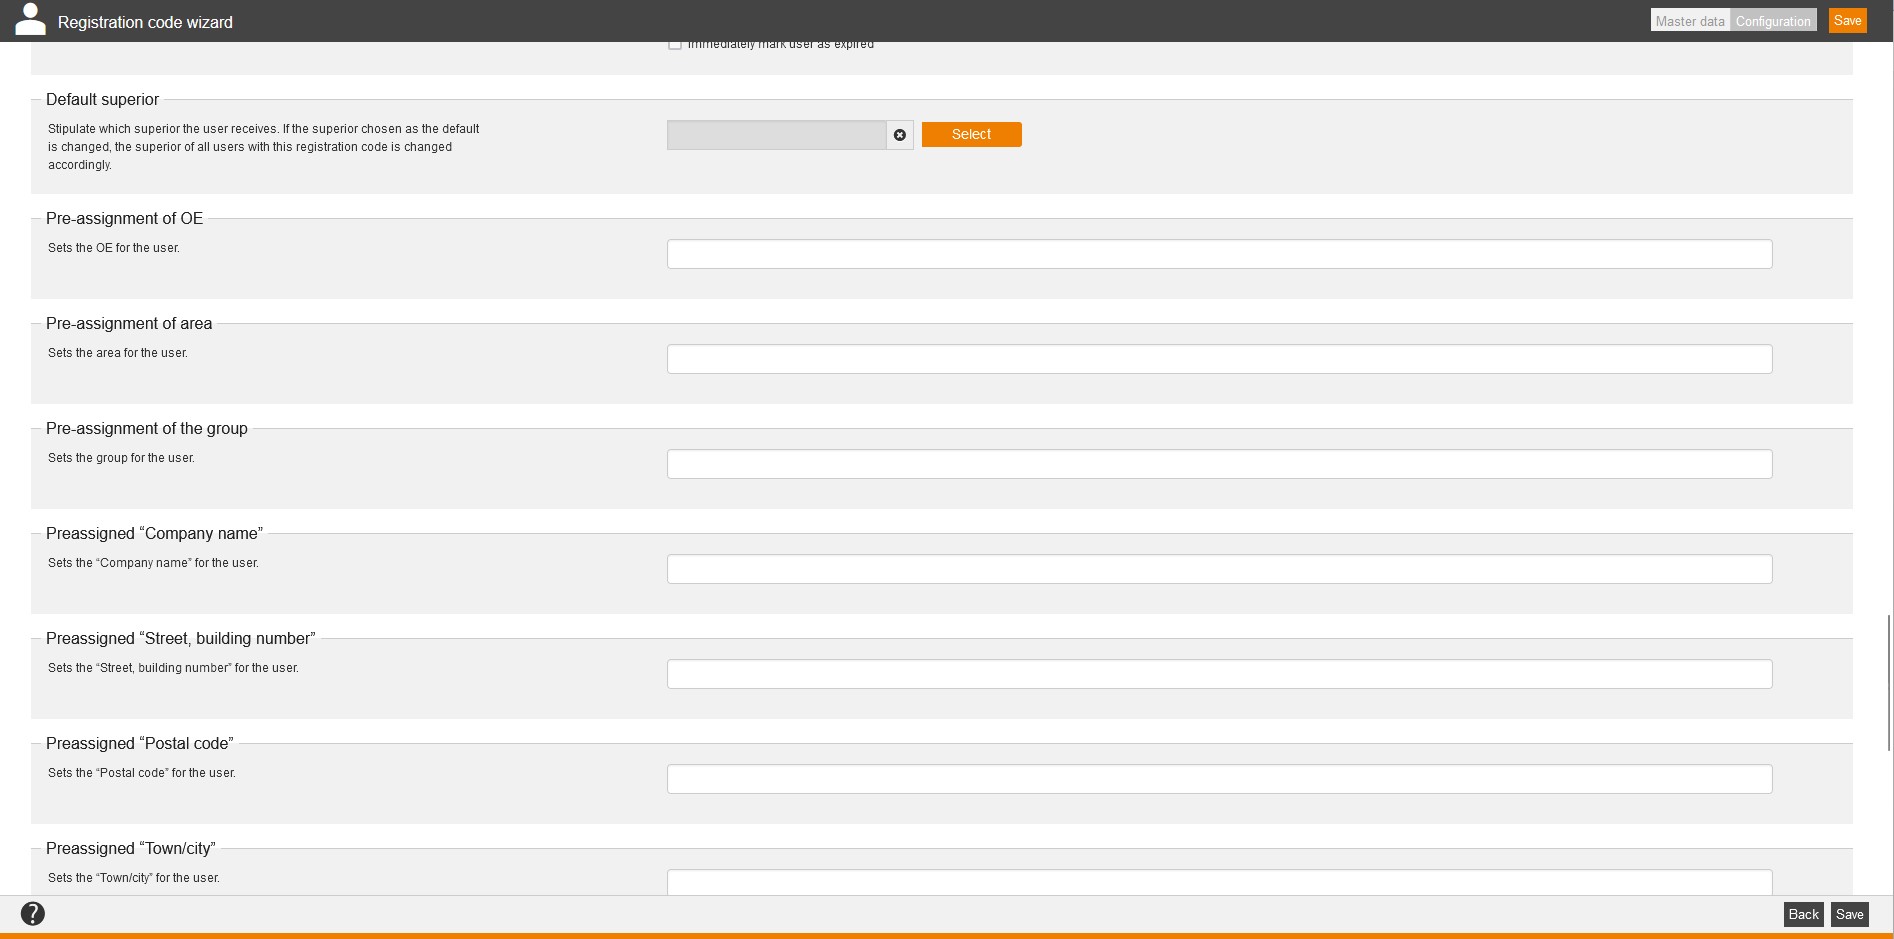
Default superior
Stipulate which superior the user receives by clicking on the button Select and confirming your selection. If the superior chosen as the default is changed, the superior of all users with this registration code is changed accordingly.
Pre-assignment of OU
Define the organizational unit for the user.
Pre-assignment of area
Define the area for the user.
Pre-assignment of the group
Define the group for the user.
Pre-assigned company name
Define the company name for the user.
Pre-assigned Street, building number
Define the street and building number for the user.
Pre-assigned postal code
Define the postal code for the user.
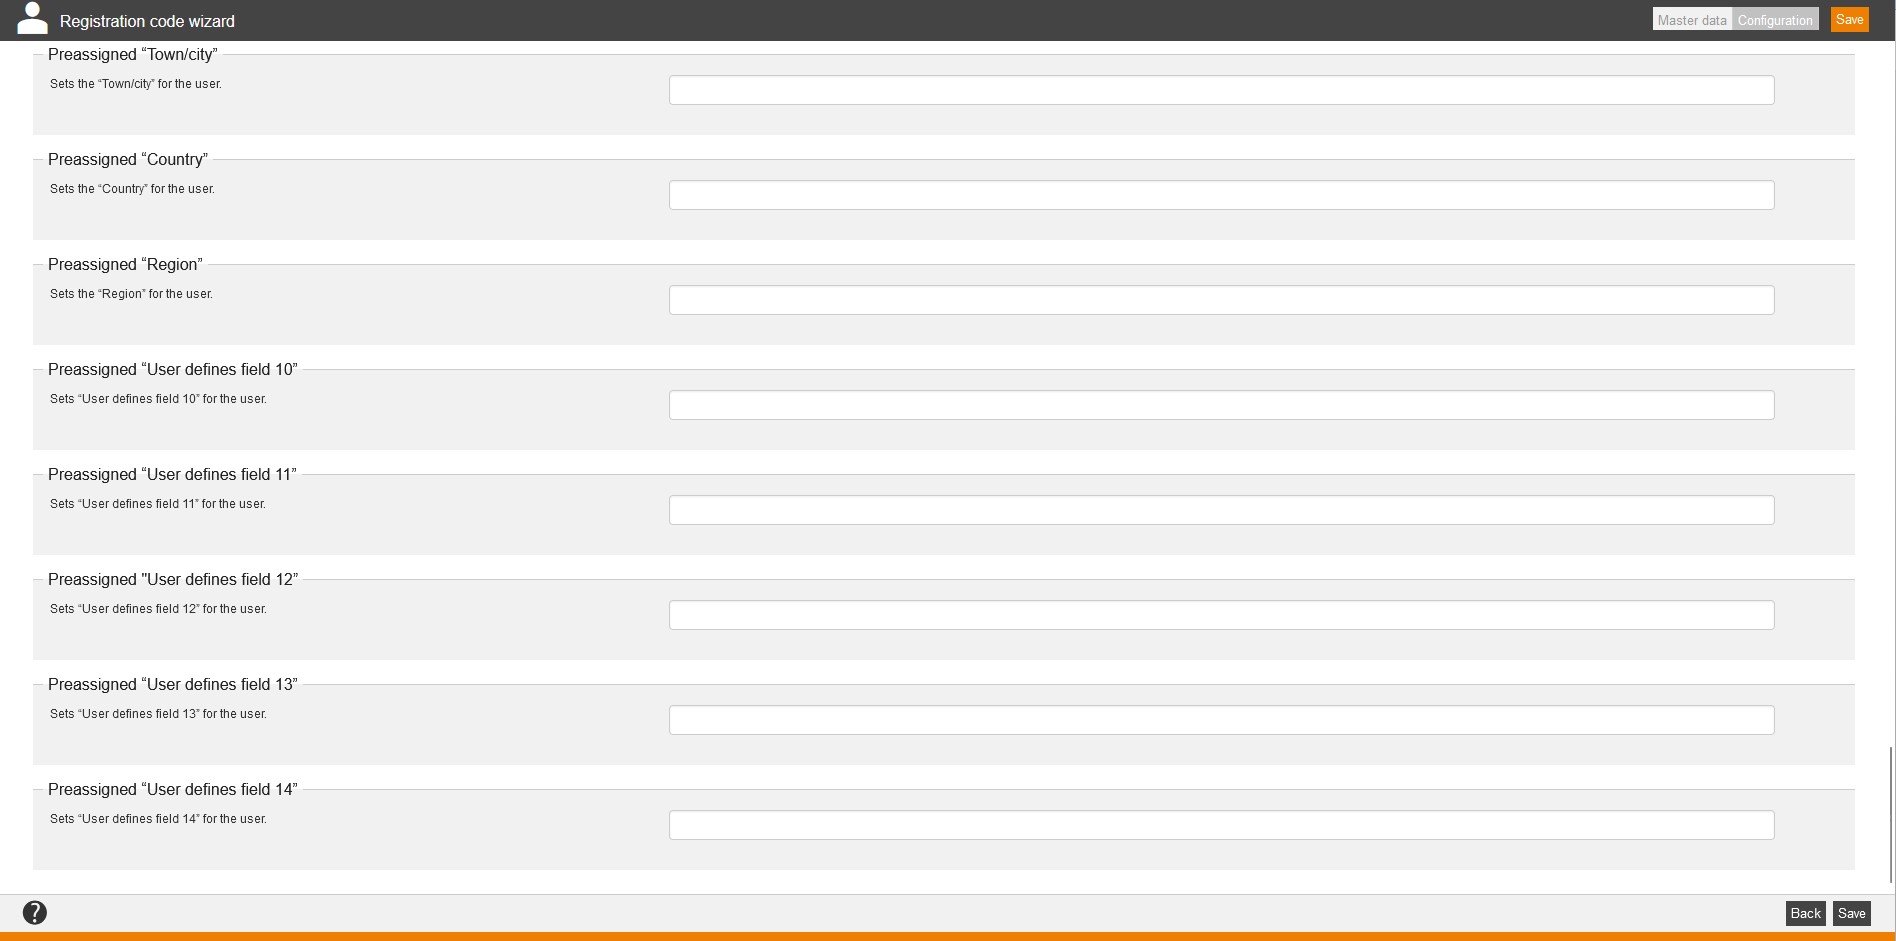
Pre-assigned Town/City
Define the town/city for the user.
Pre-assigned Country
Define the country for the user.
Pre-assigned Region
Define the region for the user.
Pre-assigned User defines fields from 10 up to 14
Define the defined fields 10 – 14 for the user.
API interface
Master data
Registration code
Enter the favoured registration code. You can use letters, numbers and special characters.
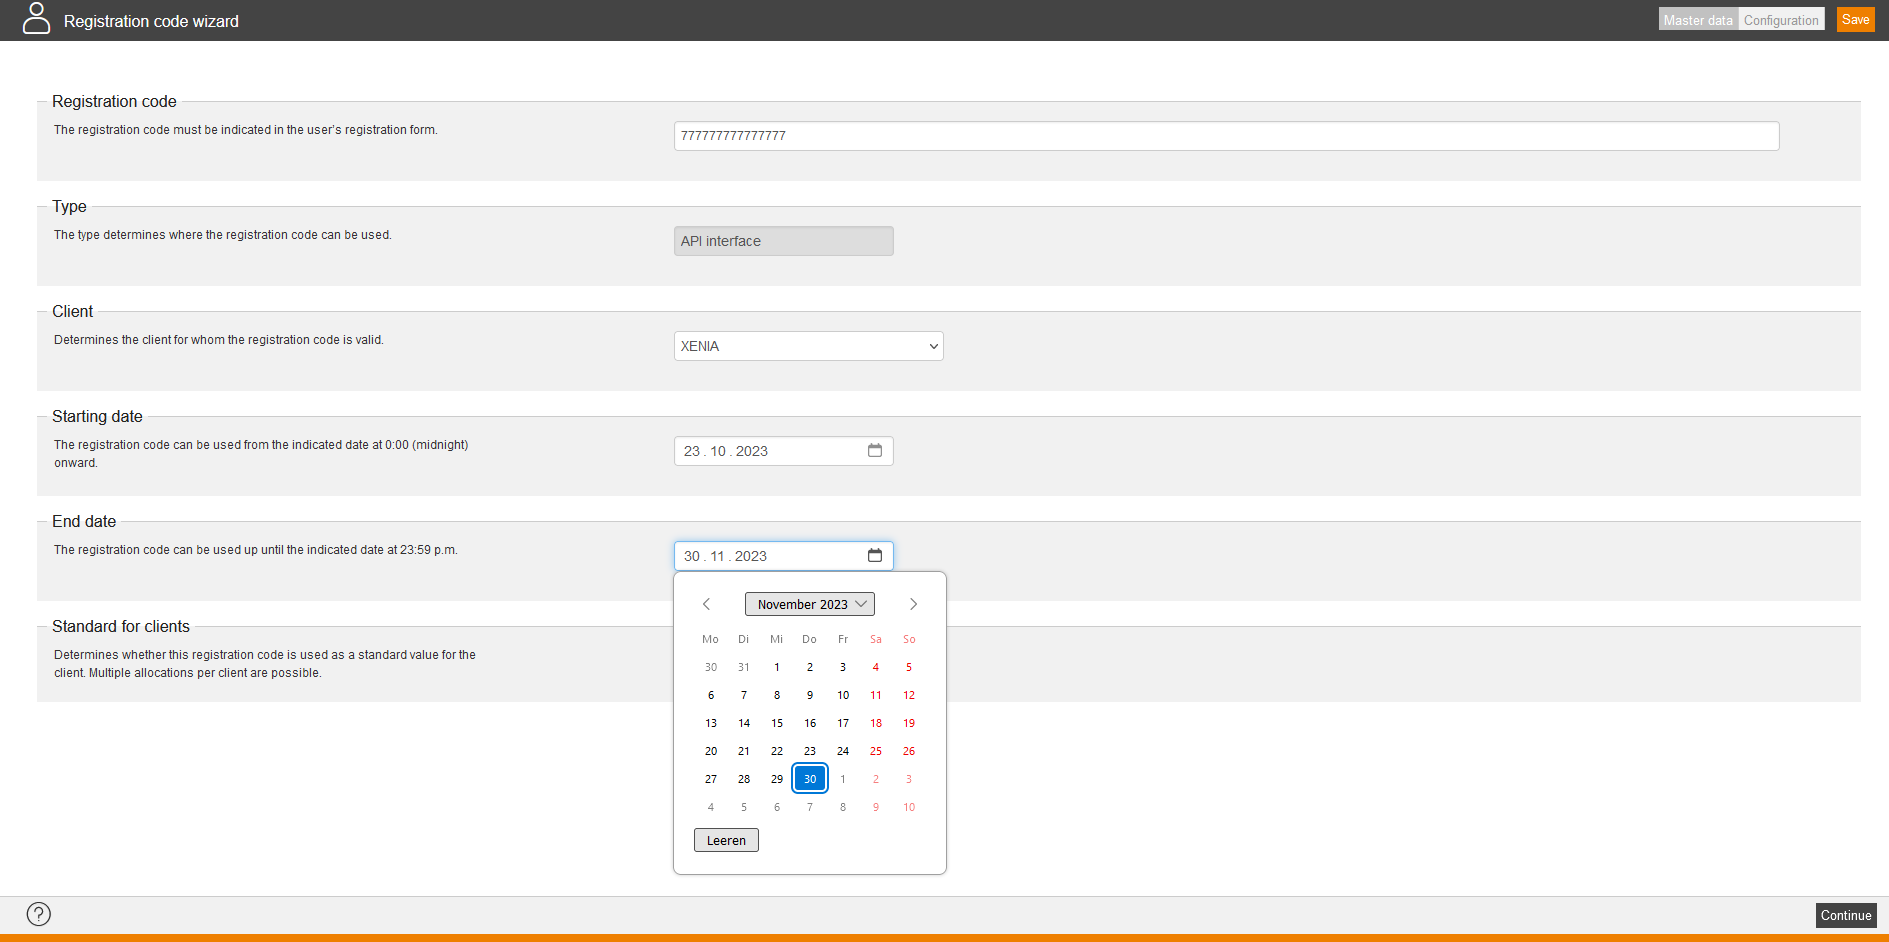
Type
The type is set per default (API interface).
Client
Choose the client, for whom the registration code is valid.
Starting date and end date
The validity period of the registration code can be limited. The code is valid from the indicated starting date at 0:00 (midnight) onward until the indicated end date at 23:59 p.m.
Standard for clients
You define by selecting the checkmark, that the code is used as standard value for the client. Multiple assignment per client are possible.
Configuration
Maximum registration
Stipulate how many registrations you wish to allow with this registration code. You can select between the following options:
- Any number of registrations or
- Enter the number of registrations (if you’ve deactivated the check mark Any number of registrations)
How many registrations are already existing with a registration code you can see in the context menu of the corresponding registration code or in the last column Registrations in the overview of the registration codes.
Use e-mail address as the username
With this option, you can determine whether the indicated email address is to be used as the user name. If that option is activated no entry field is shown for the user name in the registration form. Additionally, a further note (“E-mail address is used as user name”) is shown under the entry field “E-mail”. Furthermore set a check mark at the entry field “E-mail”.
Without this option only the standard description (“E-mail address”) is used.
To use the e-mail address as the user name, set the check mark Use the e-mail address.
Generate user login automatically
With this option you can define if the user logins are generated automatically or are entered from the form. In this case the user can give the user login by himself. Please note that the entry field for the user login must be activated.
If the user login is generated automatically, it consists of the prefix, a five-digit number and the suffix (PREFIX + XXXXX.+ SUFFIX)
User profile
Stipulate which user profile should be used for the registration.
Double opt-in
Set the check mark Activate double opt-in, if the learner (participant) should receive a verification e-mail and if he/she should confirm it, before he/she gets a registration e-mail.
Stipulate the e-mail content to be sent to participants. Select Use client setting or an Individual notification (then the source path of the Individual notification will be shown. Further information about creating an Individual notification you find here.)
Login – user registration
This notification is sent to a newly registered user. Select between:
- Do not send a notification
- Use client setting
- Individual notification (therefore select the appropriate individual notification via the button Select)
Then the source path of the individual notification will be shown. Information about creating an individual notification you find here.
Permissible domain parts for the e-mail address
You can use this option to indicate which domain parts are permissible for an indicated e-mail address. If you make no entry, every domain part is permissible.
To define the permissible domain parts for the e-mail address, click on the button Add and enter then the domain parts. If needed, you can delete these domain parts by using the button Delete.
Input fields
Define the order of the input fields for the user via drag and drop. By setting a check mark you define, if this entry field is shown for the user when registering. By setting the check mark Mandatory you define, if the appropriate input field is mandatory for the user when registering.
These three categories with these input fields are available:
- General
- User name and you can set the check mark Mandatory information
- First name
- Last name
- E-mail and you can set the check mark Mandatory information
- Password
- Gender and you can set the check mark Mandatory information
- Company name and you can set the check mark Mandatory information
- Street, building number and you can set the check mark Mandatory information
- Postal code and you can set the check mark Mandatory information
- Town and you can set the check mark Mandatory information
- Country and you can set the check mark Mandatory information
- Region and you can set the check mark Mandatory information
- Division and you can set the check mark Mandatory information
- Group and you can set the check mark Mandatory information
- OU and you can set the check mark Mandatory information
- Personnel number and you can set the check mark Mandatory information
- IDD ID and you can set the check mark Mandatory information
- Cost center and you can set the check mark Mandatory information
- Landline and you can set the check mark Mandatory information
- Mobile number (business) and you can set the check mark Mandatory information
- Mobile number (private) and you can set the check mark Mandatory information
- Defined from 10 up to 14 and you can set the check mark Mandatory information
- Language of correspondence and you can set the check mark Mandatory information
If you select this entry field the registering user can select the language of correspondence (within the user client) from the list of all available languages. The language of the user interface is listed first. Then the next standard language of the user client is listed.
Permission groups
To stipulate which permission groups you want to assign to the user, click on the button Add permission group, select the favored permission group in the list and confirm your selection via clicking the button Select. The assigned permission groups are then listed in a table with the columns Title and Action.
Via clicking the recycle bin in the column Action you can remove the assignments.
Login and API interface
Master data
Registration code
Enter the favoured registration code. You can use letters, numbers and special characters.
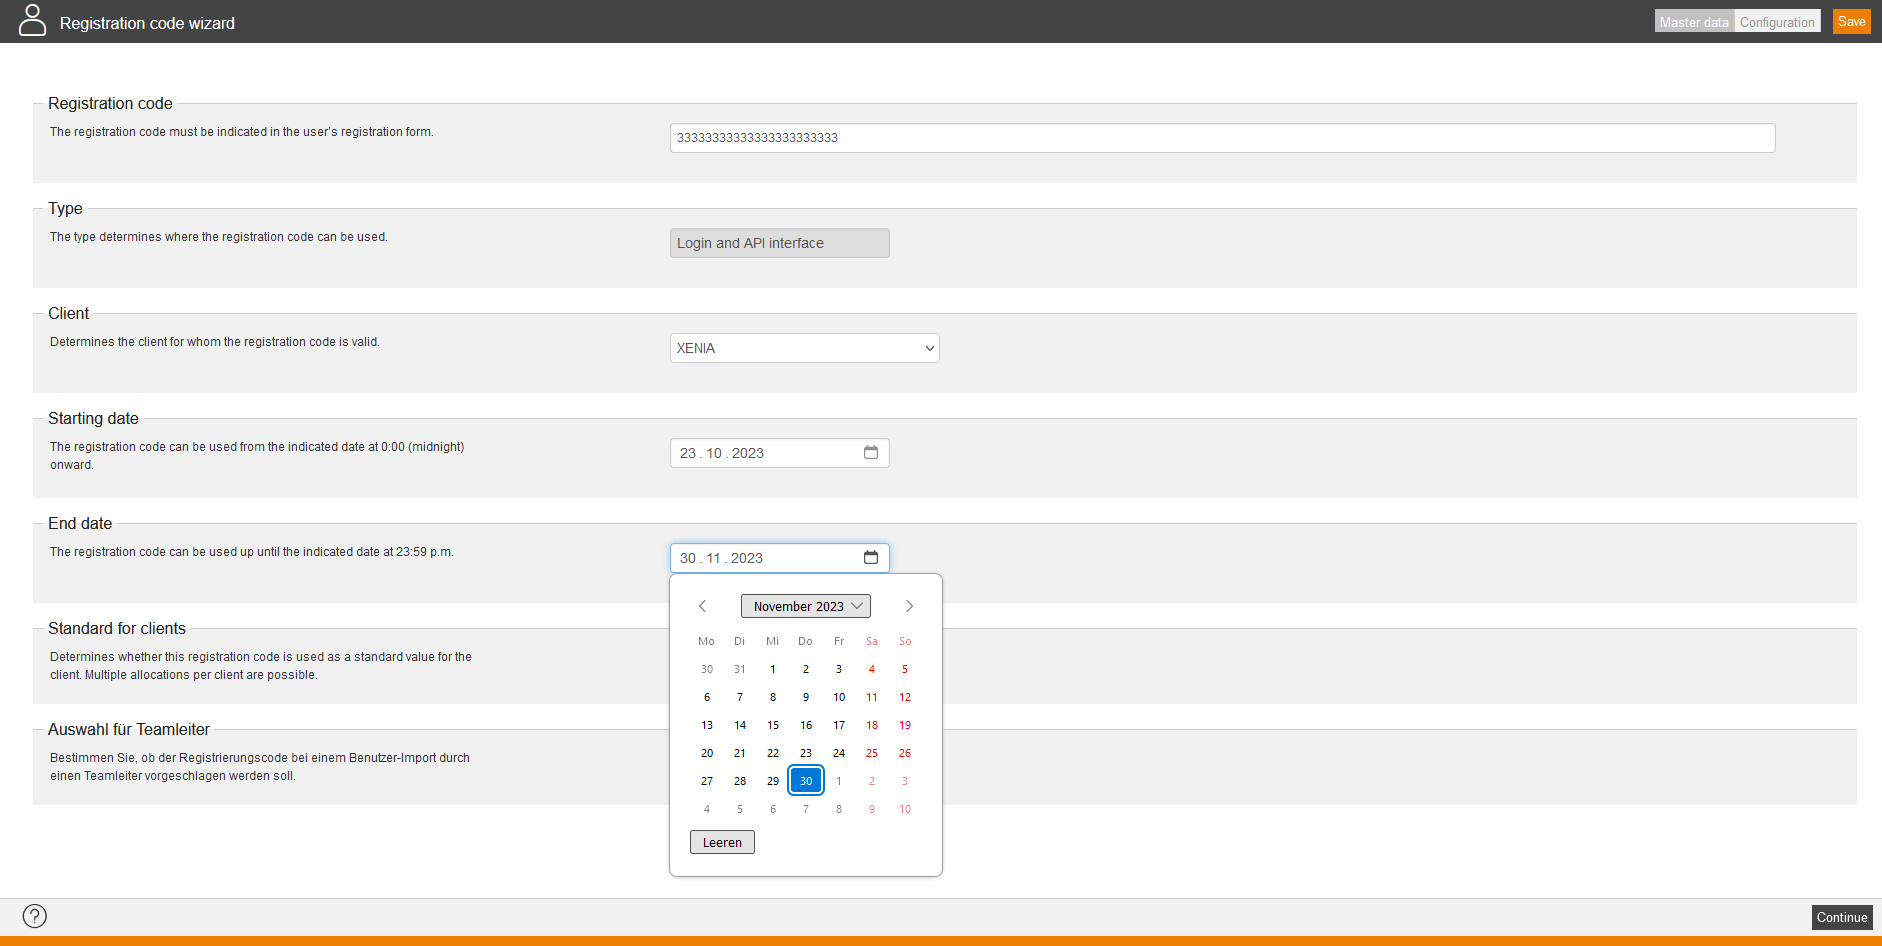
Type
The type is set per default (Login and API interface).
Client
Choose the client, for whom the registration code is valid.
Starting date and end date
The validity period of the registration code can be limited. The code is valid from the indicated starting date at 0:00 (midnight) onward until the indicated end date at 23:59 p.m.
Standard for clients
You define by selecting the check mark, that the code is used as standard value for the client. Multiple assignments per client are possible.
Configuration
Maximum registration
Stipulate how many registrations you wish to allow with this registration code. You can select between the following options:
- Any number of registrations or
- Entering the number of registrations (if you’ve deactivated the check mark Any number of registrations)
How many registrations are already existing with a registration code you can see in the context menu of the corresponding registration code or in the last column Registrations in the overview of the registration codes.
Use e-mail address as the username
With this option, you can determine whether the indicated email address is to be used as the user name. If that option is activated no entry field is shown for the user name in the registration form. Additionally, a further note (“E-mail address is used as user name”) is shown under the entry field “E-mail”. Furthermore set a check mark at the entry field “E-mail”.
Without this option only the standard description (“E-mail address”) is used.
To use the e-mail address as the user name, set the check mark Use the e-mail address.
Generate user login automatically
With this option you can define if the user logins are generated automatically or are entered from the form. In this case the user can give the user login by himself. Please note that the entry field for the user login must be activated.
If the user login is generated automatically, it consists of the prefix, a five-digit number and the suffix (PREFIX + XXXXX.+ SUFFIX)
User profile
Stipulate which user profile should be used for the registration.
Double opt-in
Set the check mark Activate double opt-in, if the learner (participant) should receive a verification e-mail and if he/she should confirm it, before he/she gets a registration e-mail.
Stipulate the e-mail content to be sent to participants. Select Use client setting or an Individual notification (then the source path of the Individual notification will be shown. Further information about creating an Individual notification you find here.)
Login – user registration
This notification is sent to a newly registered user. Select between:
- Do not send a notification
- Use client setting
- Individual notification (therefore select the appropriate individual notification via the button Select)
Then the source path of the individual notification will be shown. Information about creating an individual notification you find here.
Permissible domain parts for the e-mail address
You can use this option to indicate which domain parts are permissible for an indicated e-mail address. If you make no entry, every domain part is permissible.
To define the permissible domain parts for the e-mail address, click on the button Add and enter then the domain parts. If needed, you can delete these domain parts by using the button Delete.
Input fields
Define the order of the input fields for the user via drag and drop. By setting a check mark you define, if this entry field is shown for the user when registering. By setting the check mark Mandatory you define, if the appropriate input field is mandatory for the user when registering.
These three categories with these input fields are available:
- General
- User name and you can set the check mark Mandatory information
- First name
- Last name
- E-mail and you can set the check mark Mandatory information
- Password
- Gender and you can set the check mark Mandatory information
- Company name and you can set the check mark Mandatory information
- Street, building number and you can set the check mark Mandatory information
- Postal code and you can set the check mark Mandatory information
- Town and you can set the check mark Mandatory information
- Country and you can set the check mark Mandatory information
- Region and you can set the check mark Mandatory information
- Division and you can set the check mark Mandatory information
- Group and you can set the check mark Mandatory information
- OU and you can set the check mark Mandatory information
- Personnel number and you can set the check mark Mandatory information
- IDD ID and you can set the check mark Mandatory information
- Cost center and you can set the check mark Mandatory information
- Landline and you can set the check mark Mandatory information
- Mobile number (business) and you can set the check mark Mandatory information
- Mobile number (private) and you can set the check mark Mandatory information
- Defined from 10 up to 14 and you can set the check mark Mandatory information
- Language of correspondence and you can set the check mark Mandatory information
If you select this entry field the registering user can select the language of correspondence (within the user client) from the list of all available languages. The language of the user interface is listed first. Then the next standard language of the user client is listed.
- Billing address
- Company name and you can set the check mark Mandatory information
- First name and you can set the check mark Mandatory information
- Last name and you can set the check mark Mandatory information
- Street, building number and you can set the check mark Mandatory information
- Postal code and you can set the check mark Mandatory information
- Town and you can set the check mark Mandatory information
- E-mail and you can set the check mark Mandatory information
- Country and you can set the check mark Mandatory information
- Check boxes
- check box for general terms and conditions and
- check box for privacy policy
Permission groups
To stipulate which permission groups you want to assign to the user, click on the button Add permission group, select the favored permission group in the list and confirm your selection via clicking the button Select. The assigned permission groups are then listed in a table with the columns Title and Action.
Via clicking the recycle bin in the column Action you can remove the assignments.
Expiration date
You can define an expiration date not for the registration code only, but also for the user. Thus the user is timed. At the end of the number of days the access will be inactive. So users can register with the code within an optional period, for example three months, but the access is only 30 days valid.
You can define an expiration date extension under Expiration date. The expiration date extension extends the expiration date if the user registers within the indicated number of days prior to the expiration date. The new expiration date becomes “Today + the indicated number of days.”
Default superior
Stipulate which superior the user receives by clicking on the button Select and confirming your selection. If the superior chosen as the default is changed, the superior of all users with this registration code is changed accordingly.
Pre-assignment of OU
Define the organizational unit for the user.
Pre-assignment of area
Define the area for the user.
Pre-assignment of the group
Define the group for the user.
Pre-assigned company name
Define the company name for the user.
Pre-assigned Street, building number
Define the street and building number for the user.
Pre-assigned postal code
Define the postal code for the user.
Pre-assigned Town/City
Define the town/city for the user.
Pre-assigned Country
Define the country for the user.
Pre-assigned Region
Define the region for the user.
Pre-assigned User defines fields from 10 up to 14
Define the defined fields 10 – 14 for the user.
Accompanying persons
Master data
Registration code
Enter the favoured registration code. You can use letters, numbers and special characters.
Type
The type is set per default (Accompanying persons).
Client
Choose the client, for whom the registration code is valid.
Starting date and end date
The validity period of the registration code can be limited. The code is valid from the indicated starting date at 0:00 (midnight) onward until the indicated end date at 23:59 p.m.
Standard for clients
You define by setting the check mark, that the code is used as standard value for the client. Multiple assignments per client are possible.
Configuration
Maximum registration
Stipulate how many registrations you wish to allow with this registration code. You can select between the following options:
- Any number of registrations or
- Enter the number of registrations (if you’ve deactivated the check mark Any number of registrations)
How many registrations are already existing with a registration code you can see in the context menu of the corresponding registration code or in the last column Registrations in the overview of the registration codes.
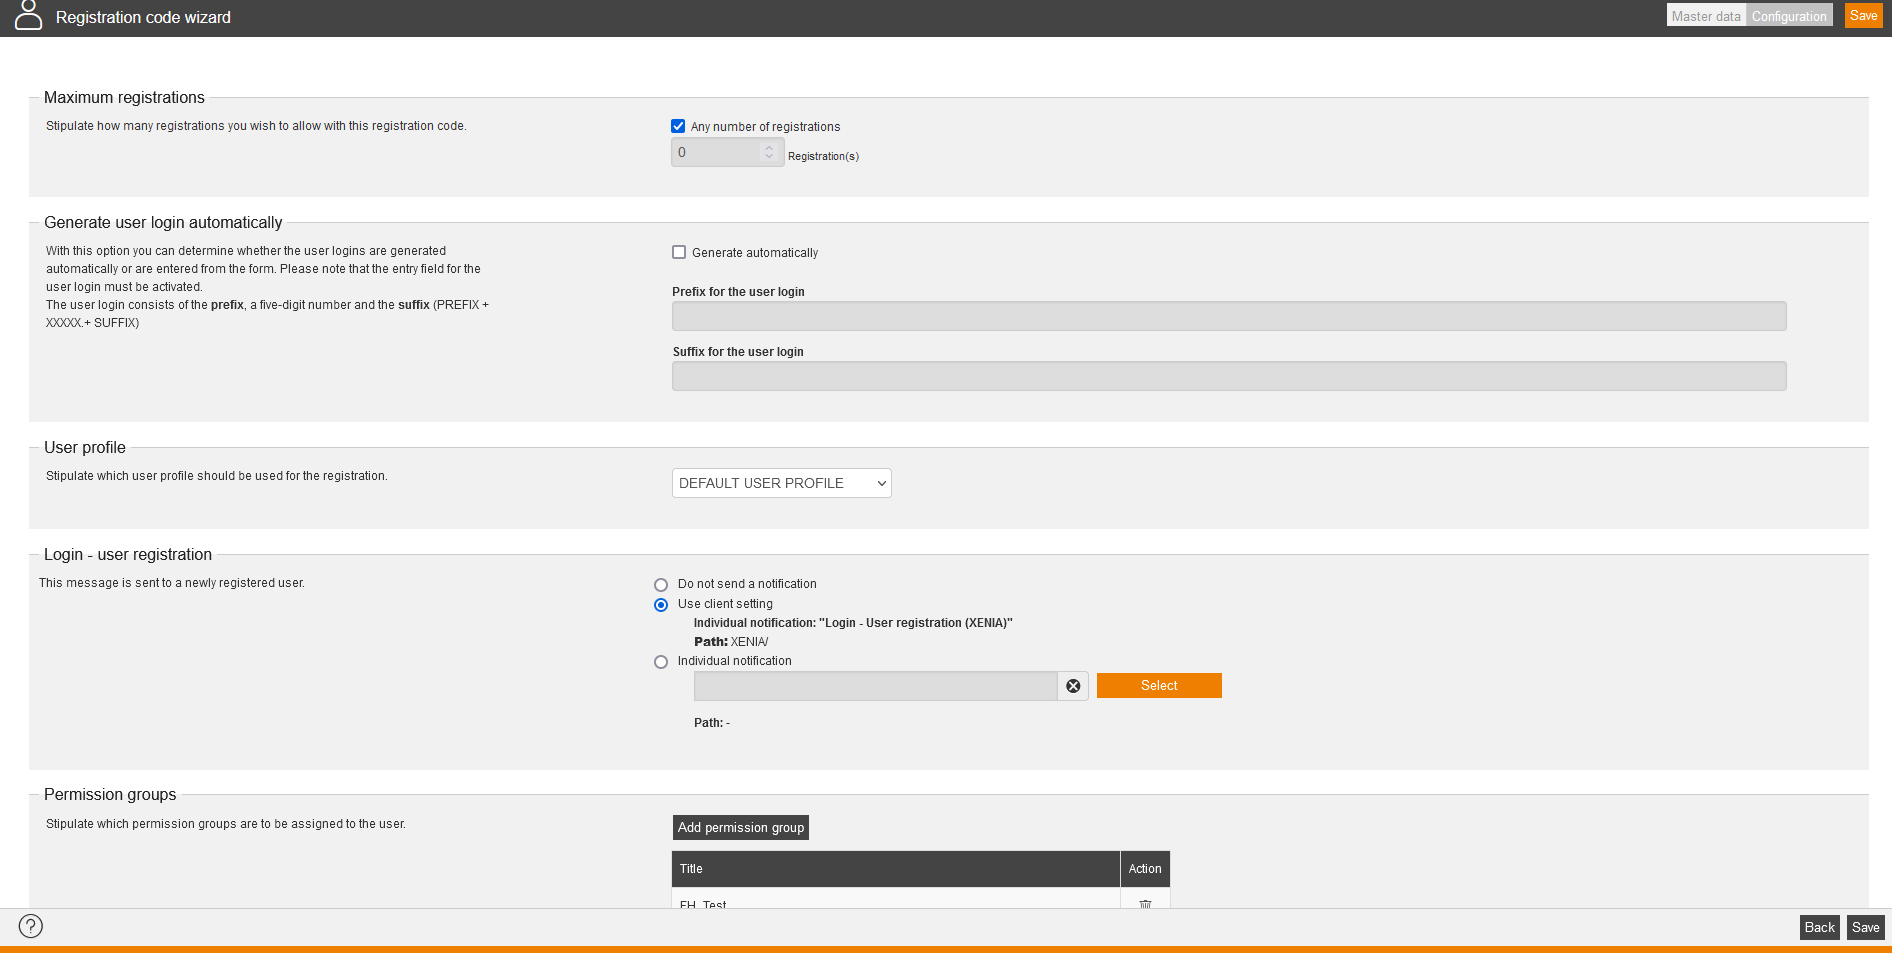
Generate user login automatically
With this option you can define if the user logins are generated automatically or are entered from the form. In this case the user can give the user login by himself. Please note that the entry field for the user login must be activated.
If the user login is generated automatically, it consists of the prefix, a five-digit number and the suffix (PREFIX + XXXXX.+ SUFFIX)
User profile
Stipulate which user profile should be used for the registration.
Login – user registration
This notification is sent to a newly registered user. Select between:
- Do not send a notification
- Use client setting
- Individual notification (therefore select the appropriate individual notification via the button Select)
Then the source path of the individual notification will be shown. Information about creating an individual notification you find here.
Permission groups
To stipulate which permission groups you want to assign to the user, click on the button Add permission group, select the favored permission group in the list and confirm your selection via clicking the button Select. The assigned permission groups are then listed in a table with the columns Title and Action.
Via clicking the recycle bin in the column Action you can remove the assignments.
Expiration date
You can define an expiration date not for the registration code only, but also for the user. Thus the user is timed. At the end of the number of days the access will be inactive. So users can register with the code within an optional period, for example three months, but the access is only 30 days valid.
You can define an expiration date extension under Expiration date. The expiration date extension extends the expiration date if the user registers within the indicated number of days prior to the expiration date. The new expiration date becomes “Today + the indicated number of days.”
Pre-assignment of OU
Define the organizational unit for the user.
Pre-assignment of area
Define the area for the user.
Pre-assignment of the group
Define the group for the user.
Pre-assigned company name
Define the company name for the user.
Pre-assigned Street, building number
Define the street and building number for the user.
Pre-assigned postal code
Define the postal code for the user.
Pre-assigned Town/City
Define the town/city for the user.
Pre-assigned Country
Define the country for the user.
Pre-assigned Region
Define the region for the user.
Pre-assigned User defines fields from 10 up to 14
Define the defined fields 10 – 14 for the user.


