
Avendoo®Move
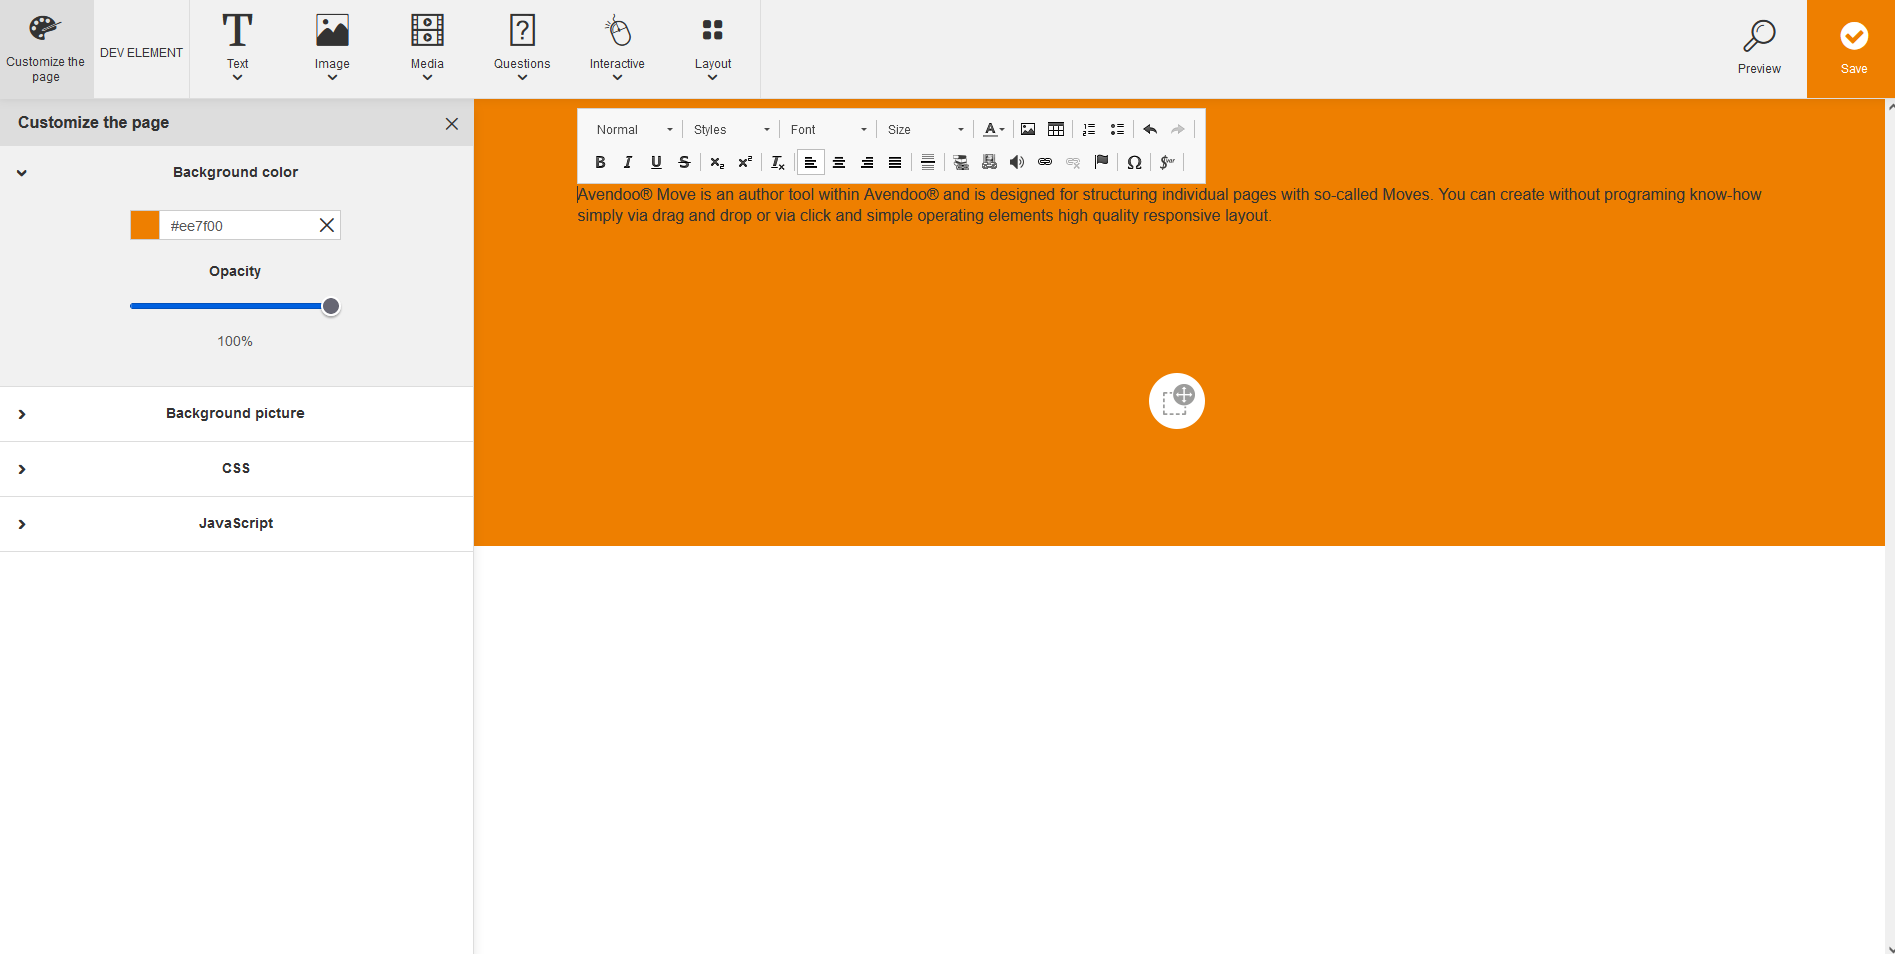
Avendoo® Move is an author tool within Avendoo® and is designed for structuring individual pages with so-called Moves. You can create without programing know-how simply via drag and drop or via click and simple operating elements high quality responsive layout.
Drag simply with pressed mouse button the appropriate elements from the bar above to the desktop and drop them. Also you can insert the elements via click on the menu items. If you want to delete the appropriate element, click on the recycle bin icon on the right side of the appropriate content. Furthermore there is a Preview function.
It depends on the number of your Move packages in the system, which Moves are available for you. The Moves of the Starter Edition are for free (see below).
You can buy further packages in future additionally to the Moves of the Starter Edition. You get in the Interaction package for example the interactive Moves Lightbox, Image comparison and the text Move Speech bubble.
You see only Moves from other packages, if the license includes the package.
Frontend users and authors can save single Moves as templates when they edit pages with Avendoo® Move. Therefore only structure rebuilt Move can be used, the Single Multiple Choice Move for example. Further Moves will follow for rebuilding.
Users and authors can select the system wide saved templates in a new selection dialog. Not only the own templates, also the system and company templates are available in the dialog window under the menu Administration.
Note that this feature is hidden in the edit process in Move by initial. If required it can be shown. Therefore contact our support team.
– The editor in Avendoo® Move is different regarding the function volume if we compare with the HTML editor. You can embed in the editor of Avendoo® Move no videos and iFrames via the editor for example. But there are appropriate Moves available – local and external videos.
– To design own learning paths via Learning path API, a further JavaScript function can be invoked on the course main and info page and the corresponding Move wizard.
For further information please contact our support team.
Move is continously developed and improved. If you find errors or have some ideas for improvement, we feel happy about a message to our support team. Many thanks!
Move is currently in the following wizards as integrated wizard available (except the Instructional material wizard):
- Instructional material wizard (not as integrated wizard)
- Course wizard (Info page (additional drag and drop options), Start page, Main page, Final page, Expiration page and Expanded layout)
- Design template wizard (Design template type Knowledge tests, Instructional materials and Courses)
- Web-based Training wizard
- Knowledge test wizard
- Activated event dates
Open Move
You can open Avendoo® Move by clicking the +tile in the corresponding wizard, for example the tab Info page in the Course wizard (see first screenshot). Then the Move editor opens integrated on the corresponding tab of the corresponding wizard.
Only in the Instructional material wizard you click the button Move on the tab Content editor. Then the Move editor opens in a new dialog window (see second screenshot).


Text editing
You can edit and format text directly in the single moves. If you click the text, the editor for various formatting opens.
Editor

You can edit and adjust the design of the Moves in the editor. To open the editor, click on the pencil icon, which appears at moving the mouse pointer over the elements. The configurations depend on the single Move.
Some common configurations like Inner padding or Animations are available in almost all Moves. If you use the Move Text on background, you can adjust via this dialog window the background picture and the color overlay.
Preview
You can show the elements as a whole in the preview. Finally you can close the editor and save your changes via clicking the button Apply and close. Then the instructional material has also to be saved.
Moves of the Starter Edition and the Interaction package
The following Moves belong to the Starter Edition:
- Image Slider
- Single-/multiple-choice-question
- Accordion
- Tab
- Image with hotspots
- Timeline
- Slider
- Flashcard
The following Moves belong to the Interaction package:
The Moves of the Interaction package bring new impulses to the design of your learning content and enhances the basic functions for any number of authors. If you’re interested, feel free to contact us.
Generally, you can define on each Move element, if this element should be shown depending on display size (Desktop, Tablet or Smartphone). Additionally, you can define per Move element on the End page of the knowledge test, if this element should be shown, when the knowledge has been passed or failed.
Via this function you can customize the whole move page for your individual design. You can select a background color or a background image for example, in order to emphasize visually a theme or to get it into Corporate Design.

To open the left editing window, click on the button Customize the page.
Left editing window
To change the background color of the page, click on the arrow on the left side besides Background color and select the appropriate background color via Color Picker. Via a slider bar you can define the Hiding power in percentage.
To change the background picture of the page, click on the arrow on the left side besides Background picture and click on the button Select picture. You can select under Scroll effect Fixed, Fill out, Adjust or Repeat. Furthermore you can remove the picture again via the button Remove picture. Furthermore you can move the the picture selection via the navigation arrow or/and you can Center per click. Additionally you can remove the picture via the button Remove picture.
To insert the CSS code for customizing the page, click on the arrow on the left side besides CSS and enter the favored CSS code in the dialog field.
To insert the JavaScript code for customizing the page, click on the arrow on the left side besides JavaScript and enter the favored JavaScript code in the dialog field.
Via this Text Move you can insert and configure running text. You can insert and configure a product description for example.
To insert running text, click on the menu item Text and drag it via drag and drop on your favored place or you click on the menu item Text .
To configure the running text, click on the Pencil of the dialog window and the left editing window opens.
Left editing window
To change the background color of the text, click on the arrow besides Background color. You can select via Color Picker by selecting the basic color via the vertical bar and then selecting the background color in the field on the left side. Alternatively you can enter directly a hexadecimal value. Via a slider bar you can define the Opacity in percentage.
To change the background picture of the text, click on the arrow on the left side besides Background picture and click on the button Select picture. You can select under Scroll effect Fixed, Fill out, Adjust or Repeat. Furthermore you can remove the picture again via the button Remove picture. Furthermore you can move the the picture selection via the navigation arrow or/and you can Center per click. Additionally you can remove the picture via the button Remove picture.
To change the maximum width (px) of the text, click on the arrow besides Maximum width (px) and enter the width (px) via the arrow buttons. Futhermore you can choose the alignment (Left, Centered or Right) and if Full width should be set. Via the alignment Centered you can change from a value 1150 downwards to Left or Right.
To enter the inner padding in pixels for text above or below, click on the arrow besides Inner padding (PX) and select the appropriate values.
To configure an animation for the text, for example Fade in, Zoom in, Fly in from the top, click on the arrow besides Animation and select the type and the duration. You can test all animations via the button Test all animations.
To define the conditional display for text, click the tab Conditional display and select depending on the display size under Only show, if.. the option Desktop, Tablet or Smartphone under Is. You can add further rules for conditional display via clicking the button Further rule. Via Recycle bin you can remove the rules.
If you add a text Move on the End page of a knowledge test, you can additionally select, if it should be shown, when the knowledge test is Passed or Failed.
If you don’t define any rule for the conditional display, the text Move will always be shown to the user.
Right editing window
To change the font formatting of the text, click directly into the placeholder text. The text editor opens. You can do the following changes: Paragraph styles, styles (block styles and inline styles), font, font size, text color, insert image, insert table, insert/remove numbered list, insert list, bold, italic, underline, strikethrough, subscript, superscript, align left, center, align right, justify, insert horizontal line, link instructional material, insert Anchor link, insert special character, insert variable insert/edit/remove link and add media.
You can remove the text again if applicable via the button Remove.
Via this Text Move you can insert and configure a title. You can insert and configure key words for an application for example.
To insert a title, click on the menu item Title and drag it via drag and drop on your favored place or you click on the menu item Title.
To configure the title, click on the Pencil of the dialog window of the title and the left editing window opens.
Left editing window
To change the background color for the title, click on the arrow besides Background color. You can select via Color Picker by selecting the basic color via the vertical bar and then selecting the background color in the field on the left side. Alternatively you can enter directly a hexadecimal value. Via a slider bar you can define the Opacity in percentage.
To change the background picture of the title, click on the arrow on the left side besides Background picture and click on the button Select picture. You can select under Scroll effect Fixed, Fill out, Adjust or Repeat. Furthermore you can remove the picture again via the button Remove picture. Furthermore you can move the the picture selection via the navigation arrow or/and you can Center per click. Additionally you can remove the picture via the button Remove picture.
To change the maximum width (px) of the title, click on the arrow besides Maximum width (px) and enter the width (px) via the arrow buttons. Futhermore you can choose the alignment (Left, Centered or Right) and if Full width should be set. Via the alignment Centered you can change from a value 1150 downwards to Left or Right.
To enter the inner padding in pixels for the title above or below, click on the arrow besides Inner padding (PX) and select the appropriate values.
To configure an animation for the title, for example Fade in, Zoom in, Fly in from the top, click on the arrow besides Animation and select the type and the duration. You can test all animations via the button Test all animations.
To define the conditional display for a title, click the tab Conditional display and select depending on the display size under Only show, if.. the option Desktop, Tablet or Smartphone under Is. You can add further rules for conditional display via clicking the button Further rule. Via Recycle bin you can remove the rules.
If you add a title Move on the End page of a knowledge test, you can additionally select, if it should be shown, when the knowledge test is Passed or Failed.
If you don’t define any rule for the conditional display, the title Move will always be shown to the user.
Right editing window
To change the font formatting of the title, click directly into the placeholder text. The text editor opens. You can do the following changes: Paragraph styles, styles (block styles and inline styles), font, font size, text color, insert image, insert table, insert/remove numbered list, insert list, bold, italic, underline, strikethrough, subscript, superscript, align left, center, align right, justify, insert horizontal line, link instructional material, insert Anchor link, insert special character, insert variable, insert/edit/remove link and add media.
You can remove the title if applicable via the button Remove.
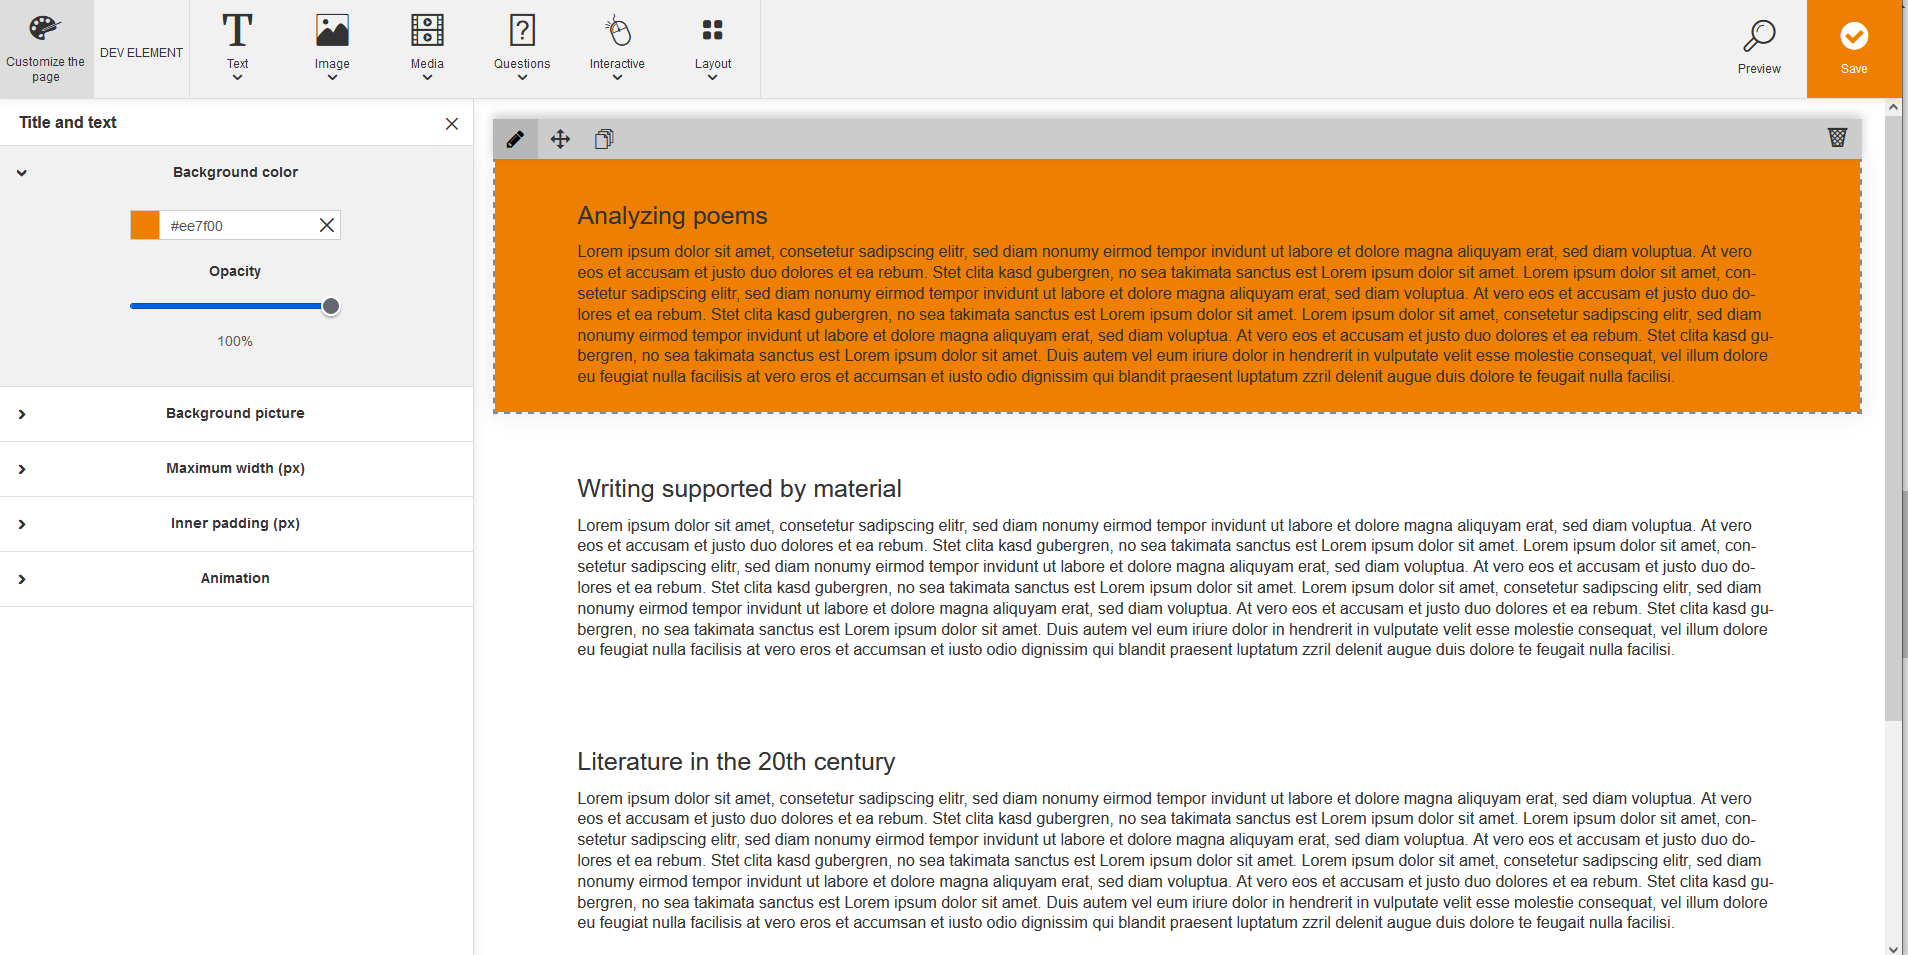
Via this Text Move you can insert and configure a title and a running text. You can insert and configure a text to learn with a summary in the title for example. You can use a title with a running text in the best way from the view of instructional design as Advance Organizer to give an overview of content structure and of learning goals. You understand Advance Organizer as the learner understands how the content is structured, related to and at which point he/she is and where he/she has to go.
To insert running text with a title, click on the menu item Title and text and drag it via drag and drop on your favored place or you click on the menu item Title and text.
To configure running text with a title, click on the Pencil of th dialog window of the placeholder text and the left editing window opens.
Left editing window
To change the background color for the title and the text, click on the arrow besides Background color. You can select via Color Picker by selecting the basic color via the vertical bar and then selecting the background color in the field on the left side. Alternatively you enter directly a hexadecimal value. Via a slider bar you can define the Opacity in percentage.
To change the background picture of the text and the title, click on the arrow on the left side besides Background picture and click on the button Select picture. You can select under Scroll effect Fixed, Fill out, Adjust or Repeat. Furthermore you can remove the picture again via the button Remove picture. Furthermore you can move the the picture selection via the navigation arrow or/and you can Center per click. Additionally you can remove the picture via the button Remove picture.
To change the maximum width (px) of the text and the title, click on the arrow besides Maximum width (px) and enter the width (px) via the arrow buttons. Futhermore you can choose the alignment (Left, Centered or Right) and if Full width should be set. Via the alignment Centered you can change from a value 1150 downwards to Left or Right.
To enter the inner padding in pixels for the title and the text above or below, click on the arrow besides Inner padding (PX) and select the appropriate values.
To configure an animation for the title and the text, for example Fade in, Zoom in, Fly in from the top, click on the arrow besides Animation and select the type and the duration. You can test all animations via the button Test all animations.
To define the conditional display for title and text, click the tab Conditional display and select depending on the display size under Only show, if.. the option Desktop, Tablet or Smartphone under Is. You can add further rules for conditional display via clicking the button Further rule. Via Recycle bin you can remove the rules.
If you add a title and text Move on the End page of a knowledge test, you can additionally select, if it should be shown, when the knowledge test is Passed or Failed.
If you don’t define any rule for the conditional display, the title and text Move will always be shown to the user.
Right editing window
To change the font formatting of the title and the text, click directly into the placeholder text. The text editor opens. You can do the following changes: Paragraph styles, styles (block styles and inline styles), font, font size, text color, insert image, insert table, insert/remove numbered list, insert list, bold, italic, underline, strikethrough, subscript, superscript, align left, center, align right, justify, insert horizontal line, link instructional material, insert Anchor link, insert special character, insert variable, insert/edit/remove link and add media.
You can remove the running text with a title if applicable via the button Remove.
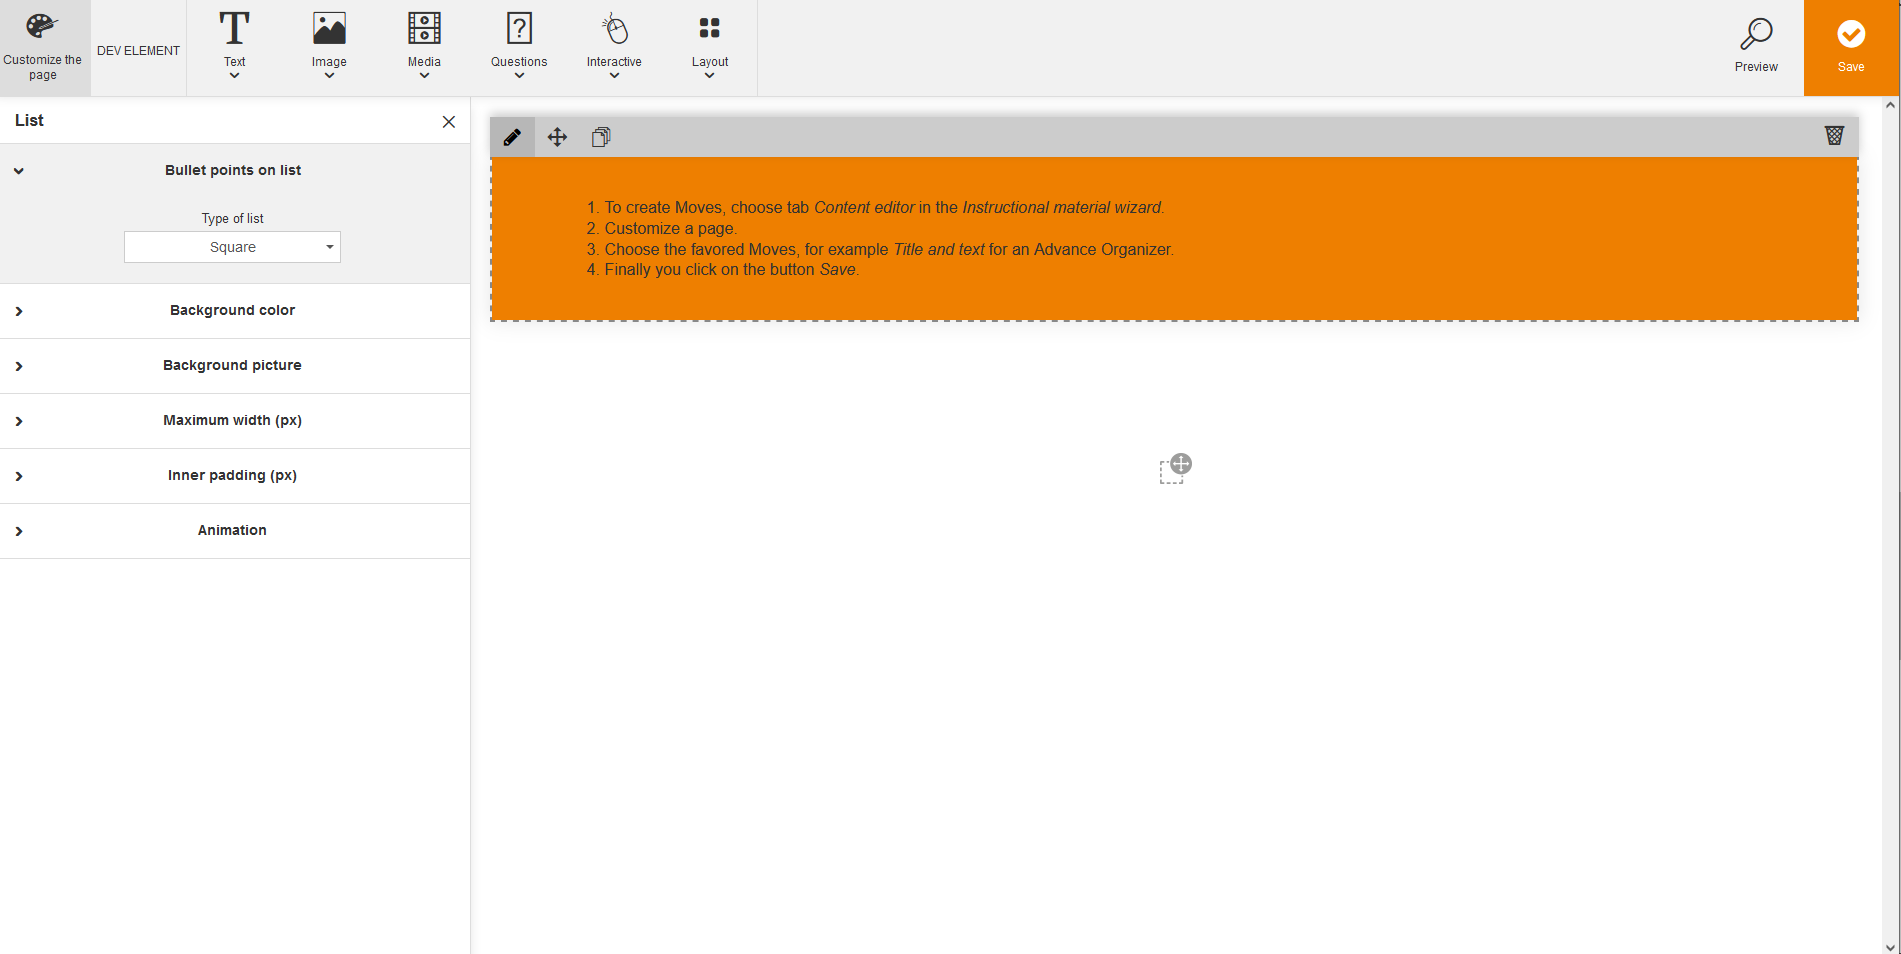
Via this Text Move you can insert and configure lists, indented on the left. You can insert and configure pros and cons, a process with single steps or a step-by-step procedure for example.
You add new bullet points via the Enter key. You remove bullet points via the Delete or Remove key.
To insert a list, click on the menu item List and drag it via drag and drop on your favored place or you click on the menu item List.
To configure a list, click on the Pencil of the dialog window of the list and the left editing window opens.
Left editing window
To select the type of list for the bullet points on list, click on the arrow on the left side besides Bullet points on list and select the Type of list, for example Circle.
To change the background color for the bullet points on list, click on the arrow besides Background color. You can select via Color Picker by selecting the basic color via the vertical bar and then selecting the background color in the field on the left side. Alternatively you enter directly a hexadecimal value. Via a slider bar you can define the Opacity in percentage.
To change the background picture of the bullet points on list, click on the arrow on the left side besides Background picture and click on the button Select picture. You can select under Scroll effect Fixed, Fill out, Adjust or Repeat. Furthermore you can remove the picture again via the button Remove picture. Furthermore you can move the the picture selection via the navigation arrow or/and you can Center per click. Additionally you can remove the picture via the button Remove picture.
To change the maximum width (px) of the bullet points on list, click on the arrow besides Maximum width (px) and enter the width (px) via the arrow buttons. Futhermore you can choose the alignment (Left, Centered or Right) and if Full width should be set. Via the alignment Centered you can change from a value 1150 downwards to Left or Right.
To enter the inner padding in pixels for the bullet points on list above or below, click on the arrow besides Inner padding (PX) and select the appropriate values.
To configure an animation for the bullet points on list, for example Fade in, Zoom in, Fly in from the top, click on the arrow besides Animation and select the type and the duration. You can test all animations via the button Test all animations.
To define the conditional display for a list, click the tab Conditional display and select depending on the display size under Only show, if.. the option Desktop, Tablet or Smartphone under Is. You can add further rules for conditional display via clicking the button Further rule. Via Recycle bin you can remove the rules.
If you add a list Move on the End page of a knowledge test, you can additionally select, if it should be shown, when the knowledge test is Passed or Failed.
If you don’t define any rule for the conditional display, the list Move will always be shown to the user.
Right editing window
To change the font formatting of the text, click directly into the placeholder text. The text editor opens. You can do the following changes: Paragraph styles, styles (block styles and inline styles), font, font size, text color, insert image, insert table, insert/remove numbered list, insert list, bold, italic, underline, strikethrough, subscript, superscript, align left, center, align right, justify, insert horizontal line, link instructional material, insert Anchor link, insert special character, insert variable, insert/edit/remove link and add media.
You can remove the list if applicable via the button Remove.
Via this Text Move of the Interaction package you can insert and configure speech bubbles. You can insert and configure dialogs or situational learning, which makes the importance of content in the daily practice clear for example.
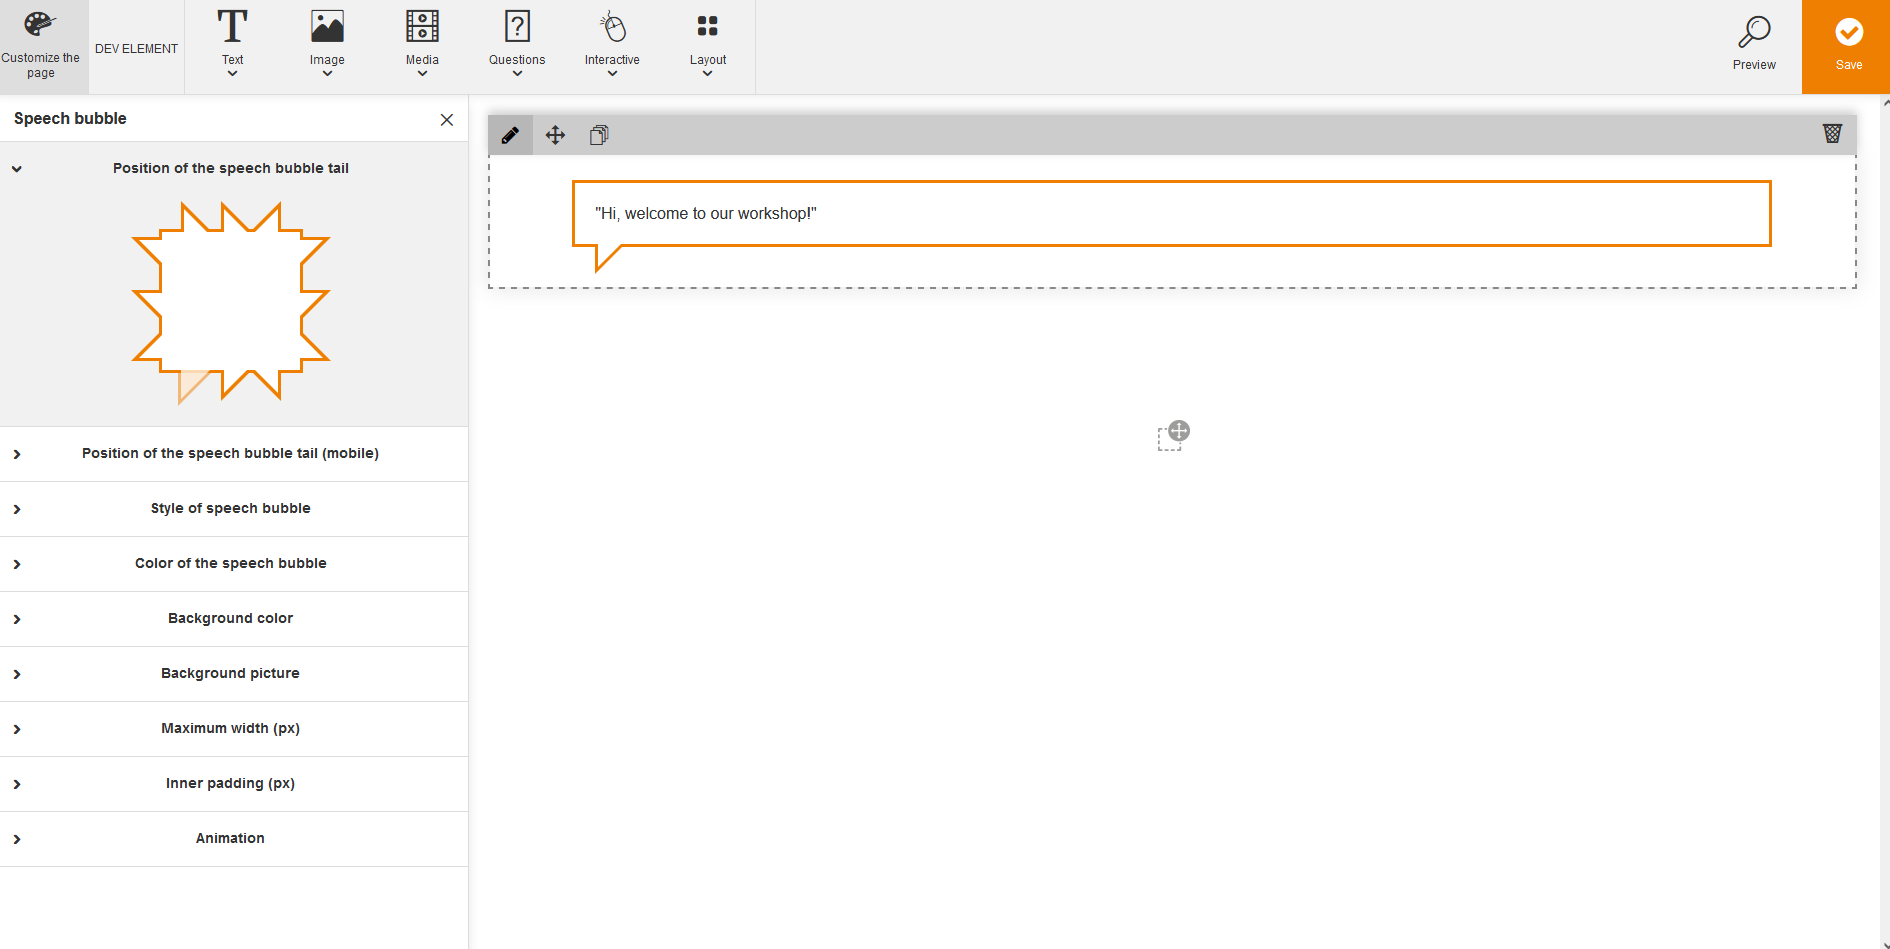
To insert a speech bubble, click on the menu item Speech bubble and drag it via drag and drop on your favored place or you click on the menu item Speech bubble.
To configure a speech bubble, click on the Pencil of the dialog window of the speech bubble and the left editing window opens.
Left editing window
To change the position of the speech bubble tail, click on the arrow on the left side besides Position of the speech bubble tail and click on your favored speech bubble tail.
To change the position of the speech bubble tail (mobile), click on the arrow on the left side besides Position of the speech bubble tail (mobile) and click on your favored speech bubble tail. Alternatively you can click on No tail on speech bubble.
To change the style of the speech bubble, click on the arrow on the left side besides Style of the speech bubble and select the favored Border (Full, Single border, Dashed or Dottled) and the favored Speech bubble tail (Angled or Triangle).
To change the color of the speech bubble, click on the arrow on the left side besides Color of the speech bubble and select the Background color and the Border color. You can select via Color Picker by selecting the basic color via the vertical bar and then selecting the background color in the field on the left side. Alternatively you enter directly a hexadecimal value.
To change the background color of the speech bubble, click on the arrow besides Background color. You can select via Color Picker by selecting the basic color via the vertical bar and then selecting the background color in the field on the left side. Alternatively you enter directly a hexadecimal value. Via a slider bar you can define the Opacity in percentage.
To change the background picture of the speech bubble, click on the arrow on the left side besides Background picture and click on the button Select picture. You can select under Scroll effect Fixed, Fill out, Adjust or Repeat. Furthermore you can remove the picture again via the button Remove picture. Furthermore you can move the the picture selection via the navigation arrow or/and you can Center per click. Additionally you can remove the picture via the button Remove picture.
To change the maximum width (px) of the speech bubble, click on the arrow besides Maximum width (px) and enter the width (px) via the arrow buttons. Futhermore you can choose the alignment (Left, Centered or Right) and if Full width should be set. Via the alignment Centered you can change from a value 1150 downwards to Left or Right.
To enter the inner padding in pixels of the speech bubble above or below, click on the arrow besides Inner padding (PX) and select the appropriate values.
To configure an animation for the speech bubble, for example Fade in, Zoom in, Fly in from the top, click on the arrow besides Animation and select the type and the duration. You can test all animations via the button Test all animations.
To define the conditional display for a speech bubble, click the tab Conditional display and select depending on the display size under Only show, if.. the option Desktop, Tablet or Smartphone under Is. You can add further rules for conditional display via clicking the button Further rule. Via Recycle bin you can remove the rules.
If you add a speech bubble Move on the End page of a knowledge test, you can additionally select, if it should be shown, when the knowledge test is Passed or Failed.
If you don’t define any rule for the conditional display, the speech bubble Move will always be shown to the user.
Right editing window
To change the font formatting of the text in the speech bubble, click directly into the placeholder text. The text editor opens. You can do the following changes: Paragraph styles, styles (block styles and inline styles), font, font size, text color, insert image, insert table, insert/remove numbered list, insert list, bold, italic, underline, strikethrough, subscript, superscript, align left, center, align right, justify, insert horizontal line, link instructional material, insert Anchor link, insert special character, insert variable, insert/edit/remove link and add media.
Via the appropriate icons you can move or duplicate the speech bubble.
You can remove the speech bubble if applicable via the button Remove.
Via this Text Move of the Interaction package you can insert and configure notes. You can use this Move like a digital post-it for stressing important content.
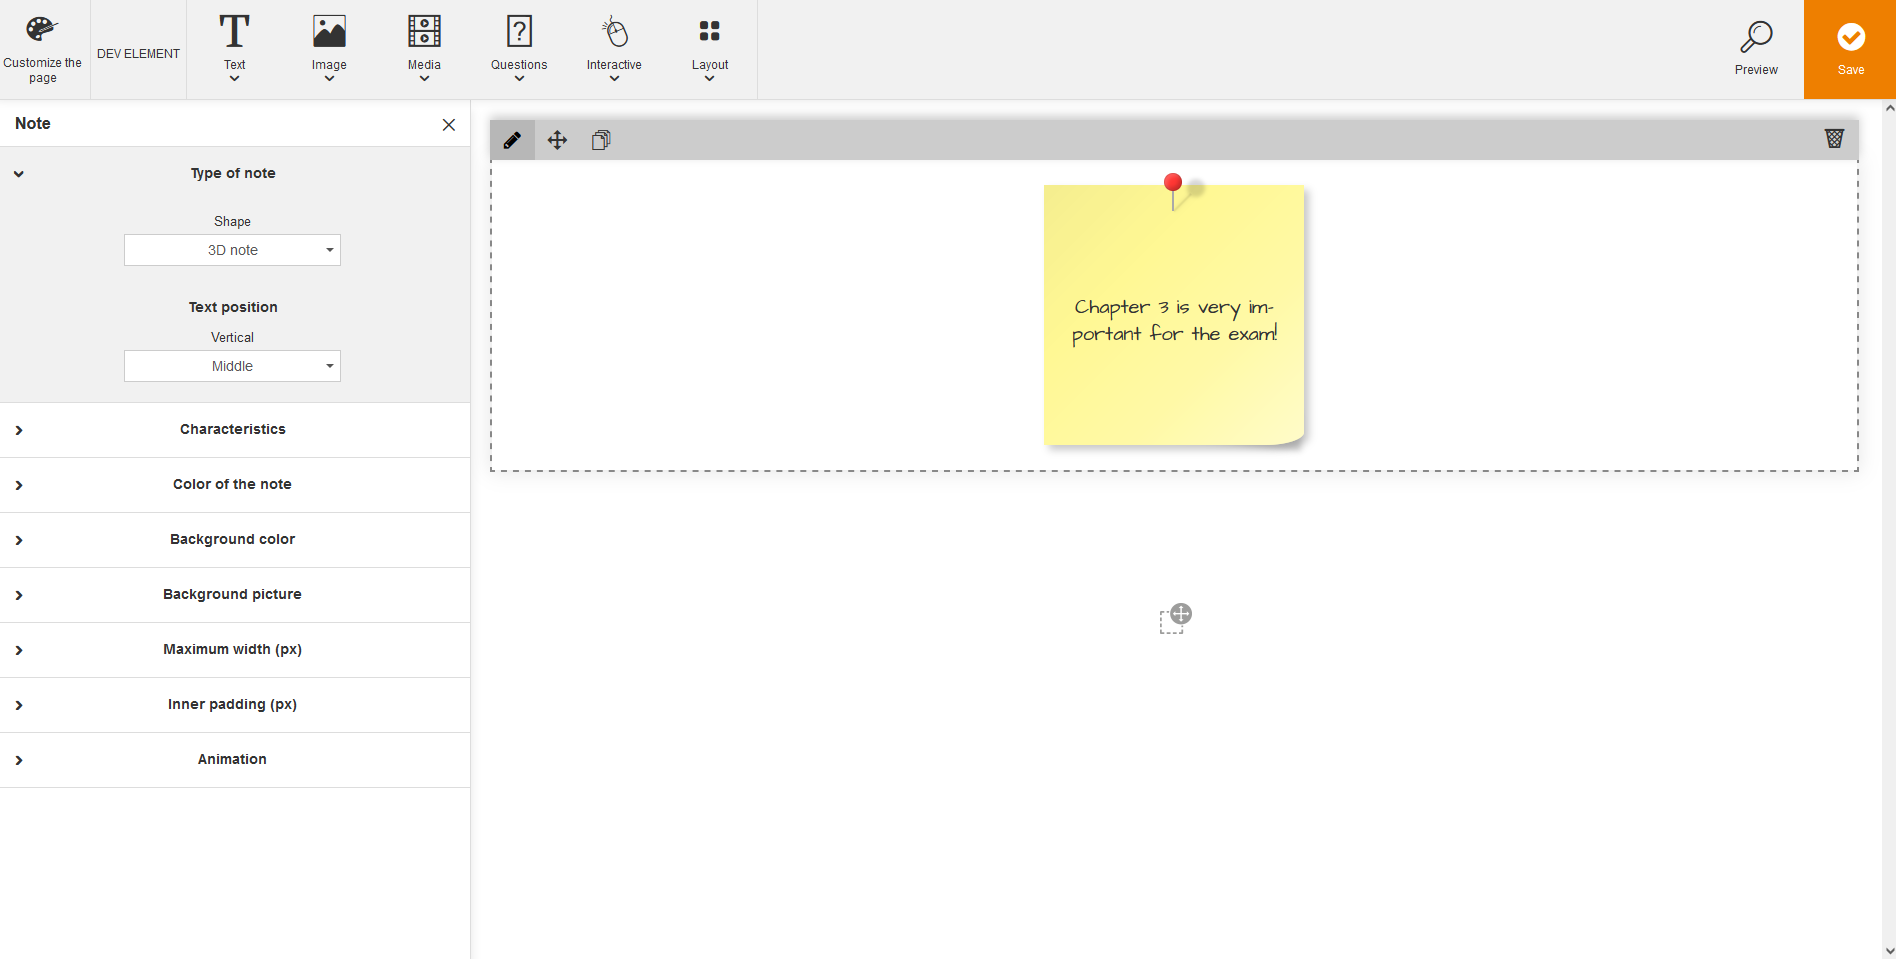
To insert a note, click on the menu item Note and drag it via drag and drop on your favored place or you click on the menu item Note.
To configure a note, click on the Pencil of the dialog window of the note and the left editing window opens.
Left editing window
To change the type of the note, click on the arrow on the left side besides Type of the note and select the shape (3D note, Square, Rectangle or Index cards) and the Text position vertical (Top, Middle or Bottom).
To change the characteristics of the note, click on the arrow on the left side besides Characteristics and select between Random rotation, Hover animation and/or Pin. You can select via Color Picker by selecting the basic color of the pin via the vertical bar and then selecting the color in the field on the left side
To change the color of the note, click on the arrow on the left side besides Color of the note. You can select via Color Picker by selecting the basic color and then selecting the background color and the frame color in the field on the left side. Alternatively you enter directly a hexadecimal value.
To change the background color of the note, click on the arrow besides Background color. You can select via Color Picker by selecting the basic color via the vertical bar and then selecting the background color in the field on the left side. Alternatively you enter directly a hexadecimal value. Via a slider bar you can define the Opacity in percentage.
To change the background picture of the note, click on the arrow on the left side besides Background picture and click on the button Select picture. You can select under Scroll effect Fixed, Fill out, Adjust or Repeat. Furthermore you can remove the picture again via the button Remove picture. Furthermore you can move the the picture selection via the navigation arrow or/and you can Center per click. Additionally you can remove the picture via the button Remove picture.
To change the maximum width (px) of the note, click on the arrow besides Maximum width (px) and enter the width (px) via the arrow buttons. Futhermore you can choose the alignment (Left, Centered or Right) and if Full width should be set. Via the alignment Centered you can change from a value 1150 downwards to Left or Right.
To enter the inner padding in pixels of the note above or below, click on the arrow besides Inner padding (PX) and select the appropriate values.
To configure an animation for the note, for example Fade in, Zoom in, Fly in from the top, click on the arrow besides Animation and select the type and the duration. You can test all animations via the button Test all animations.
To define the conditional display for a note, click the tab Conditional display and select depending on the display size under Only show, if.. the option Desktop, Tablet or Smartphone under Is. You can add further rules for conditional display via clicking the button Further rule. Via Recycle bin you can remove the rules.
If you add a note Move on the End page of a knowledge test, you can additionally select, if it should be shown, when the knowledge test is Passed or Failed.
If you don’t define any rule for the conditional display, the note Move will always be shown to the user.
Right editing window
To change the font formatting of the text in the note, click directly into the placeholder text. The text editor opens. You can do the following changes: Paragraph styles, styles (block styles and inline styles), font, font size, text color, insert image, insert table, insert/remove numbered list, insert list, bold, italic, underline, strikethrough, subscript, superscript, align left, center, align right, justify, insert horizontal line, link instructional material, insert Anchor link, insert special character, insert variable, insert/edit/remove link and add media.
Via the appropriate icons you can move or duplicate the note.
You can remove the note if applicable via the button Remove.
Via this Image Move you can insert and configure pictures. You can insert and configure pictures for explaining content for example.
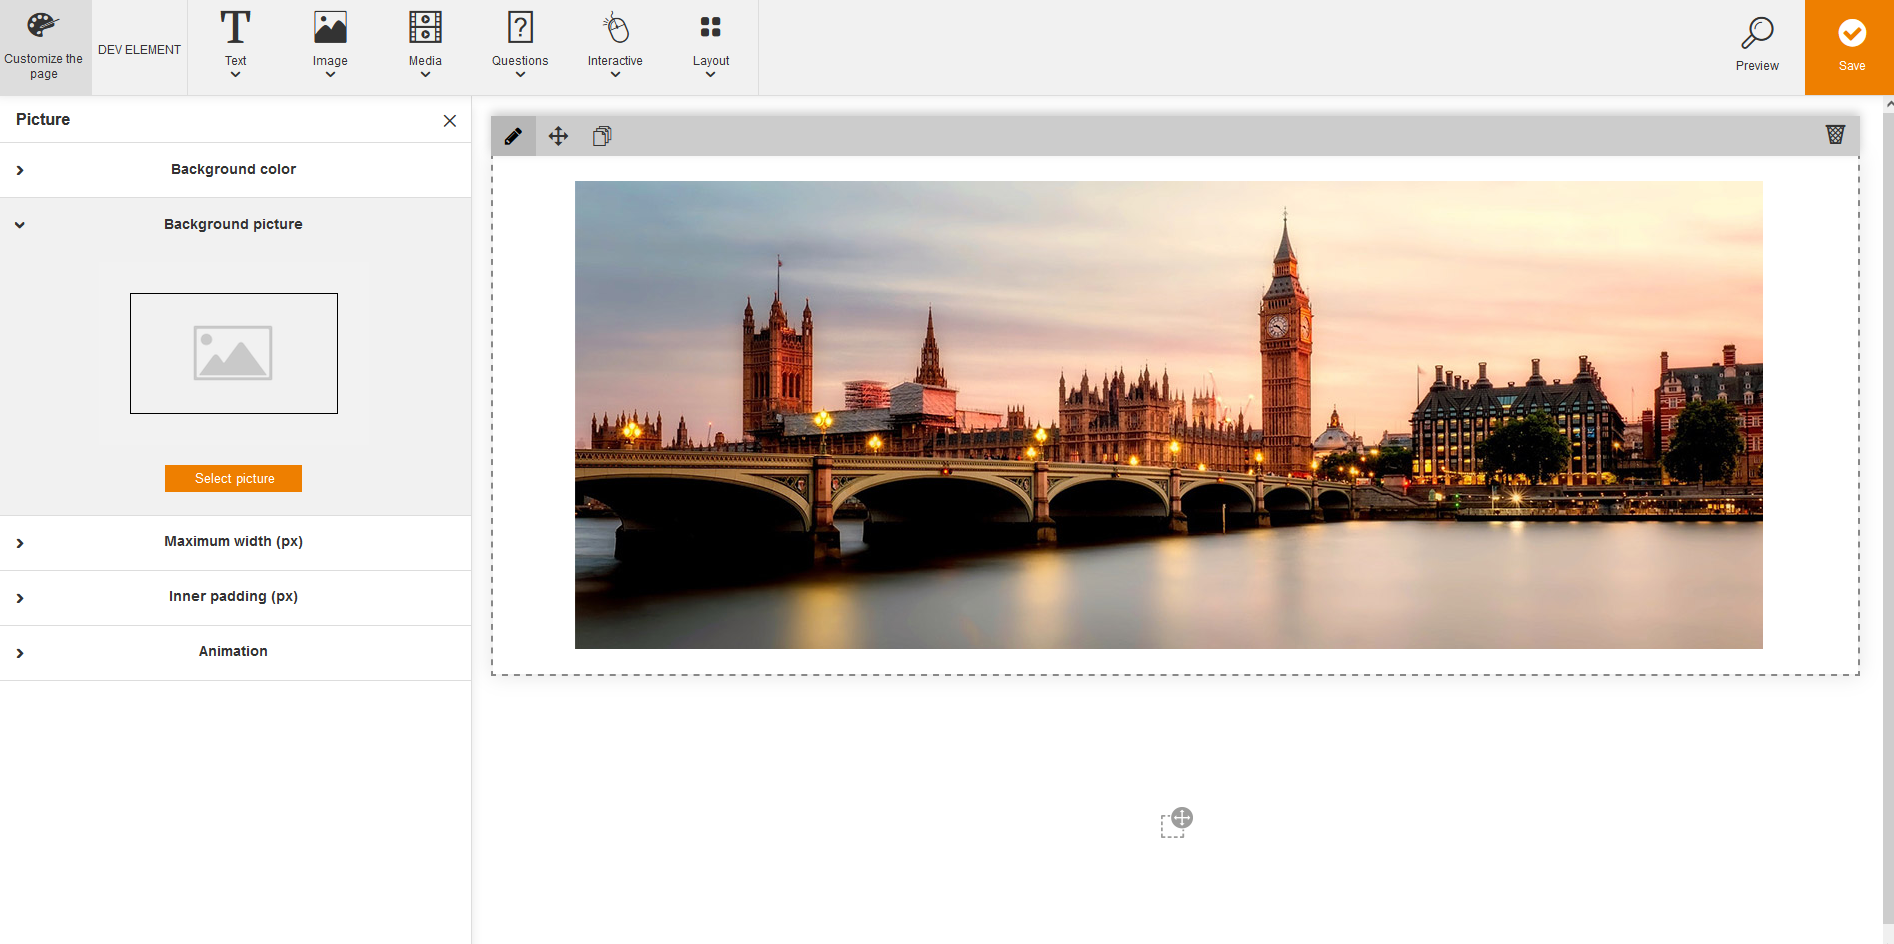
To insert a picture, click on the menu item Picture and drag it via drag and drop on your favored place or you click on the menu item Picture.
To configure a picture, click on the Pencil of the dialog window of the picture and the left editing window opens.
Left editing window
To change the background color of the picture, click on the arrow besides Background color. You can select via Color Picker by selecting the basic color via the vertical bar and then selecting the background color in the field on the left side. Alternatively you enter directly a hexadecimal value. Via a slider bar you can define the Opacity in percentage.
To change the background picture of the picture, click on the arrow on the left side besides Background picture and click on the button Select picture. You can select under Scroll effect Fixed, Fill out, Adjust or Repeat. Furthermore you can remove the picture again via the button Remove picture. Furthermore you can move the the picture selection via the navigation arrow or/and you can Center per click. Additionally you can remove the picture via the button Remove picture.
If you make a right click on the picture the dialog window with the Picture characteristics opens. If you want to exchange the URL you find it in the Avendoo® system as follows. You find the media ID under Learning content → Media. There you make a right click on the picture and choose Information. There you see the General information like the ID (medium) of your picture. Copy this ID and insert it into the favored place.
To change the maximum width (px) of the picture, click on the arrow besides Maximum width (px) and enter the width (px) via the arrow buttons. Futhermore you can choose the alignment (Left, Centered or Right) and if Full width should be set. Via the alignment Centered you can change from a value 1150 downwards to Left or Right.
To enter the inner padding in pixels for the picture above or below, click on the arrow besides Inner padding (PX) and select the appropriate values.
To configure an animation for the picture, for example Fade in, Zoom in, Fly in from the top, click on the arrow besides Animation and select the type and the duration. You can test all animations via the button Test all animations.
To define the conditional display for a picture, click the tab Conditional display and select depending on the display size under Only show, if.. the option Desktop, Tablet or Smartphone under Is. You can add further rules for conditional display via clicking the button Further rule. Via Recycle bin you can remove the rules.
If you add a picture Move on the End page of a knowledge test, you can additionally select, if it should be shown, when the knowledge test is Passed or Failed.
If you don’t define any rule for the conditional display, the picture Move will always be shown to the user.
Right editing window
You can move the picture via the button Move.
You can duplicate the picture via the button Duplicate and you can remove the duplicate via the button Remove if applicable.
To shrink or enlarge the picture, click with pressed left mouse button on the blue rectangle down right and drag as long as you have reached the favored size.
You can remove the picture if applicable via the button Remove.
Via this Image Move you can insert and configure panoramas. You can insert and configure a photograph, which is important for the text or a visual divider for example.
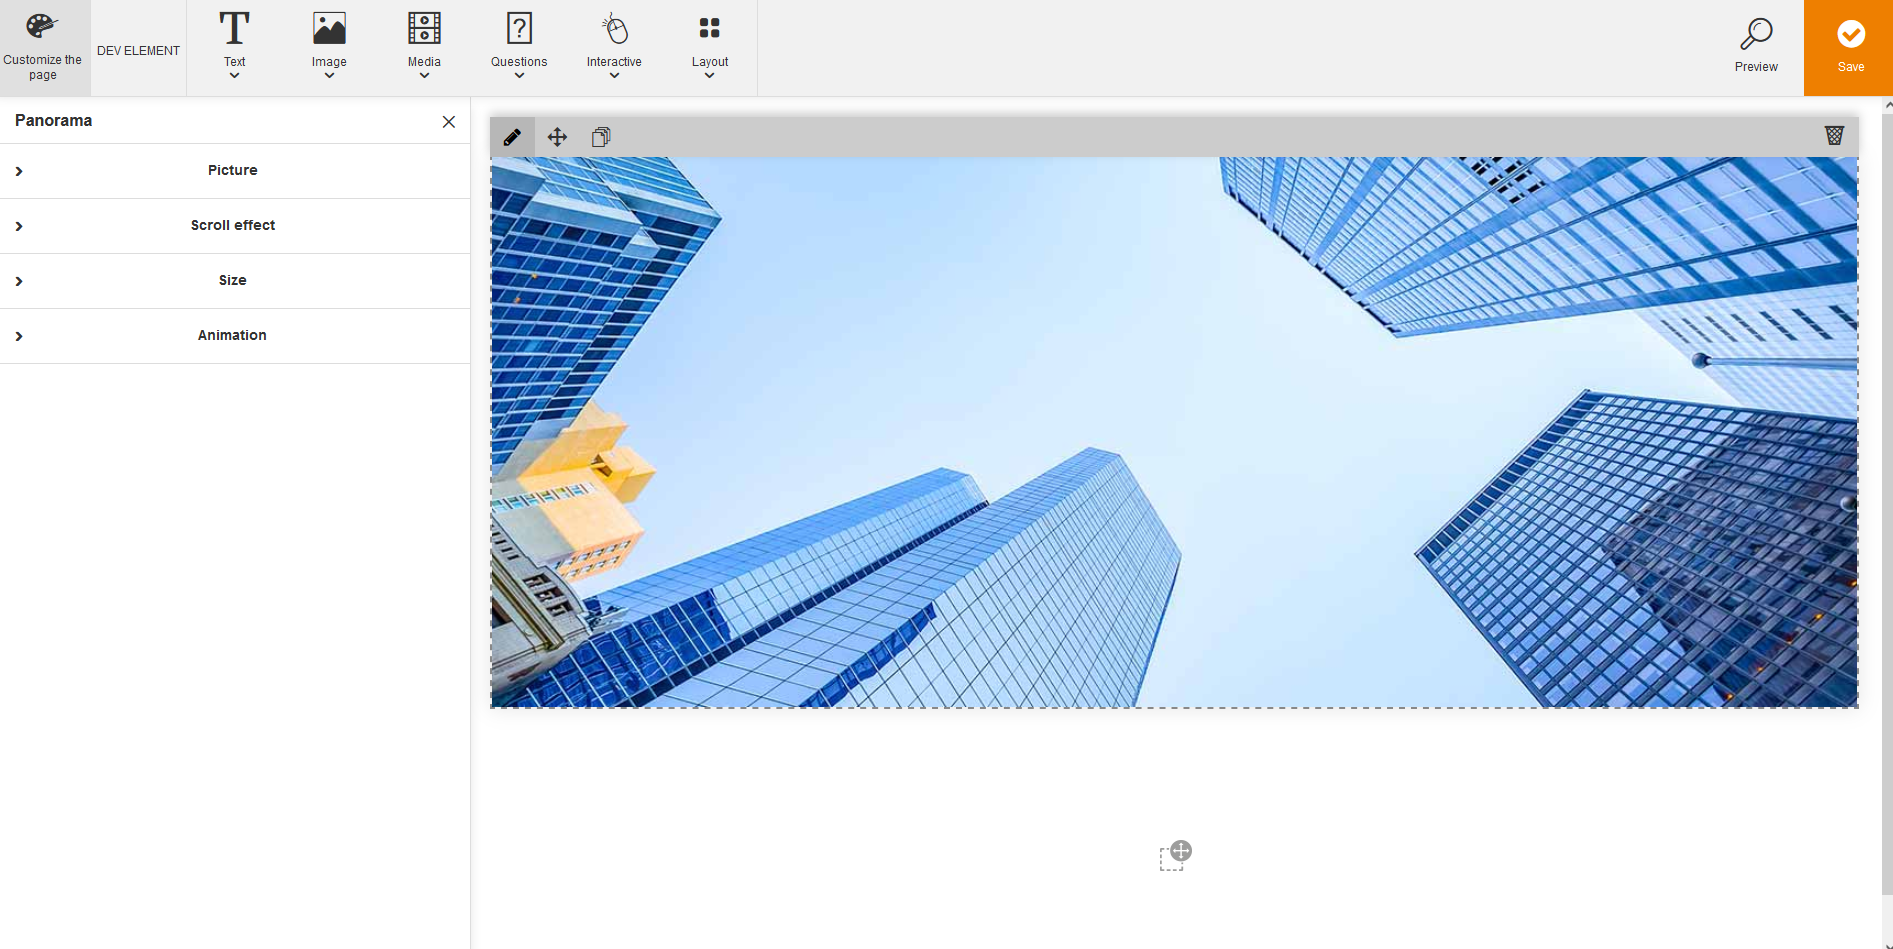
To insert a panorama, click on the menu item Panorama and drag it via drag and drop on your favored place or you click on the menu item Panorama.
To configure a panorama, click on the Pencil of the dialog window of the picture and the left editing window opens.
Left editing window
To select or change the panorama picture, click on the arrow on the left side besides Picture and then on the button Select picture.
To edit the scroll effect of the panorama, click on the arrow on the left side besides Scroll effect and select then, if the Parallax effect should be activated. Yes=Picture is frozen if you scroll
To configure the height of the panorama in pixels, click on the arrow on the left side besides Size and enter then the height (px) via the up and down arrows.
To configure an animation for the panorama, for example Fade in, Zoom in, Fly in from the top, click on the arrow besides Animation and select the type and the duration. You can test all animations via the button Test all animations.
To define the conditional display for a panorama, click the tab Conditional display and select depending on the display size under Only show, if.. the option Desktop, Tablet or Smartphone under Is. You can add further rules for conditional display via clicking the button Further rule. Via Recycle bin you can remove the rules.
If you add a panorama Move on the End page of a knowledge test, you can additionally select, if it should be shown, when the knowledge test is Passed or Failed.
If you don’t define any rule for the conditional display, the panorama Move will always be shown to the user.
Right editing window
You can move the panaroma via the button Move.
You can duplicate the panorama via the button Duplicate and you can remove the duplicate if applicable via the button Remove.
You can remove the panorama if applicable via the button Remove.
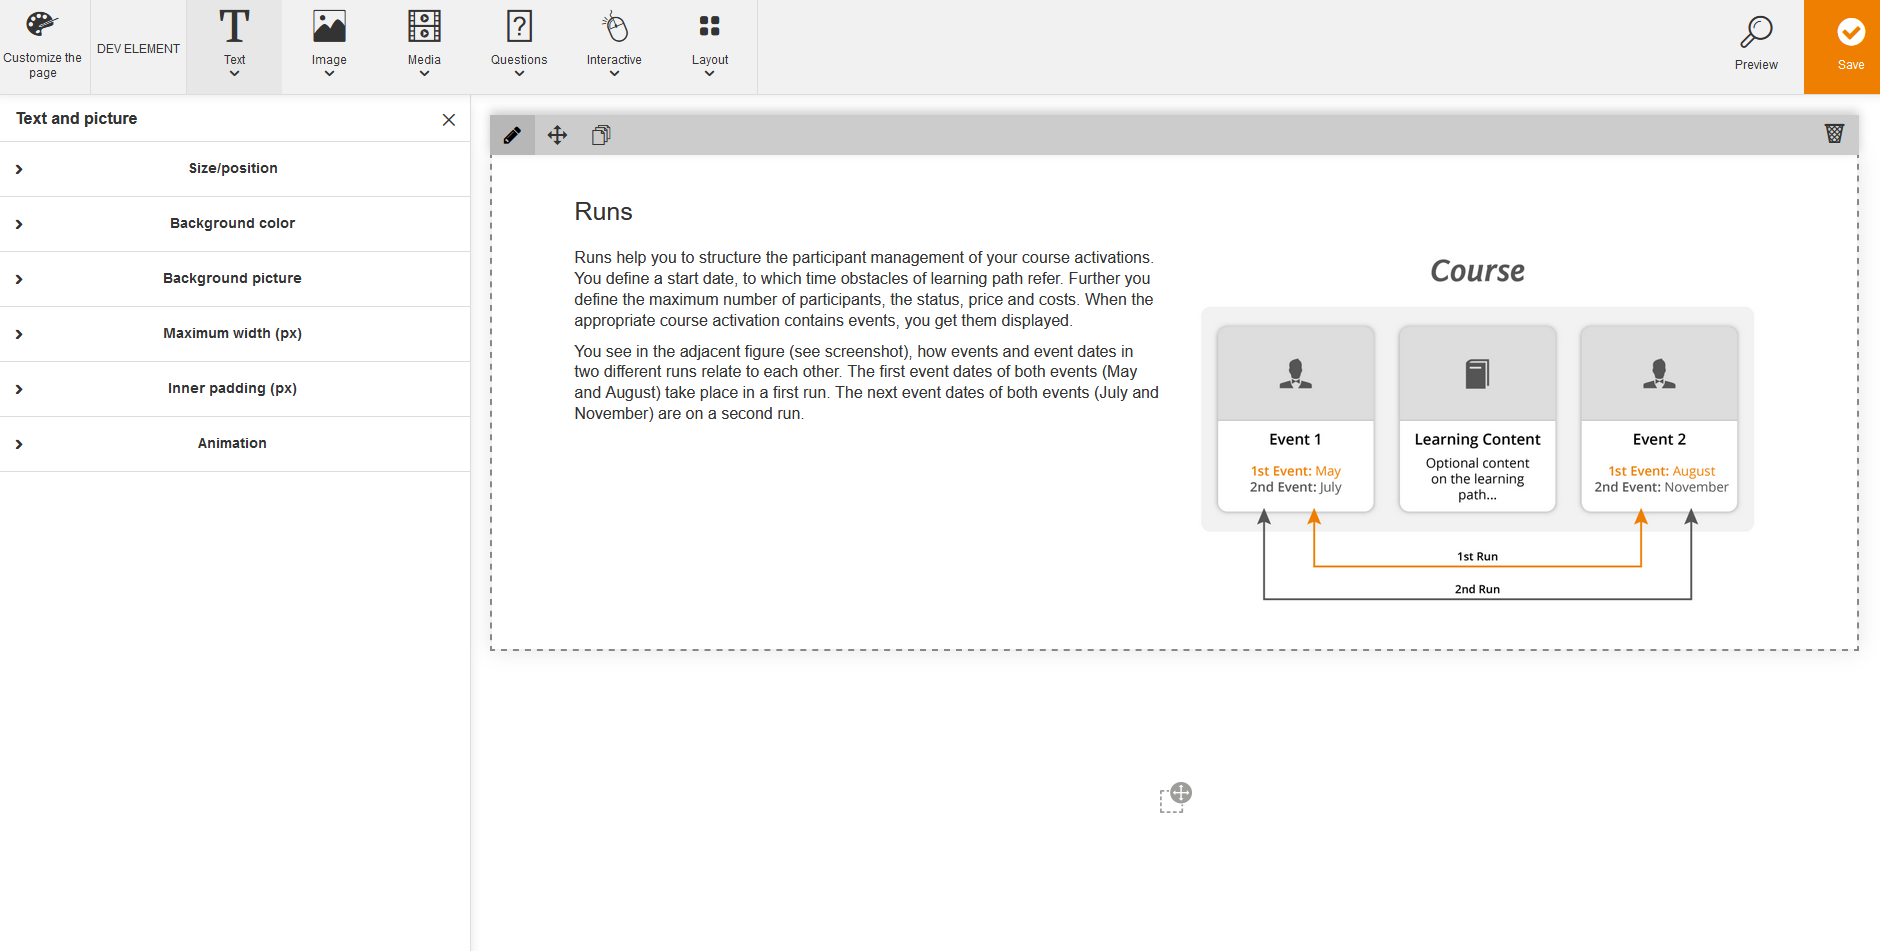
Via this Image Move you can insert and configure pictures with title and text. You can insert and configure a step-by-step procedure for example. Thus logical pictures for showing relations, processes and complex content play an important role.
To insert a picture with title and text, click on the menu item Text and picture and drag it via drag and drop on your favored place or you click on the menu item Text and picture.
To configure a picture with title and text, click on the Pencil of the dialog window and the left editing window opens.
Left editing window
To configure the text size and picture size or/and arrangement, click on the arrow besides Size/Position and select then the favored text and picture size, for example: Picture of the same size, or/and click on the button Swap picture and text.
To change the background color of the text and the picture, click on the arrow besides Background color. You can select via Color Picker by selecting the basic color via the vertical bar and then selecting the background color in the field on the left side. Alternatively you can enter directly a hexadecimal value. Via a slider bar you can define the Opacity in percentage.
To change the background picture of the text and the picture, click on the arrow on the left side besides Background picture and click on the button Select picture. You can select under Scroll effect Fixed, Fill out, Adjust or Repeat. Furthermore you can remove the picture again via the button Remove picture. Furthermore you can move the the picture selection via the navigation arrow or/and you can Center per click. Additionally you can remove the picture via the button Remove picture.
To change the maximum width (px) of the text and the picture, click on the arrow besides Maximum width (px) and enter the width (px) via the arrow buttons. Futhermore you can choose the alignment (Left, Centered or Right) and if Full width should be set. Via the alignment Centered you can change from a value 1150 downwards to Left or Right.
To enter the inner padding in pixels for the text and the picture above or below, click on the arrow besides Inner padding (PX) and select the appropriate values.
To configure an animation for the text, for example Fade in, Zoom in, Fly in from the top, click on the arrow Animation and select the type and the duration. You can test all animations via the button Test all animations.
To define the conditional display for text and picture, click the tab Conditional display and select depending on the display size under Only show, if.. the option Desktop, Tablet or Smartphone under Is. You can add further rules for conditional display via clicking the button Further rule. Via Recycle bin you can remove the rules.
If you add a text and picture Move on the End page of a knowledge test, you can additionally select, if it should be shown, when the knowledge test is Passed or Failed.
If you don’t define any rule for the conditional display, the text and picture Move will always be shown to the user.
Right editing window
To upload the picture, click on the placeholder image, then on the button Browse Server and then select the appropriate picture. Further you can enter an alternative text, you can change the width, the height, the border and you can select an alignment or set the check mark Captioned image.
To change the font formatting of the text, click directly into the placeholder text. The text editor opens. You can do the following changes: Paragraph styles, styles (block styles and inline styles), font, font size, text color, insert image, insert table, insert/remove numbered list, insert list, bold, italic, underline, strikethrough, subscript, superscript, align left, center, align right, justify, insert horizontal line, link instructional material, insert Anchor link, insert special character, insert variable, insert/edit/remove link and add media.
You can remove the picture with title and text if applicable via the button Remove.
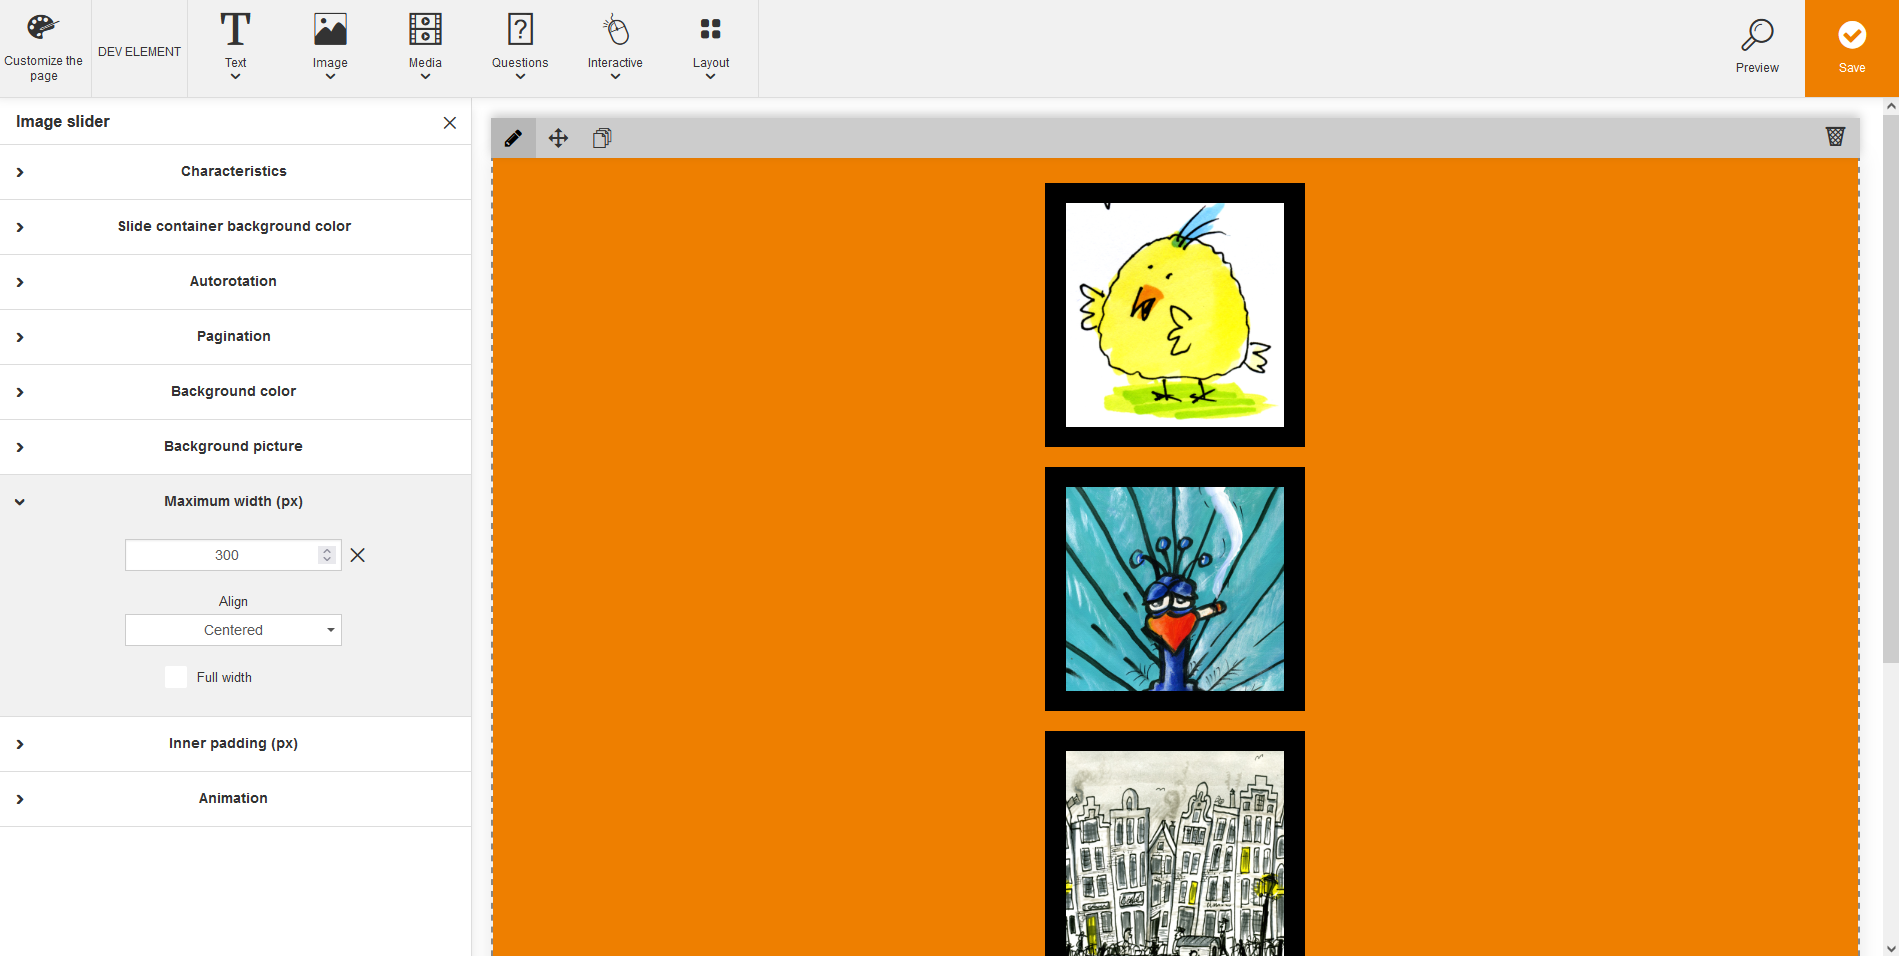
Via this Image Move you can insert and configure an image slider. You can insert and configure a slide show, a step-by-step instruction or quotes for example.
To insert an image slider, click on the menu item Image slider and drag it via drag and drop on your favored place or you click on the menu item Image slider.
To configure the image slider, click on the Pencil of the dialog window and the left editing window opens.
Left editing window
To select the characteristics of the image slider, click on the arrow on the left side besides Characteristics and select between Loop and Fade effect.
To select the background color of the slide container, click on the arrow on the left side besides Slide container background color. You can select via Color Picker by selecting the basic color via the vertical bar and then selecting the background color in the field on the left side. Alternatively you enter directly a hexadecimal value. Via a slider bar you can define the Opacity in percentage.
To select the autorotation of the image slider, click on the arrow on the left side besides Autorotation and select if applicable Yes and then the duration via the slider (from 1 second to 10 seconds).
To select the pagination of the image slider, click on the arrow on the left side besides Pagination and select under the Type Bullets, Numbers or Progress bar.
To change the background picture of the image slider, click on the arrow on the left side besides Background picture and click on the button Select picture. You can select under Scroll effect Fixed, Fill out, Adjust or Repeat. Furthermore you can remove the picture again via the button Remove picture. Furthermore you can move the the picture selection via the navigation arrow or/and you can Center per click. Additionally you can remove the picture via the button Remove picture.
To change the maximum width (px) of the image slider, click on the arrow besides Maximum width (px) and enter the width (px) via the arrow buttons. Futhermore you can choose the alignment (Left, Centered or Right) and if Full width should be set. Via the alignment Centered you can change from a value 1150 downwards to Left or Right.
To enter the inner padding in pixels for the image slider, click on the tab Inner padding (PX) and select the appropriate values.
To configure an animation for the image slider, for example Fade in, Zoom in, Fly in from the top, click on the tab Animation and select the type and the duration. You can test all animations via the button Test all animations.
To define the conditional display for an image slider, click the tab Conditional display and select depending on the display size under Only show, if.. the option Desktop, Tablet or Smartphone under Is. You can add further rules for conditional display via clicking the button Further rule. Via Recycle bin you can remove the rules.
If you add an image slider Move on the End page of a knowledge test, you can additionally select, if it should be shown, when the knowledge test is Passed or Failed.
If you don’t define any rule for the conditional display, the image slider Move will always be shown to the user.
Right editing window
If you have inserted the image slider (3 images, one below the other), you can remove an image via the recycle bin in the upper right corner of the image and you can insert an image via the + below the last image. You can duplicate the image slider via Duplicate in the upper left corner of the editing window.
If you first click on the icon Move in the upper left corner of the appropriate image and then on the icon Image, you can edit the Image Properties (URL, Alternative Text, Width, Height, Alignment, Captioned image).
Via this Image Move you can insert text (inclusive title) on a background picture and configure it. You can insert and configure texts full of atmosphere for example.

To insert a text with title on a background picture, click on the menu item Text on background and drag it via drag and drop on your favored place or you click on the menu item Text on background.
To configure a text with title on a background picture, click on the Pencil of the dialog window and the left editing window opens.
Left editing window
To change the background color of the text on background, click on the arrow besides Background color. You can select via Color Picker by selecting the basic color via the vertical bar and then selecting the background color in the field on the left side. Alternatively you can enter directly a hexadecimal value. Via a slider bar you can define the Opacity in percentage.
To change the background picture of the text on background, click on the arrow on the left side besides Background picture and click on the button Select picture. You can select under Scroll effect Fixed, Fill out, Adjust or Repeat. Furthermore you can remove the picture again via the button Remove picture. Furthermore you can move the the picture selection via the navigation arrow or/and you can Center per click. Additionally you can remove the picture via the button Remove picture.
To change the maximum width (px) of the text on background, click on the arrow besides Maximum width (px) and enter the width (px) via the arrow buttons. Futhermore you can choose the alignment (Left, Centered or Right) and if Full width should be set. Via the alignment Centered you can change from a value 1150 downwards to Left or Right.
To enter the inner padding in pixels of the text on background above or below, click on the tab Inner padding (PX) and select the appropriate values.
To configure an animation for the text, for example Fade in, Zoom in, Fly in from the top, click on the tab Animation and select the type and the duration. You can test all animations via the button Test all animations.
To define the conditional display for text on background, click the tab Conditional display and select depending on the display size under Only show, if.. the option Desktop, Tablet or Smartphone under Is. You can add further rules for conditional display via clicking the button Further rule. Via Recycle bin you can remove the rules.
If you add a text on background Move on the End page of a knowledge test, you can additionally select, if it should be shown, when the knowledge test is Passed or Failed.
If you don’t define any rule for the conditional display, the text on background Move will always be shown to the user.
Right editing window
To change the font formatting of the title and the text, click directly into the placeholder text. The text editor opens. You can do the following changes: Paragraph styles, styles (block styles and inline styles), font, font size, text color, insert image, insert table, insert/remove numbered list, insert list, bold, italic, underline, strikethrough, subscript, superscript, align left, center, align right, justify, insert horizontal line, link instructional material, insert Anchor link, insert special character, insert variable, insert/edit/remove link and add media.
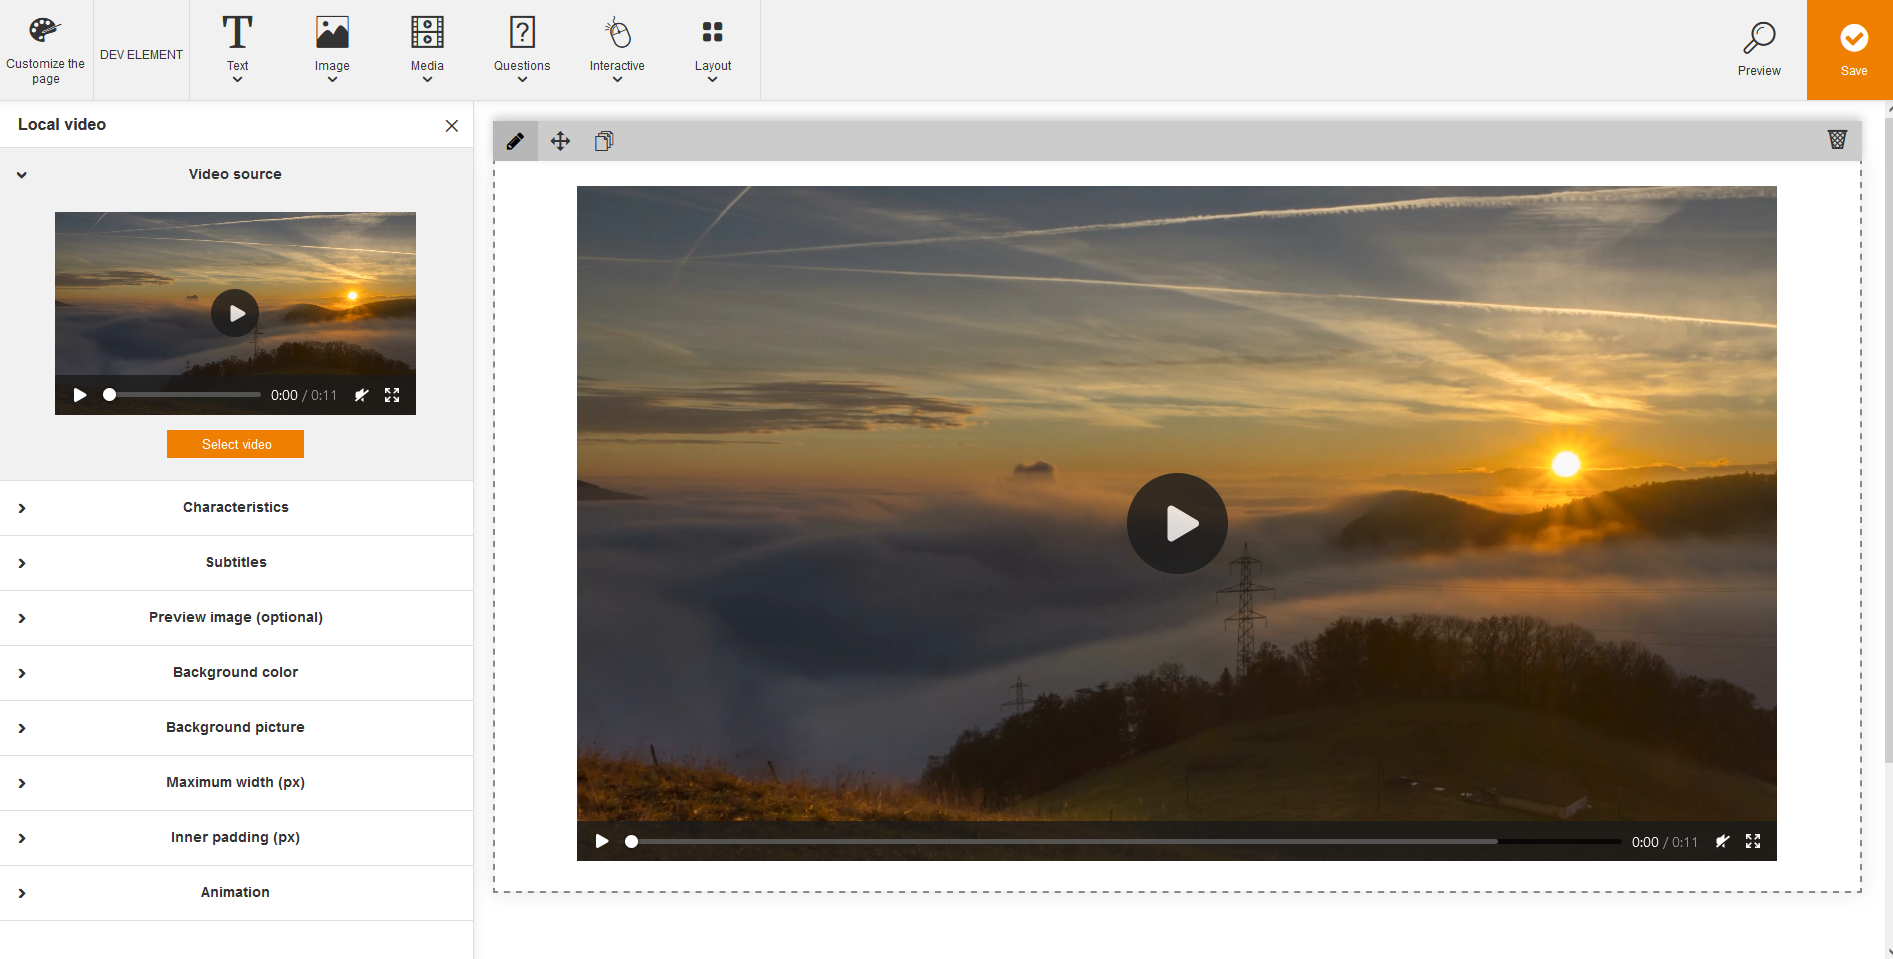
Via this Media Move you can insert local videos and configure them. You can insert and configure an own product video, an explanation of processes and sequences, learning by watching, behavioral training and motion sequences for example.
To insert a local video, click on the menu item Local video and drag it via drag and drop on your favored place or you click on the menu item Local video.
To edit the local video, click on the Pencil of the dialog window of the local video and the left editing window opens.
Left editing window
To change the video source, click on the arrow besides Video source and click on the button Select video.
To change the characteristics of the local video, click on the arrow besides Characteristics and do the appropriate changes by setting a check mark at Play in loop or Autoplay. Note that Autoplay is not supported by all browsers and depends on user settings.
To insert a subtitle of the local video, click on the arrow besides Subtitles and select the appropriate subtitle language. A dialog window opens to select the media in the appropriate subtitle language.
Only subtitles in the format “.VTT” are supported.
You can add a subtitle per subtitle language.
To insert an optional preview image of the local video, click on the arrow besides Preview image (optional) and select the appropriate picture. You can remove the picture if applicable via the button Remove picture.
To change the background color of the local video, click on the arrow besides Background color. You can select via Color Picker by selecting the basic color via the vertical bar and then selecting the background color in the field on the left side. Alternatively you can enter directly a hexadecimal value. Via a slider bar you can define the Opacity in percentage.
To change the background picture of the local video, click on the arrow on the left side besides Background picture and click on the button Select picture. You can select under Scroll effect Fixed, Fill out, Adjust or Repeat. Furthermore you can remove the picture again via the button Remove picture. Furthermore you can move the the picture selection via the navigation arrow or/and you can Center per click. Additionally you can remove the picture via the button Remove picture.
To change the maximum width (px) of the local video, click on the arrow besides Maximum width (px) and enter the width (px) via the arrow buttons. Futhermore you can choose the alignment (Left, Centered or Right) and if Full width should be set. Via the alignment Centered you can change from a value 1150 downwards to Left or Right.
To enter the inner padding in pixels for the local video above or below, click on the arrow besides Inner padding (PX) and select the appropriate values.
To configure an animation for the local video, for example Fade in, Zoom in, Fly in from the top, click on the arrow besides Animation and select the type and the duration. You can test all animations via the button Test all animations.
To define the conditional display for a local video, click the tab Conditional display and select depending on the display size under Only show, if.. the option Desktop, Tablet or Smartphone under Is. You can add further rules for conditional display via clicking the button Further rule. Via Recycle bin you can remove the rules.
If you add a local video Move on the End page of a knowledge test, you can additionally select, if it should be shown, when the knowledge test is Passed or Failed.
If you don’t define any rule for the conditional display, the local video Move will always be shown to the user.
Right editing window
You can play the local video.
You can remove the local video if applicable via the button Remove.
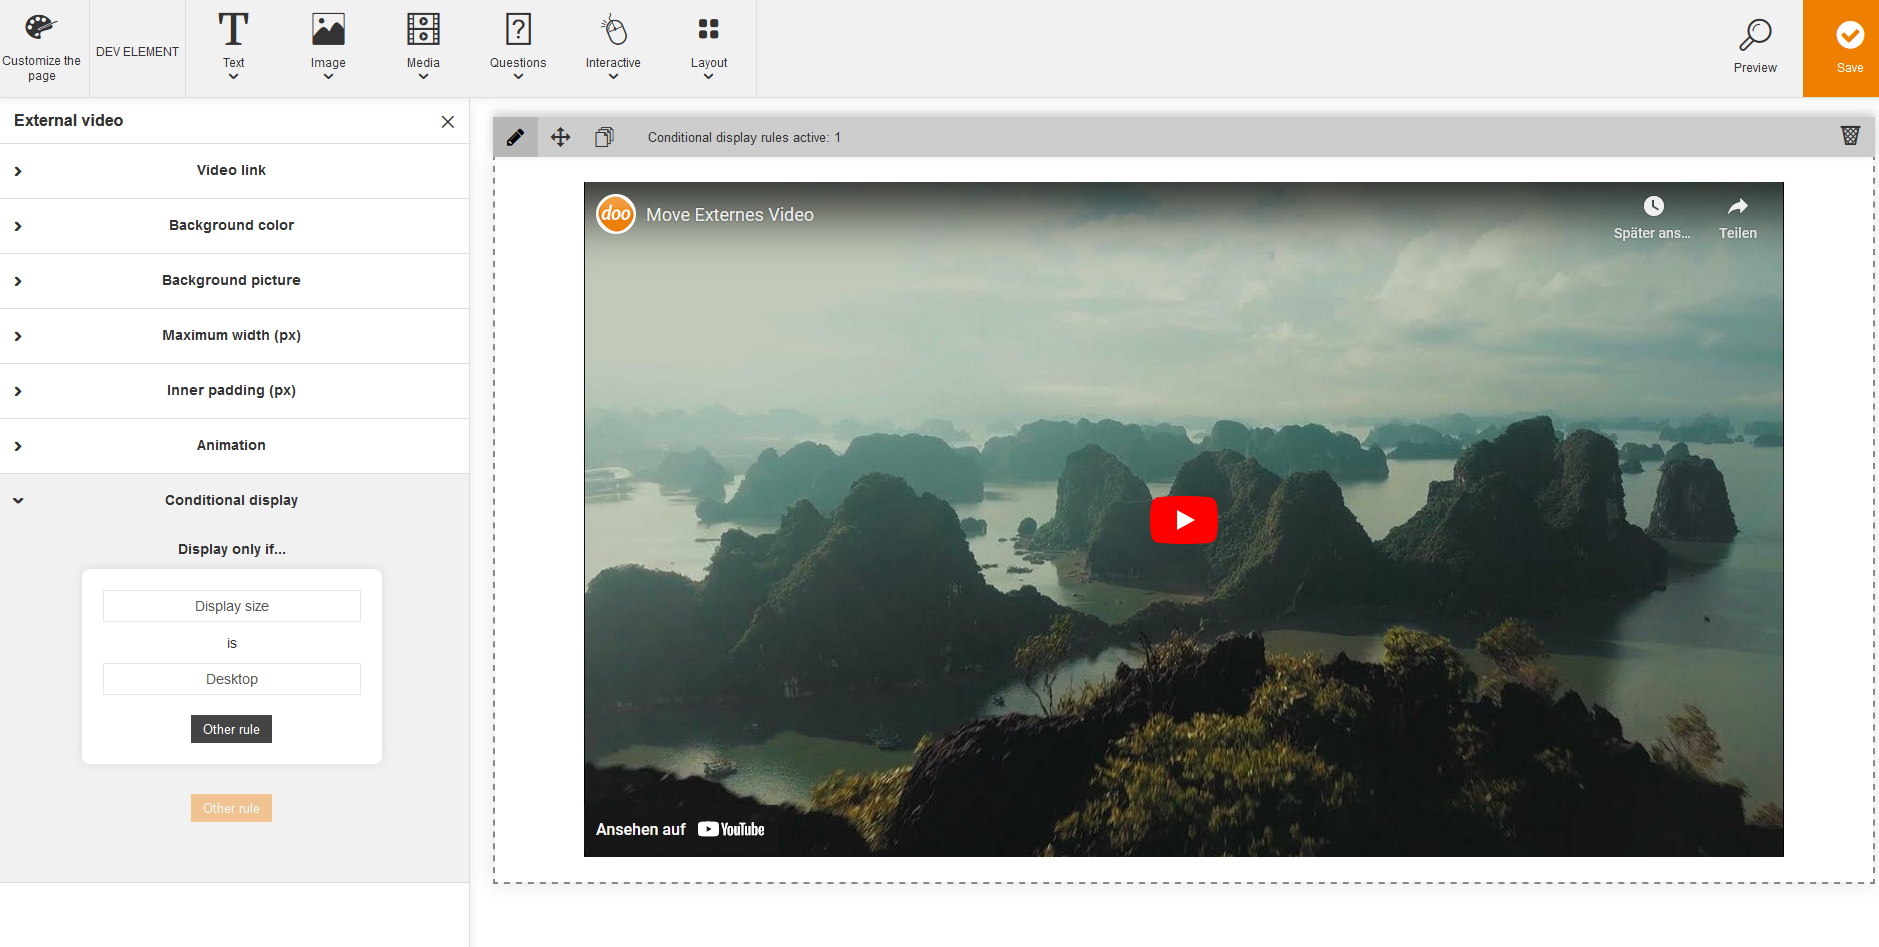
Via this Media Move you can insert external videos and configure them. You can insert and configure a YouTube video for example. The default is a neutral license-free video.
To insert an external video, click on the menu item External video and drag it via drag and drop on your favored place or you click on the menu item External video.
To edit the external video, click on the Pencil of the dialog window of the local video and the left editing window opens.
Left editing window
To change the YouTube link, click on the arrow besides YouTube link, enter the YouTube link and click on the button Embed video. You can head for other platforms like Microsoft Streams or Vimeo besides YouTube. You should only insert the link for the video like you would share it.
To change the maximum width (px) of the external video, click on the arrow besides Maximum width (px) and enter the width (px) via the arrow buttons. Futhermore you can choose the alignment (Left, Centered or Right) and if Full width should be set. Via the alignment Centered you can change from a value 1150 downwards to Left or Right.
To change the background color of the external video, click on the arrow besides Background color. You can select via Color Picker by selecting the basic color via the vertical bar and then selecting the background color in the field on the left side. Alternatively you can enter directly a hexadecimal value. Via a slider bar you can define the Opacity in percentage.
To change the background picture of the external video, click on the arrow on the left side besides Background picture and click on the button Select picture. You can select under Scroll effect Fixed, Fill out, Adjust or Repeat. Furthermore you can remove the picture again via the button Remove picture. Furthermore you can move the the picture selection via the navigation arrow or/and you can Center per click. Additionally you can remove the picture via the button Remove picture.
To enter the inner padding in pixels for the external video above or below, click on the arrow besides Inner padding (PX) and select the appropriate values.
To configure an animation for the external video, for example Fade in, Zoom in, Fly in from the top, click on the arrow besides Animation and select the type and the duration. You can test all animations via the button Test all animations.
To define the conditional display for an external video, click the tab Conditional display and select depending on the display size under Only show, if.. the option Desktop, Tablet or Smartphone under Is. You can add further rules for conditional display via clicking the button Further rule. Via Recycle bin you can remove the rules.
If you add an external video Move on the End page of a knowledge test, you can additionally select, if it should be shown, when the knowledge test is Passed or Failed.
If you don’t define any rule for the conditional display, the external video Move will always be shown to the user.
Right editing window
You can play the external video.
You can remove the external video if applicable via the button Remove.
Via this Media Move you can insert audios and configure them. You can insert and configure
- a Welcome,
- a podcast of a dialog with inquiries to clear some comprehension questions,
- a little story to integrate storytelling in the learning environment,
- an interview of an expert or
- an audio comment regarding a complex chart
for example.
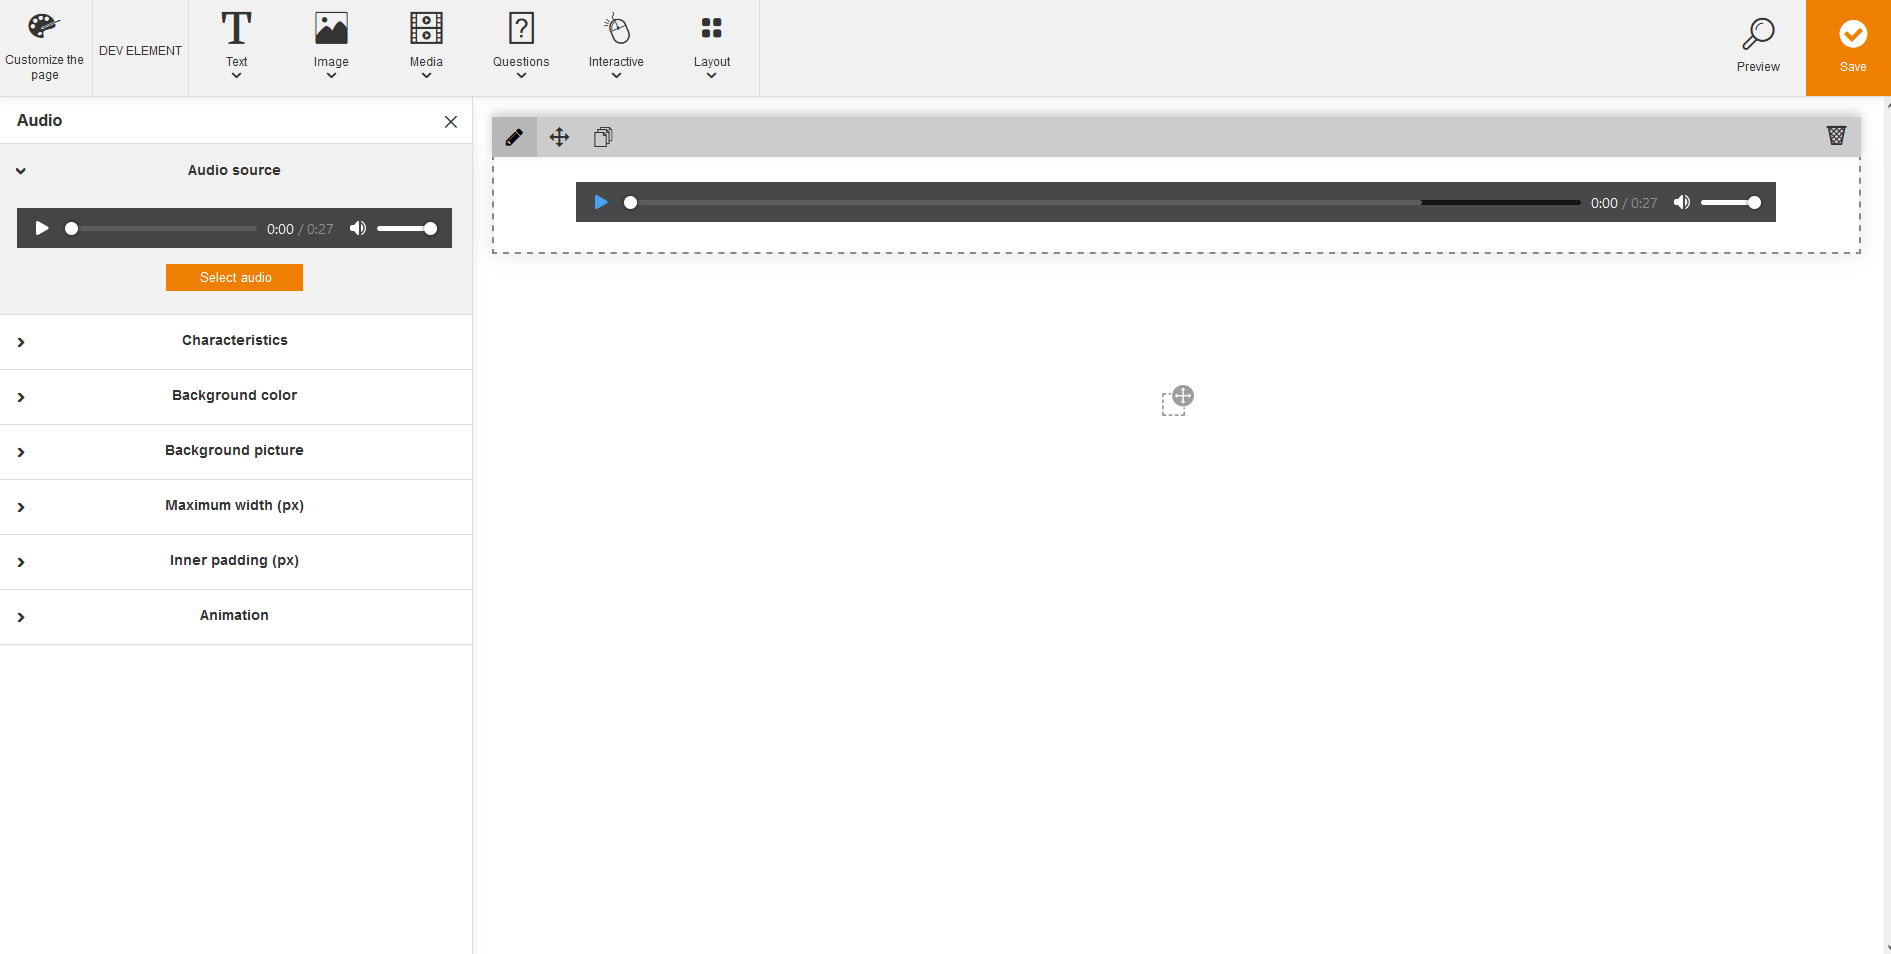
To insert an audio, click on the menu item Audio and drag it via drag and drop on your favored place or you click on the menu item Audio.
To edit the audio, click on the Pencil of the dialog window of the audio and the left editing window opens.
Left editing window
To change the audio source, click on the arrow besides Audio source and click on the button Select audio.
To change the characteristics of the audio, click on the arrow besides Characteristics and do the appropriate changes by setting a check mark at Play in loop or Autoplay. Note that Autoplay is not supported by all browsers and depends on user settings.
To change the background color of the audio, click on the arrow besides Background color. You can select via Color Picker by selecting the basic color via the vertical bar and then selecting the background color in the field on the left side. Alternatively you can enter directly a hexadecimal value. Via a slider bar you can define the Opacity in percentage.
To change the background picture of the audio, click on the arrow on the left side besides Background picture and click on the button Select picture. You can select under Scroll effect Fixed, Fill out, Adjust or Repeat. Furthermore you can remove the picture again via the button Remove picture. Furthermore you can move the the picture selection via the navigation arrow or/and you can Center per click. Additionally you can remove the picture via the button Remove picture.
To change the maximum width (px) of the audio, click on the arrow besides Maximum width (px) and enter the width (px) via the arrow buttons. Futhermore you can choose the alignment (Left, Centered or Right) and if Full width should be set. Via the alignment Centered you can change from a value 1150 downwards to Left or Right.
To enter the inner padding in pixels of the audio above or below, click on the arrow besides Inner padding (PX) and select the appropriate values.
To configure an animation for the audio, for example Fade in, Zoom in, Fly in from the top, click on the arrow besides Animation and select the type and the duration. You can test all animations via the button Test all animations.
To define the conditional display for an audio, click the tab Conditional display and select depending on the display size under Only show, if.. the option Desktop, Tablet or Smartphone under Is. You can add further rules for conditional display via clicking the button Further rule. Via Recycle bin you can remove the rules.
If you add an audio Move on the End page of a knowledge test, you can additionally select, if it should be shown, when the knowledge test is Passed or Failed.
If you don’t define any rule for the conditional display, the audio Move will always be shown to the user.
Right editing window
You can play the audio.
You can remove the audio if applicable via the button Remove.
Via this Media Move you can insert PDFs and configure them. You can insert and configure background information, which is integrated as document, for example.
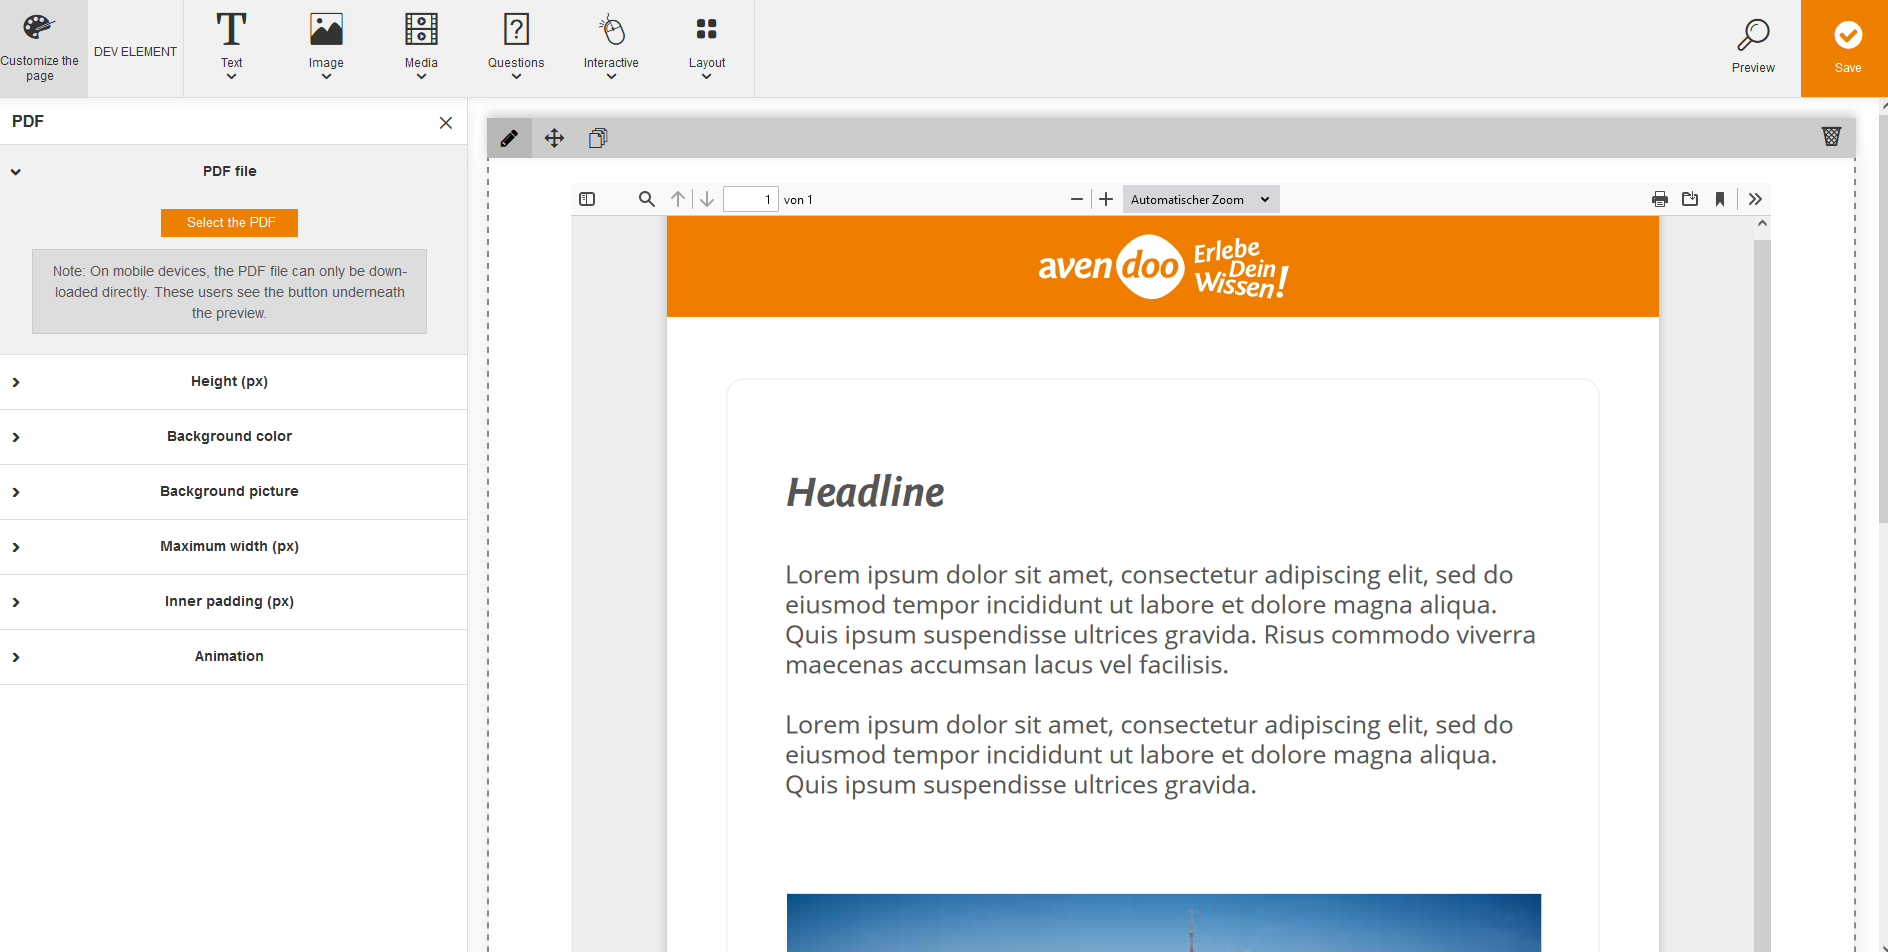
To insert a PDF, click on the menu item PDF and drag it via drag and drop on your favored place or you click on the menu item PDF.
To edit the PDF, click on the Pencil of the dialog window of the PDF and the left editing window opens.
Left editing window
To change the audio source, click on the arrow besides Audio source and click on the button Select audio.
To change the PDF file, click on the arrow besides PDF file and then on the button Select the PDF. Note that on mobile devices, the PDF file can only be downloaded directly. These users see the button underneath the preview.
To change the height of the PDF file, click on the arrow besides Height (px) and enter the height of the PDF file in pixel or click on the appropriate arrows for configuring the height in pixel.
To change the background color of the PDF file, click on the arrow besides Background color. You can select via Color Picker by selecting the basic color via the vertical bar and then selecting the background color in the field on the left side. Alternatively you can enter directly a hexadecimal value. Via a slider bar you can define the Opacity in percentage.
To change the background picture of the PDF file, click on the arrow on the left side besides Background picture and click on the button Select picture. You can select under Scroll effect Fixed, Fill out, Adjust or Repeat. Furthermore you can remove the picture again via the button Remove picture. Furthermore you can move the the picture selection via the navigation arrow or/and you can Center per click. Additionally you can remove the picture via the button Remove picture.
To change the maximum width (px) of the PDF file, click on the arrow besides Maximum width (px) and enter the width (px) via the arrow buttons. Futhermore you can choose the alignment (Left, Centered or Right) and if Full width should be set. Via the alignment Centered you can change from a value 1150 downwards to Left or Right.
To enter the inner padding in pixels of the PDF file above or below, click on the arrow besides Inner padding (PX) and select the appropriate values.
To configure an animation for the PDF file, for example Fade in, Zoom in, Fly in from the top, click on the arrow besides Animation and select the type and the duration. You can test all animations via the button Test all animations.
To define the conditional display for PDFs, click the tab Conditional display and select depending on the display size under Only show, if.. the option Desktop, Tablet or Smartphone under Is. You can add further rules for conditional display via clicking the button Further rule. Via Recycle bin you can remove the rules.
If you add a PDF Move on the End page of a knowledge test, you can additionally select, if it should be shown, when the knowledge test is Passed or Failed.
If you don’t define any rule for the conditional display, the PDF Move will always be shown to the user.
Right editing window
In the dialog window of the PDF file you can switch to the side bar, in which miniature views and the document structure as well as attachments and levels are shown. Furthermore you can search in the document, whereas you can activate Highlight all, Consider upper and lower case and/or Whole words. Also you can page forward and back in the document, zoom in and out, as well you can select Automatic zoom, Original size, Page size, Page width or the favored Percent by view. And you can print, save or select the current view of the document or you can select Tools like Horizontal handedness.
Finally you can move, duplicate or remove the PDF file if applicable via the button Remove.
Via this Question Move you can insert and configure single- or multiple-choice-questions. You can insert and configure a single- or multiple-choice-question for examination or learning by feedback for example. Thus the answer to this question is for knowledge transfer.
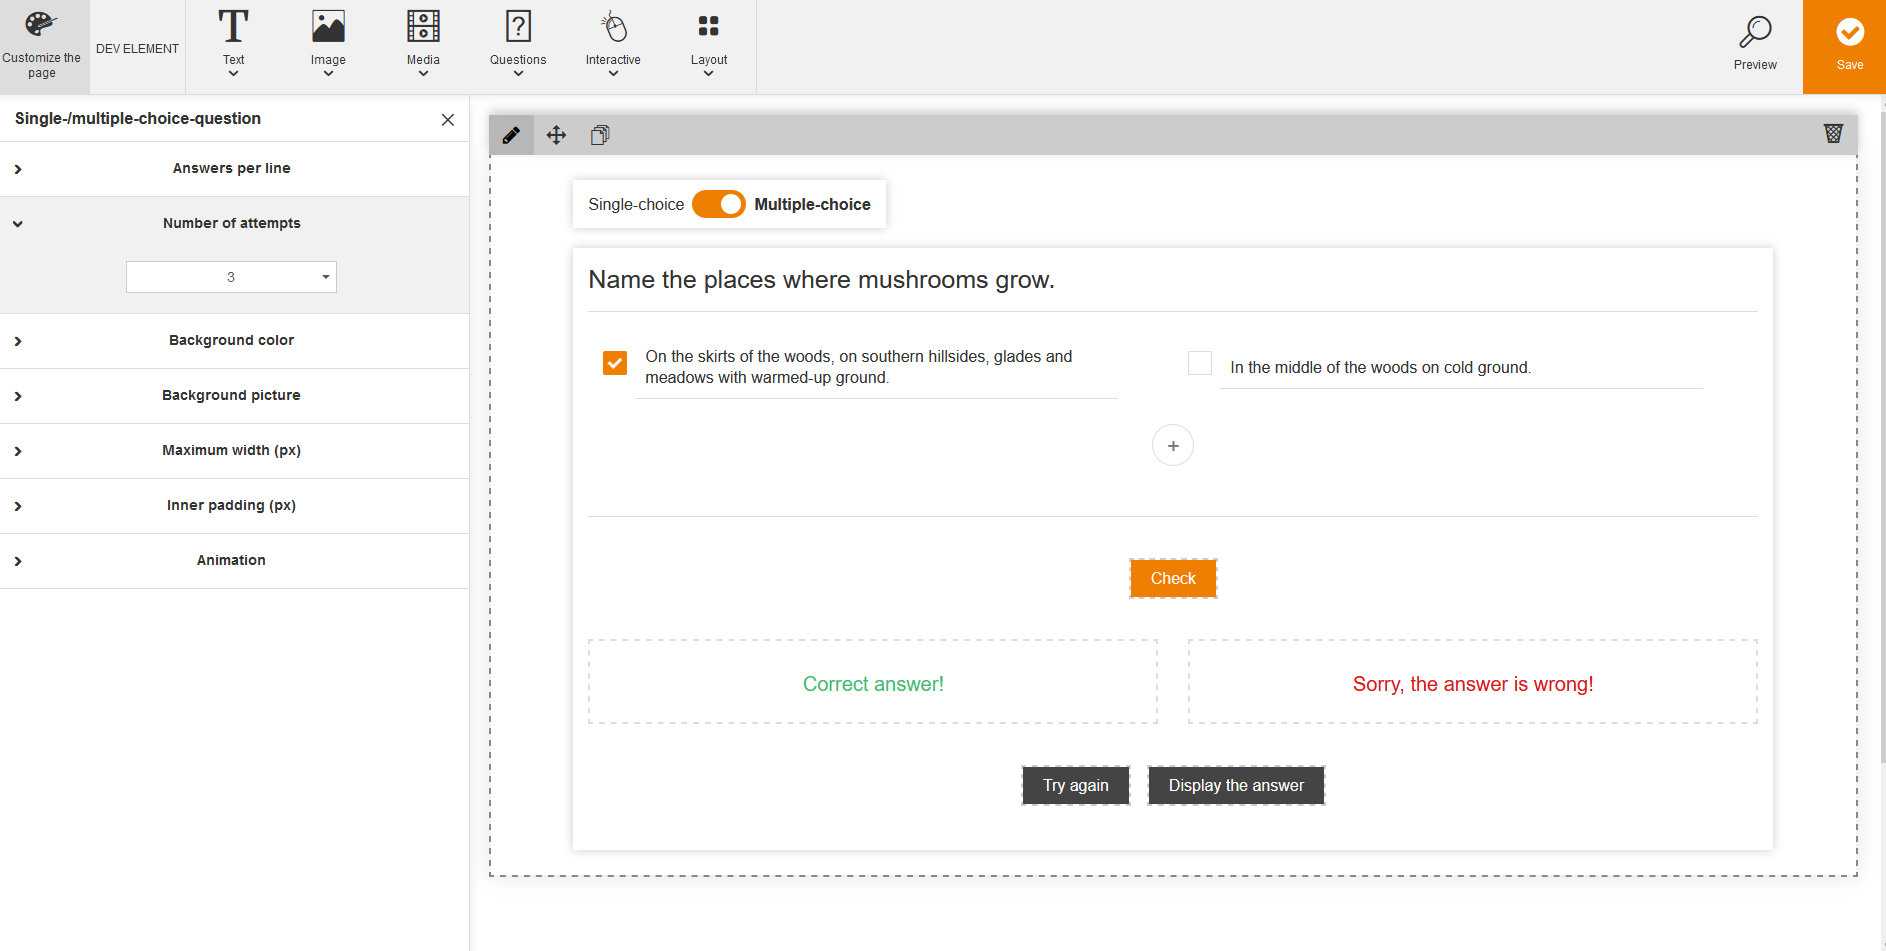
This Question Move is available since version 16.10.
To insert a single- or multiple-choice-question, click on the menu item Single-/multiple-choice-question and drag it via drag and drop on your favored place or you click on the menu item Single-/multiple-choice-question.
To configure a single- or multiple-choice-question, click on the Pencil of the dialog window of the single- or multiple-choice-question and the left editing window opens.
Left editing window
To change the answers per line, click on the arrow besides Answers per line and choose the favored answers per line.
To change the number of attempts, click on the arrow besides Number of attempts and choose the favored number of attempts.
To change the background color for the single- or multiple-choice-question, click on the arrow besides Background color. You can select via Color Picker by selecting the basic color via the vertical bar and then selecting the background color in the field on the left side. Alternatively you can enter directly a hexadecimal value. Via a slider bar you can define the Opacity in percentage.
To change the background picture for the single- or multiple-choice-question, click on the arrow on the left side besides Background picture and click on the button Select picture. You can select under Scroll effect Fixed, Fill out, Adjust or Repeat. Furthermore you can remove the picture again via the button Remove picture. Furthermore you can move the the picture selection via the navigation arrow or/and you can Center per click. Additionally you can remove the picture via the button Remove picture.
To change the maximum width (px) for the single- or multiple-choice-question, click on the arrow besides Maximum width (px) and enter the width (px) via the arrow buttons. Futhermore you can choose the alignment (Left, Centered or Right) and if Full width should be set. Via the alignment Centered you can change from a value 1150 downwards to Left or Right.
To enter the inner padding in pixels for the single- or multiple-choice-question above or below, click on the arrow besides Inner padding (PX) and select the appropriate values.
To configure an animation for the single- or multiple-choice-question, for example Fade in, Zoom in, Fly in from the top, click on the arrow besides Animation and select the type and the duration. You can test all animations via the button Test all animations.
To define the conditional display for the single- or multiple-choice-question, click the tab Conditional display and select depending on the display size under Only show, if.. the option Desktop, Tablet or Smartphone under Is. You can add further rules for conditional display via clicking the button Further rule. Via Recycle bin you can remove the rules.
If you add a single- or multiple-choice-question Move on the End page of a knowledge test, you can additionally select, if it should be shown, when the knowledge test is Passed or Failed.
If you don’t define any rule for the conditional display, the single- or multiple-choice-question Move will always be shown to the user.
Right editing window
You can switch in the header from single choice to multiple choice via the toggle.
Enter the question in the appropriate line.
Select the appropriate radio button or mark if multiple choice the correct answers per check mark and enter the corresponding answer. Via + you can enter further answers.
If applicable you can change the text of the buttons Check, Try again and Display the answer. This you can do also with the text Correct answer! and Sorry, the answer is wrong! via Editor.
You can remove the single- or multiple-choice-question via the button Remove if applicable.
Via this Question Move you can insert and configure association questions. You can insert and configure a sorting task, which enables the interactivity and activity of the learner for example.
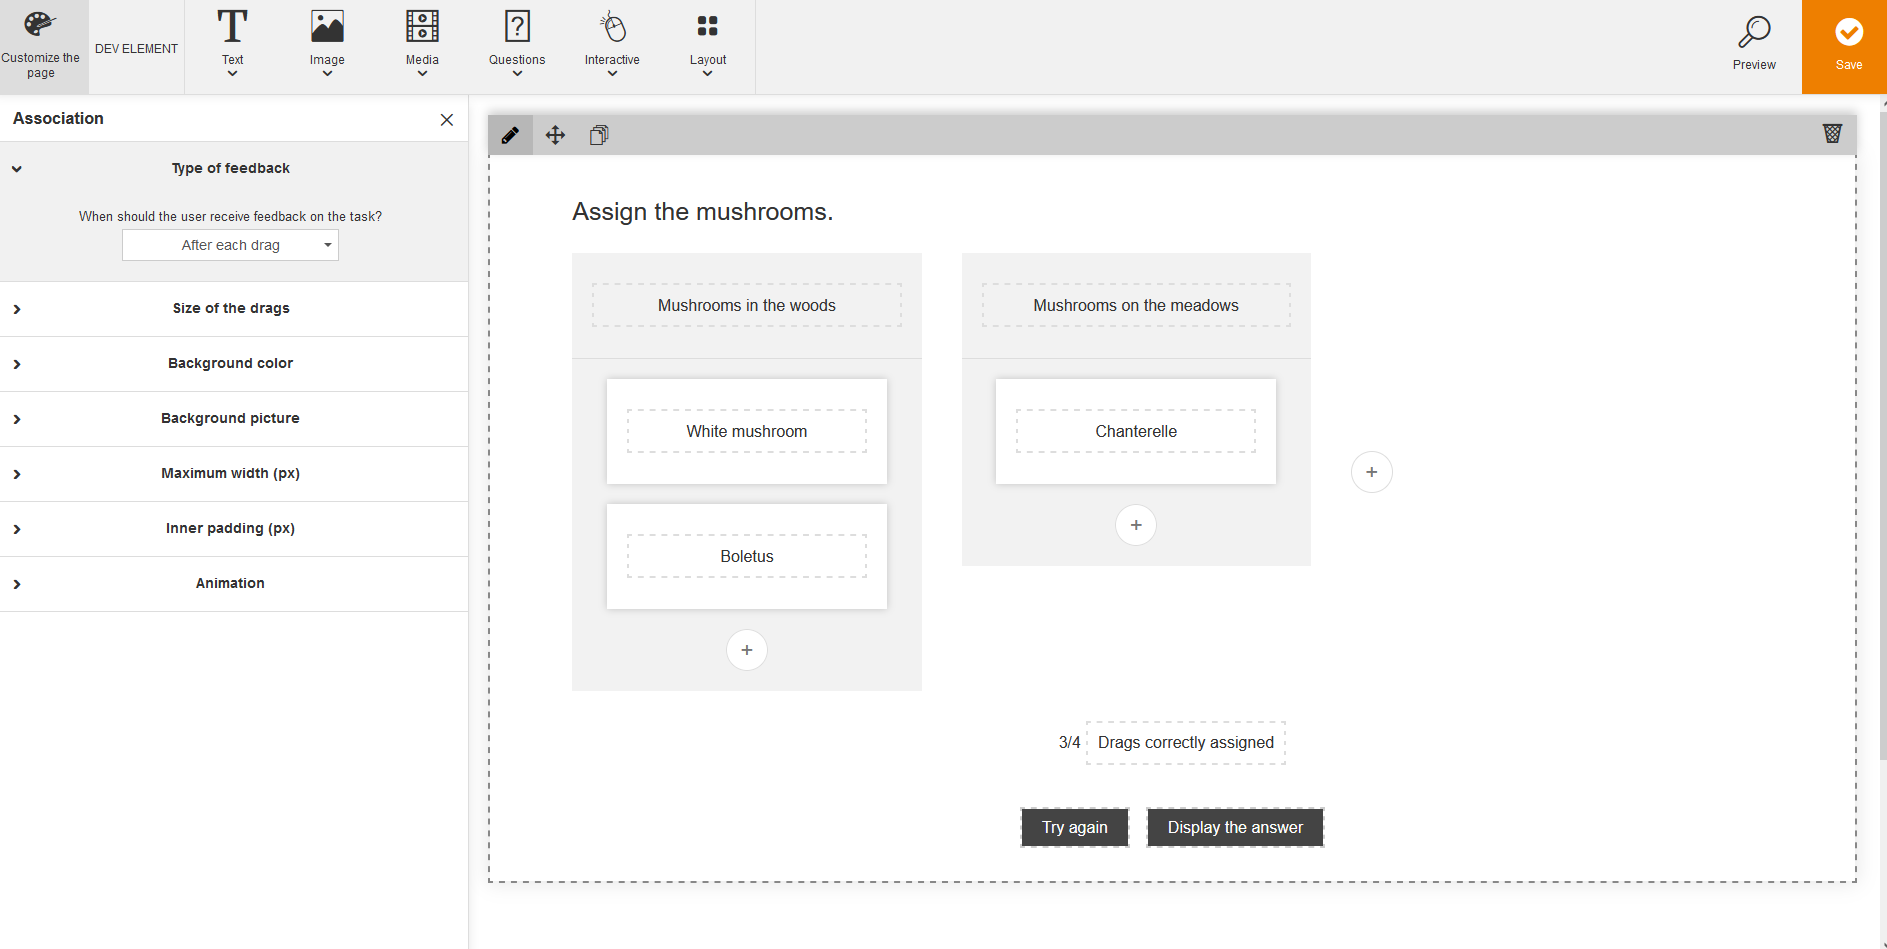
This question move is only available in the Instructional material wizard.
To insert an association question, click on the menu item Association in the menu Questions and drag it via drag and drop on your favored place or you click on the menu item Asscociation in the menu Questions.
To configure an association question, click on the Pencil of the dialog window of the association question and the left editing window opens.
Left editing window
To change the type of feedback, click on the arrow besides Type of feedback and choose, when the user should receive the feedback on the task (After each processing or After each drag).
To change the size of the drags, click on the arrow besides Size of drags and choose the favored size of drags (Standard or Large).
To change the background color for the association question, click on the arrow besides Background color. You can select via Color Picker by selecting the basic color via the vertical bar and then selecting the background color in the field on the left side. Alternatively you can enter directly a hexadecimal value. Via a slider bar you can define the Opacity in percentage.
To change the background picture for the association question, click on the arrow on the left side besides Background picture and click on the button Select picture. You can select under Scroll effect Fixed, Fill out, Adjust or Repeat. Furthermore you can remove the picture again via the button Remove picture. Furthermore you can move the the picture selection via the navigation arrow or/and you can Center per click. Additionally you can remove the picture via the button Remove picture.
To change the maximum width (px) for the association question, click on the arrow besides Maximum width (px) and enter the width (px) via the arrow buttons. Futhermore you can choose the alignment (Left, Centered or Right) and if Full width should be set. Via the alignment Centered you can change from a value 1150 downwards to Left or Right.
To enter the inner padding in pixels for the association question above or below, click on the arrow besides Inner padding (PX) and select the appropriate values.
To configure an animation for the association question, for example Fade in, Zoom in, Fly in from the top, click on the arrow besides Animation and select the type and the duration. You can test all animations via the button Test all animations.
To define the conditional display for the association question, click the tab Conditional display and select depending on the display size under Only show, if.. the option Desktop, Tablet or Smartphone under Is. You can add further rules for conditional display via clicking the button Further rule. Via Recycle bin you can remove the rules.
If you add an association question Move on the End page of a knowledge test, you can additionally select, if it should be shown, when the knowledge test is Passed or Failed.
If don’t define any rule for the conditional display, the association question Move will always be shown to the user.
Right editing window
You can move and duplicate the association question via the buttons + and recycle bin.
Enter per association box the appropriate title, to which the user should assign. Then enter the provided text of the answer boxes, which are to assign. Via + you can add further answer boxes.
You can change if applicable the text of the buttons Try again and Display the answer via the Editor. Furthermore you can adjust the text Drags correctly assigned via the Editor.
You can remove the association question via the button Remove if applicable.
Via this Question Move you can insert and configure image questions. You can insert and configure an image test, which is designed as a single choice or a multiple choice question, and also enables interactivity and activity of the learner for example.

This question move is only available in the Instructional material wizard.
To insert an image question, click on the menu item Image question in the menu Questions and drag it via drag and drop on your favored place or you click on the menu item Image question in the menu Questions.
To configure an image question, click on the Pencil of the dialog window of the assocition question and the left editing window opens.
Left editing window
To change the number of images per row, click on the arrow besides Images per row and select an entry of number of images per row (1, 2, 3 or 4).
To change the number of attempts of the image question, click on the arrow besides Number of attempts and select an entry (Unlimited, 1, 2 or 3).
To change the image size of the single images in the image question, click on the arrow besides Image size and select an entry (Square, Landscape or Portrait).
To show or hide the appropriate description text of the images, click on the arrow besides Description text and select between Hide or Show and enter the appropriate text beneath the images.
To change the background color of the tile, click on the arrow besides Background color of the tile and select via Color Picker by selecting the basic color via the vertical bar and then selecting the background color in the field on the left side. Alternatively you can enter directly a hexadecimal value.
To change the background color for the image question, click on the arrow besides Background color. You can select via Color Picker by selecting the basic color via the vertical bar and then selecting the background color in the field on the left side. Alternatively you can enter directly a hexadecimal value. Via a slider bar you can define the Opacity in percentage.
To change the background picture for the image question, click on the arrow on the left side besides Background picture and click on the button Select picture. You can select under Scroll effect Fixed, Fill out, Adjust or Repeat. Furthermore you can remove the picture again via the button Remove picture. Furthermore you can move the the picture selection via the navigation arrow or/and you can Center per click. Additionally you can remove the picture via the button Remove picture.
To change the maximum width (px) for the image question, click on the arrow besides Maximum width (px) and enter the width (px) via the arrow buttons. Futhermore you can choose the alignment (Left, Centered or Right) and if Full width should be set. Via the alignment Centered you can change from a value 1150 downwards to Left or Right.
To enter the inner padding in pixels for the image question above or below, click on the arrow besides Inner padding (PX) and select the appropriate values.
To configure an animation for the image question, for example Fade in, Zoom in, Fly in from the top, click on the arrow besides Animation and select the type and the duration. You can test all animations via the button Test all animations.
To define the conditional display for the image question, click the tab Conditional display and select depending on the display size under Only show, if.. the option Desktop, Tablet or Smartphone under Is. You can add further rules for conditional display via clicking the button Further rule. Via Recycle bin you can remove the rules.
If you add an image question Move on the End page of a knowledge test, you can additionally select, if it should be shown, when the knowledge test is Passed or Failed.
If don’t define any rule for the conditional display, the image question Move will always be shown to the user.
Right editing window
You can move, duplicate and remove the image question via the appropriate buttons on the header of the dialog window.
Select via a toggle, if the image question should be single choice or multiple choice.
Enter the question in the appropriate line under this toggle. You can do the following changes: Paragraph styles, styles (block styles and inline styles), font, font size, text color, insert image, insert table, insert/remove numbered list, insert list, bold, italic, underline, strikethrough, subscript, superscript, align left, center, align right, justify, insert horizontal line, link instructional material, insert Anchor link, insert special character, insert variable, insert/edit/remove link, paste as plain text and add media.
You mark the correct answers by a check mark. You can select other images for the existing ones and you change the image size.
Define the number of images via the buttons + and recycle bin.
You can change if applicable the text of the buttons Check, Try again and Display the answer via the Editor. Furthermore you can adjust the text of the boxes Correct answers and Sorry, the answer is wrong via the Editor.
You can remove the image question via the button Remove if applicable.
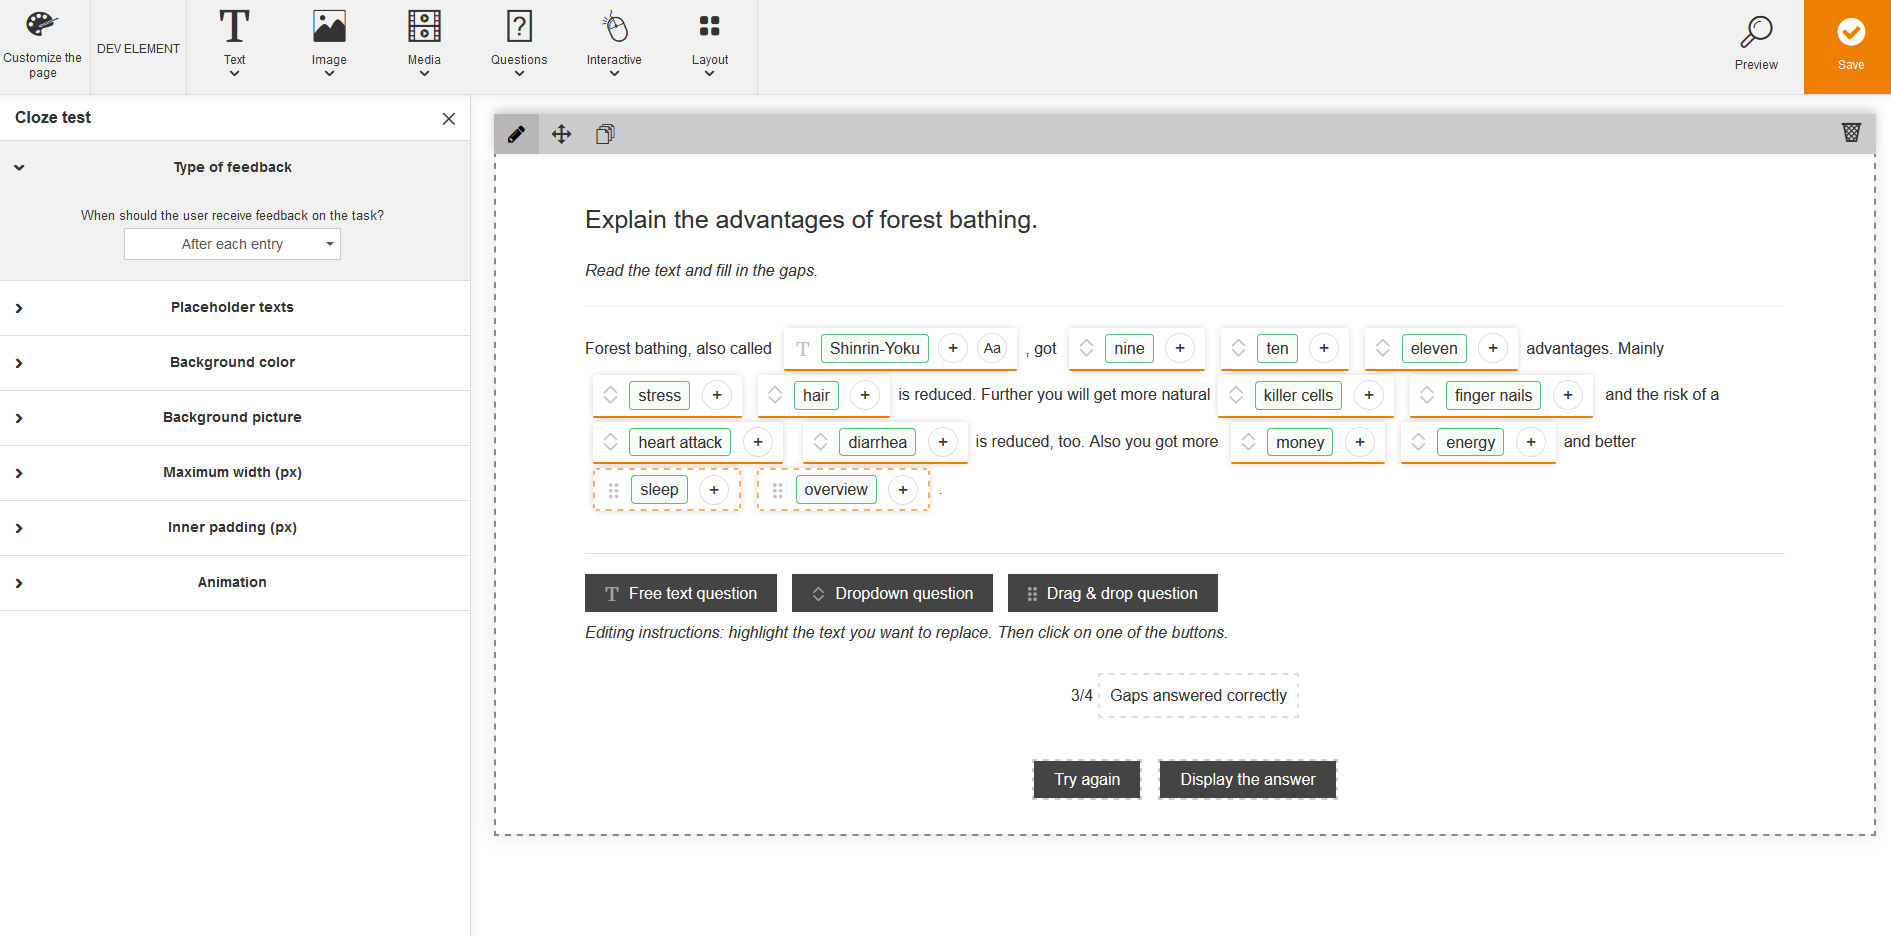
Via this Question Move you can insert and configure cloze tests. You can insert and configure (technical) terms (free text question) for example or you can use cloze tests for differentiating similar terms (dropdown question) or for asking for matching terms (drag & drop question) for example.
This Question Move is only available in the Instructional material wizard.
To insert a cloze test, click on the menu entry Cloze test in the menu Questions and drag it via drag and drop on your favored place or you click on the menu item Cloze test in the menu Questions.
To configure the cloze test, click on the Pencil in the dialog window of the cloze test and the left editing window opens.
Left editing window
To change the type of feedback of the cloze test, click on the arrow besides Type of feedback and select After each entry or After each processing to define when the learner should get the feedback regarding the task.
To enter alternative texts as placeholder texts depending on the cloze type, click on the arrow besides Placeholder texts and enter the alternative texts in the corresponding fields (Free text, Dropdown and Drag&drop).
To change the background color for the cloze test, click on the arrow besides Background color. You can select via Color Picker by selecting the basic color via the vertical bar and then selecting the background color in the field on the left side. Alternatively you can enter directly a hexadecimal value. Via a slider bar you can define the Opacity in percentage.
To change the background picture for the cloze test, click on the arrow on the left side besides Background picture and click on the button Select picture. You can select under Scroll effect Fixed, Fill out, Adjust or Repeat. Furthermore you can remove the picture again via the button Remove picture. Furthermore you can move the the picture selection via the navigation arrow or/and you can Center per click. Additionally you can remove the picture via the button Remove picture.
To change the maximum width (px) for the cloze test, click on the arrow besides Maximum width (px) and enter the width (px) via the arrow buttons. Futhermore you can choose the alignment (Left, Centered or Right) and if Full width should be set. Via the alignment Centered you can change from a value 1150 downwards to Left or Right.
To enter the inner padding in pixels for the cloze test above or below, click on the arrow besides Inner padding (PX) and select the appropriate values.
To configure an animation for the cloze test, for example Fade in, Zoom in, Fly in from the top, click on the arrow besides Animation and select the type and the duration. You can test all animations via the button Test all animations.
To define the conditional display for the cloze test, click the tab Conditional display and select depending on the display size under Only show, if.. the option Desktop, Tablet or Smartphone under Is. You can add further rules for conditional display via clicking the button Further rule. Via Recycle bin you can remove the rules.
If you add a cloze test Move on the End page of a knowledge test, you can additionally select, if it should be shown, when the knowledge test is Passed or Failed.
If don’t define any rule for the conditional display, the cloze test Move will always be shown to the user.
Right editing window
You can move, duplicate and remove the cloze test via the appropriate buttons on the header of the dialog window.
Enter the question in the appropriate line under this toggle. You can do the following changes: Paragraph styles, styles (block styles and inline styles), font, font size, text color, insert image, insert table, insert/remove numbered list, insert list, bold, italic, underline, strikethrough, subscript, superscript, align left, center, align right, justify, insert horizontal line, link instructional material, insert Anchor link, insert special character, insert variable, insert/edit/remove link, paste as plain text and add media.
You mark the correct answers by a check mark. You can select other images for the existing ones and you change the image size.
Define the number of images via the buttons + and recycle bin.
You can change if applicable the text of the buttons Check, Try again and Display the answer via the Editor. Furthermore you can adjust the text of the boxes Correct answers and Sorry, the answer is wrong via the Editor.
You can remove the image question via the button Remove if applicable.
If you want to create a free text question (for asking for terms for example) mark the favored word or the favored text and click on the button Free text question. The corresponding processing window of the free text question is shown in which you can add a variant by clicking on the + or you can activate considering the upper and lower case by clicking on aA. If you’ve added a variant the text Wrong answer is shown by default. You can adjust this text if applicable. If you move the cursor over the processing window of the free text question the Recycle bin for removing it is shown. Note that if you click on the Recycle bin also the text of the free text question is removed.
If you want to create a dropdown question (for asking for numbers for example) mark the favored word or the favored number and click on the button Dropdown question. The corresponding processing window of the dropdown question is shown in which you can add a variant by clicking on the +. If you’ve added a variant the text Wrong answer is shown by default. You can adjust this text if applicable. If you move the cursor over the processing window of the dropdown question the Recycle bin for removing it is shown. Note that if you click on the Recycle bin also the text of the dropdown question is removed.
If you want to create a drag&drop question (for matching terms via drag and drop for example) mark the favored term separately and click on the button Drag&drop question. The corresponding processing window of the drag&drop question is shown in which you can add a variant by clicking on the +. If you’ve added a variant the text Wrong answer is shown by default. You can adjust this text if applicable. If you move the cursor over the processing window of the drag&drop question the Recycle bin for removing it is shown. Note that if you click on the Recycle bin also the text of the drag&drop question is removed.
If applicable you can adjust the text of the button Check, also of the button Try again or Display the answer.
If needed you can remove the cloze test via the button Remove.
Via this Question Move you can insert and configure reply cards in a certain order. You insert and configure answer cards with which you ask for certain process steps or sequences for example.

This Question Move is only available in the Instructional material wizard.
To insert an order question, click on the menu entry Order in the menu Questions and move it via Drag and Drop on your favored place or click on the menu entry Order.
To configure the order question, click on the Pencil of the dialog window of the order question and the left editing window opens.
Left editing window
To restrict the number of attempts, click on the arrow besides Number of attempts and select 1, 2 or 3 or let the selection Unlimited if you don’t want to restrict it.
To select the arrangement of the answer cards, click on the arrow besides Arrangement and select between Horizontal and Vertical.
To configure the numbering of the answer cards and the color of the numbering, click on the arrow besides Numbering and select Yes for activating the numbering. Then you can change the color of the numbering via Color Picker.
To define the type of card and the image size, click on the arrow besides Answer format and select on the type of card between Text only, Text+image or Image only. When the image has been selected you can select the image sizes between Square, Portrait or Landscape.
To define the color of the answer cards, click on the arrow besides Color of answer cards and select the favored color via Color Picker.
To change the background color for the answer cards, click on the arrow besides Background color. You can select via Color Picker by selecting the basic color via the vertical bar and then selecting the background color in the field on the left side. Alternatively you can enter directly a hexadecimal value. Via a slider bar you can define the Opacity in percentage.
To change the background picture for the answer cards, click on the arrow on the left side besides Background picture and click on the button Select picture. You can select under Scroll effect Fixed, Fill out, Adjust or Repeat. Furthermore you can remove the picture again via the button Remove picture. Furthermore you can move the the picture selection via the navigation arrow or/and you can Center per click. Additionally you can remove the picture via the button Remove picture.
To change the maximum width (px) for the answer cards, click on the arrow besides Maximum width (px) and enter the width (px) via the arrow buttons. Futhermore you can choose the alignment (Left, Centered or Right) and if Full width should be set. Via the alignment Centered you can change from a value 1150 downwards to Left or Right.
To enter the inner padding in pixels for the answer cards above or below, click on the arrow besides Inner padding (PX) and select the appropriate values.
To configure an animation for the answer cards, for example Fade in, Zoom in, Fly in from the top, click on the arrow besides Animation and select the type and the duration. You can test all animations via the button Test all animations.
To define the conditional display for the answer cards, click the tab Conditional display and select depending on the display size under Only show, if.. the option Desktop, Tablet or Smartphone under Is. You can add further rules for conditional display via clicking the button Further rule. Via Recycle bin you can remove the rules.
If you add an order Move on the End page of a knowledge test, you can additionally select, if it should be shown, when the knowledge test is Passed or Failed.
If don’t define any rule for the conditional display, the order Move will always be shown to the user.
Right editing window
You can move, duplicate and remove the answer cards via the corresponding buttons on the header of the dialog window.
Enter the question in the appropriate line under this toggle. You can do the following changes: Paragraph styles, styles (block styles and inline styles), font, font size, text color, insert image, insert table, insert/remove numbered list, insert list, bold, italic, underline, strikethrough, subscript, superscript, align left, center, align right, justify, insert horizontal line, link instructional material, insert Anchor link, insert special character, insert variable, insert/edit/remove link, paste as plain text and add media.
Enter the favored text on the answer cards. You can do the following changes: Paragraph styles, font, font size, text color, redo, restore, bold formatting, italic formatting, underline, strikethrough, subscript, superscript, remove formatting, align left, center, align right, insert special character, insert variable and paste as plain text.
You can change the order of the answer cards via the arrow buttons.
If you move over the default images with the cursor you can exchange an image by clicking on the button Select image and confirming this selection. Furthermore you can change the image size.
You can remove the whole answer card by clicking on the Recycle bin in the upper right corner of the answer card.
You add new answer cards via the +.
If required you can adjust the text of the button Check, also the text of the button Try again and Display the answer.
Furthermore it’s possible to adjust the texts Correct answer! or Sorry, the answer is wrong.
If you want to show how the order question looks like for the user you can click on the button Preview.
Via this Question Move you can insert and configure slider questions. You can create questions for making a guess for example. Then you ask for the result that should be guessed. Also you can create mathematic questions.
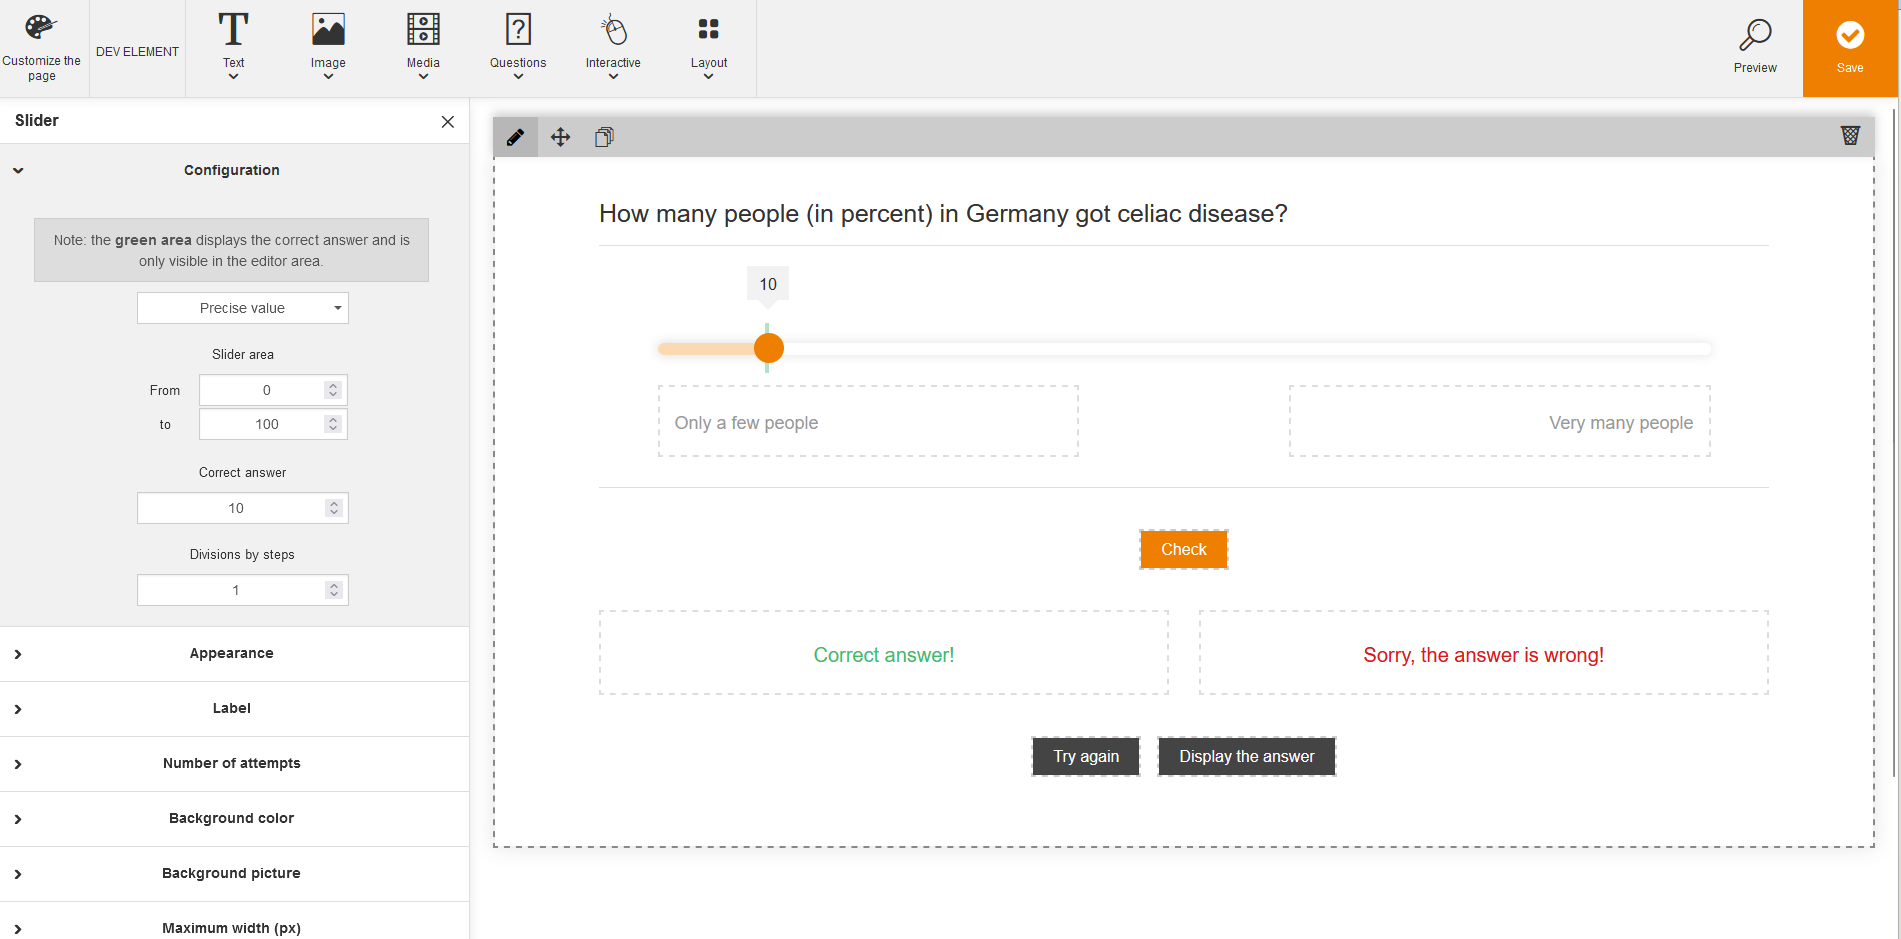
This Question Move is only available in the Instructional material wizard.
To insert a slider question, click on the menu entry Slider in the menu Questions and move it via Drag and Drop on your favored place or click on the menu entry Slider.
To configure the slider question, click on the Pencil of the dialog window of the slider question and the left editing window opens.
Left editing window
To make the configuration of the slider question, click on the arrow besides Configuration and select either Precise value or Range, depending on what should be shown by the slider. Note that the green range shows the correct answer and is only visible in the editor area.
Furthermore you configure in which area the slider should be shown, which slider value is the correct value and in how many divisions the steps should be.
To define the appearance of the slider question, click on the arrow besides Appearance and define the color of the slider via Color Picker, also the slider shape (Round or Square) and the slider thickness (Thin or Thick).
To configure the label of the slider question, click on the arrow besides Label and define if the label should be at start and end, if the slider label and if the unit should be shown.
To define the number of attempts, click on the arrow besides Number of attempts and select 1, 2 or 3 or let the selection Unlimited if you don’t want to restrict it.
To change the background color for the slider question, click on the arrow besides Background color. You can select via Color Picker by selecting the basic color via the vertical bar and then selecting the background color in the field on the left side. Alternatively you can enter directly a hexadecimal value. Via a slider bar you can define the Opacity in percentage.
To change the background picture for the slider question, click on the arrow on the left side besides Background picture and click on the button Select picture. You can select under Scroll effect Fixed, Fill out, Adjust or Repeat. Furthermore you can remove the picture again via the button Remove picture. Furthermore you can move the the picture selection via the navigation arrow or/and you can Center per click. Additionally you can remove the picture via the button Remove picture.
To change the maximum width (px) for the slider question, click on the arrow besides Maximum width (px) and enter the width (px) via the arrow buttons. Futhermore you can choose the alignment (Left, Centered or Right) and if Full width should be set. Via the alignment Centered you can change from a value 1150 downwards to Left or Right.
To enter the inner padding in pixels for the slider question above or below, click on the arrow besides Inner padding (PX) and select the appropriate values.
To configure an animation for the slider question, for example Fade in, Zoom in, Fly in from the top, click on the arrow besides Animation and select the type and the duration. You can test all animations via the button Test all animations.
To define the conditional display for the slider question, click the tab Conditional display and select depending on the display size under Only show, if.. the option Desktop, Tablet or Smartphone under Is. You can add further rules for conditional display via clicking the button Further rule. Via Recycle bin you can remove the rules.
If you add a slider question Move on the End page of a knowledge test, you can additionally select, if it should be shown, when the knowledge test is Passed or Failed.
If don’t define any rule for the conditional display, the slider question Move will always be shown to the user.
Right editing window
You can move, duplicate and remove the dialog window of the slider question via the corresponding buttons on the header of the dialog window.
Enter the question in the corresponding line under this toggle. You can do the following changes: Paragraph styles, styles (block styles and inline styles), font, font size, text color, insert image, insert table, insert/remove numbered list, insert list, bold, italic, underline, strikethrough, subscript, superscript, align left, center, align right, justify, insert horizontal line, link instructional material, insert Anchor link, insert special character, insert variable, insert/edit/remove link, paste as plain text and add media.
If required you can adjust the text of the button Check, also the text of the button Try again and Display the answer.
Furthermore it’s possible to adjust the texts Correct answer! or Sorry, the answer is wrong.
If you want to show how the slider question looks like for the user you can click on the button Preview.
You can remove the whole slider question by clicking on the Recycle bin in the upper right corner of the answer card.
Via this Interactive Move you can insert and configure accordions. You can insert and configure FAQs as showing from the simple, this means the title, to the complex, this means the explanations, for example.

To insert an accordion, click on the menu item Accordion and drag it via drag and drop on your favored place or you click on the menu item Accordion.
To configure an accordion, click on the Pencil of the dialog window of the accordion and the left editing window opens.
Left editing window
To configure the font color (active and inactive) and the background color of the title, click on the arrow on the left side besides Title and do the appropriate changes via Color Picker.
To change the font color and the background color of the content (text), click on the arrow on the left side besides Content and do the appropriate changes via Color Picker.
To change the color of the border, click on the arrow on the left side besides Border and do the appropriate changes via Color Picker.
To change the background color of the accordions, click on the arrow besides Background color. You can select via Color Picker by selecting the basic color via the vertical bar and then selecting the background color in the field on the left side. Alternatively you can enter directly a hexadecimal value. Via a slider bar you can define the Opacity in percentage.
To change the background picture of the accordion, click on the arrow on the left side besides Background picture and click on the button Select picture. You can select under Scroll effect Fixed, Fill out, Adjust or Repeat. Furthermore you can remove the picture again via the button Remove picture. Furthermore you can move the the picture selection via the navigation arrow or/and you can Center per click. Additionally you can remove the picture via the button Remove picture.
To change the maximum width (px) of the accordion, click on the arrow besides Maximum width (px) and enter the width (px) via the arrow buttons. Futhermore you can choose the alignment (Left, Centered or Right) and if Full width should be set. Via the alignment Centered you can change from a value 1150 downwards to Left or Right.
To enter the inner padding in pixels for the text above or below, click on the tab Inner padding (PX) and select the appropriate values.
To configure an animation for the tab, for example Fade in, Zoom in, Fly in from the top, click on the tab Animation and select the type and the duration. You can test all animations via the button Test all animations.
To define the conditional display for the accordion, click the tab Conditional display and select depending on the display size under Only show, if.. the option Desktop, Tablet or Smartphone under Is. You can add further rules for conditional display via clicking the button Further rule. Via Recycle bin you can remove the rules.
If you add an accordion Move on the End page of a knowledge test, you can additionally select, if it should be shown, when the knowledge test is Passed or Failed.
If you don’t define any rule for the conditional display, the accordion Move will always be shown to the user.
Right editing window
To add further accordions, click on Add new accordion below the last accordion.
To change the text of the accordion, click on the appropriate accordion.
To open the editor for the text, click on the running text of the appropriate accordion. You can do the following changes: Paragraph styles, styles (block styles and inline styles), font, font size, text color, insert table, insert/remove numbered list, insert list, bold, italic, underline, strikethrough, subscript, superscript, align left, center, align right, justify, insert/edit/remove link.
Via this Interactive Move you can insert and configure tabs. You can use the tab as help for structuring of complex themes or to show different facets of a theme.

To insert a tab, click on the menu item Tab and drag it via drag and drop on your favored place or you click on the menu item Tab.
To configure a tab, click on the Pencil of the dialog window of the tab and the left editing window opens.
Left editing window
To configure the font color (active and inactive) and the background color of the title, click on the arrow on the left side besides Title and do the appropriate changes via Color Picker.
To change the font color and the background color of the content (text), click on the arrow on the left side besides Content and do the appropriate changes via Color Picker.
To change the color of the border, click on the arrow on the left side besides Border and do the appropriate changes via Color Picker.
To change the background color of the tabs, click on the arrow besides Background color. You can select via Color Picker by selecting the basic color via the vertical bar and then selecting the background color in the field on the left side. Alternatively you can enter directly a hexadecimal value. Via a slider bar you can define the Opacity in percentage.
To change the background picture of the tabs, click on the arrow on the left side besides Background picture and click on the button Select picture. You can select under Scroll effect Fixed, Fill out, Adjust or Repeat. Furthermore you can remove the picture again via the button Remove picture. Furthermore you can move the the picture selection via the navigation arrow or/and you can Center per click. Additionally you can remove the picture via the button Remove picture.
To change the maximum width (px) of the tabs, click on the arrow besides Maximum width (px) and enter the width (px) via the arrow buttons. Futhermore you can choose the alignment (Left, Centered or Right) and if Full width should be set. Via the alignment Centered you can change from a value 1150 downwards to Left or Right.
To enter the inner padding in pixels for the text above or below, click on the tab Inner padding (PX) and select the appropriate values.
To change the background color of the tabs, click on the left side besides Background color and select the appropriate background color via Color Picker.
To configure an animation for the tab, for example Fade in, Zoom in, Fly in from the top, click on the tab Animation and select the type and the duration. You can test all animations via the button Test all animations.
To define the conditional display for the tab, click the tab Conditional display and select depending on the display size under Only show, if.. the option Desktop, Tablet or Smartphone under Is. You can add further rules for conditional display via clicking the button Further rule. Via Recycle bin you can remove the rules.
If you add a tab Move on the End page of a knowledge test, you can additionally select, if it should be shown, when the knowledge test is Passed or Failed.
If you don’t define any rule for the conditional display, the tab Move will always be shown to the user.
Right editing window
To add further tabs, click on the + on the right side besides the last tab.
To change the text of the tab, click on the appropriate tab.
To open the editor for the text, click on the running text of the appropriate tab. You can do the following changes: Paragraph styles, styles (block styles and inline styles), font, font size, text color, insert table, insert/remove numbered list, insert list, bold, italic, underline, strikethrough, subscript, superscript, align left, center, align right, justify, insert/edit/remove link.
Via this interactive Move you can insert and configure images with hotspots. You insert and configure
– a quiz,
– an explanation for a formular structure,
– an explanation for an user interface,
– a picture puzzle or
– showing situations with explanation
for example.

To insert an image with hotspots, click on the menu item Image with hotspots in the menu Interactive and drag it via drag and drop on your favored place or you click on the menu item Image with hotspots.
To configure an image with hotspots, click on the Pencil of the dialog window of the image with hotspots and the left editing window opens.
Left editing window
To select the image for configuring hotspots, click on the arrow besides Picture and then on the button Select picture.
To activate or deactivate the invisible hotspots, click on the arrow besides Invisible hotspots and choose Yes or No.
To edit the icon of the hotspots, click on the arrow on the left side besides Icon and choose the favored icon.
To change the background color for image with hotspots, click on the arrow besides Background color. You can select via Color Picker by selecting the basic color via the vertical bar and then selecting the background color in the field on the left side. Alternatively you can enter directly a hexadecimal value. Via a slider bar you can define the Opacity in percentage.
To change the background picture for the image with hotspots, click on the arrow on the left side besides Background picture and click on the button Select picture. You can select under Scroll effect Fixed, Fill out, Adjust or Repeat. Furthermore you can remove the picture again via the button Remove picture. Furthermore you can move the the picture selection via the navigation arrow or/and you can Center per click. Additionally you can remove the picture via the button Remove picture.
To change the maximum width (px) for the image with hotspots, click on the arrow besides Maximum width (px) and enter the width (px) via the arrow buttons. Futhermore you can choose the alignment (Left, Centered or Right) and if Full width should be set. Via the alignment Centered you can change from a value 1150 downwards to Left or Right.
To enter the inner padding in pixels for the image with hotspots above or below, click on the arrow besides Inner padding (PX) and select the appropriate values.
To configure an animation for the image with hotspots, for example Fade in, Zoom in, Fly in from the top, click on the arrow besides Animation and select the type and the duration. You can test all animations via the button Test all animations.
To define the conditional display for the image with hotspots, click the tab Conditional display and select depending on the display size under Only show, if.. the option Desktop, Tablet or Smartphone under Is. You can add further rules for conditional display via clicking the button Further rule. Via Recycle bin you can remove the rules.
If you add an image with hotspots Move on the End page of a knowledge test, you can additionally select, if it should be shown, when the knowledge test is Passed or Failed.
If you don’t define any rule for the conditional display, the image with hotspots Move will always be shown to the user.
Right editing window
To add a new hotspot, click on the image on the favored place. In the opening dialog window you can edit the text. If applicable you can remove the text via the icon recycle bin.
You can move the image with hotspots via the button Move.
You can duplicate the image with hotspots via the button Duplicate and can remove it via the button Remove if applicable.
You can remove the picture if applicable via the button Remove.
Via this interactive Move you can insert and configure timelines. You can use this Move for showing processes or for structuring content and sequences for example.

To insert a timeline, click on the menu item Timeline in the menu Interactive and drag it via drag and drop on your favored place or you click on the menu item Timeline in the menu Interactive.
To configure a timeline, click on the Pencil of the dialog window of the timeline and the left editing window opens.
Left editing window
To change the postion of the timeline, click on the arrow besides Position of the timeline and choose the favored postion (On the left or Centered). Note: This setting is overwritten on mobile devices to improve the on-screen display.
To change the clickability of the elements, click on the arrow besides Clickable and choose the appropriate option (Not clickable, Elements remain opened or Only one open element). Test the on-screen display in the preview.
To change the highlight of the headlines, click on the arrow besides Highlight headlines and choose Yes for activating and if applicable Yes for hiding the content.
To change the background color for the timeline, click on the arrow besides Background color. You can select via Color Picker by selecting the basic color via the vertical bar and then selecting the background color in the field on the left side. Alternatively you can enter directly a hexadecimal value. Via a slider bar you can define the Opacity in percentage.
To change the background picture for the timeline, click on the arrow on the left side besides Background picture and click on the button Select picture. You can select under Scroll effect Fixed, Fill out, Adjust or Repeat. Furthermore you can remove the picture again via the button Remove picture. Furthermore you can move the the picture selection via the navigation arrow or/and you can Center per click. Additionally you can remove the picture via the button Remove picture.
To change the maximum width (px) for the timeline, click on the arrow besides Maximum width (px) and enter the width (px) via the arrow buttons. Futhermore you can choose the alignment (Left, Centered or Right) and if Full width should be set. Via the alignment Centered you can change from a value 1150 downwards to Left or Right.
To enter the inner padding in pixels for the timeline above or below, click on the arrow besides Inner padding (PX) and select the appropriate values.
To configure an animation for the timeline, for example Fade in, Zoom in, Fly in from the top, click on the arrow besides Animation and select the type and the duration. You can test all animations via the button Test all animations.
To define the conditional display for the timeline, click the tab Conditional display and select depending on the display size under Only show, if.. the option Desktop, Tablet or Smartphone under Is. You can add further rules for conditional display via clicking the button Further rule. Via Recycle bin you can remove the rules.
If you add a timeline Move on the End page of a knowledge test, you can additionally select, if it should be shown, when the knowledge test is Passed or Failed.
If you don’t define any rule for the conditional display, the timeline Move will always be shown to the user.
Right editing window
By clicking on the appropriate fields you can edit the numbers of the timeline, enter or edit titles and enter or edit text under the text.
Via the + button you can add further elements. Via the recycle bin (top right in the title line) you can remove the elements.
You can move, duplicate nd remove the timeline via the appropriate buttons.
Via this interactive Move you can insert and configure a slider. You can use this Move for texts, which are successive, or for showing sequences and processes, without taking a large amount of vertical place, for example.

To insert a slider, click on the menu item Slider in the menu Interactive and drag it via drag and drop on your favored place or you click on the menu item Slider.
To configure a slider, click on the Pencil of the dialog window of the slider and the left editing window opens.
Left editing window
To select the characteristics of the slider, click on the arrow on the left side besides Characteristics and select between Loop, Fade effect and Show slide number.
To select the background color for slides, click on the arrow on the left side besides Background color for slides. You can select via Color Picker by selecting the basic color via the vertical bar and then selecting the background color in the field on the left side. Alternatively you enter directly a hexadecimal value.
To select the autorotation of the slider, click on the arrow on the left side besides Autorotation and select if applicable Yes and then the duration via the slider (from 1 second to 10 seconds).
To select the pagination of the slider, click on the arrow on the left side besides Pagination and select under the Type Bullets, Numbers or Progress bar.
To change the background color for the slider, click on the arrow besides Background color. You can select via Color Picker by selecting the basic color via the vertical bar and then selecting the background color in the field on the left side. Alternatively you can enter directly a hexadecimal value. Via a slider bar you can define the Opacity in percentage.
To change the background picture for the slider, click on the arrow on the left side besides Background picture and click on the button Select picture. You can select under Scroll effect Fixed, Fill out, Adjust or Repeat. Furthermore you can remove the picture again via the button Remove picture. Furthermore you can move the the picture selection via the navigation arrow or/and you can Center per click. Additionally you can remove the picture via the button Remove picture.
To change the maximum width (px) for the slider, click on the arrow besides Maximum width (px) and enter the width (px) via the arrow buttons. Futhermore you can choose the alignment (Left, Centered or Right) and if Full width should be set. Via the alignment Centered you can change from a value 1150 downwards to Left or Right.
To enter the inner padding in pixels for the slider, click on the tab Inner padding (PX) and select the appropriate values.
To configure an animation for the slider, for example Fade in, Zoom in, Fly in from the top, click on the arrow on the left side besidesAnimation and select the type and the duration. You can test all animations via the button Test all animations.
To define the conditional display for the slider, click the tab Conditional display and select depending on the display size under Only show, if.. the option Desktop, Tablet or Smartphone under Is. You can add further rules for conditional display via clicking the button Further rule. Via Recycle bin you can remove the rules.
If you add a slider Move on the End page of a knowledge test, you can additionally select, if it should be shown, when the knowledge test is Passed or Failed.
If you don’t define any rule for the conditional display, the slider Move will always be shown to the user.
Right editing window
If you have inserted the slider (3 text blocks, one below the other), you can remove the text block via the recycle bin on the upper right corner of the text block and you can insert a text block via + below the last text block. You can duplicate the slider via Duplicate in the upper left corner of the editing window.
If you click into the text block, you can do the following changes: Paragraph styles, styles (block styles and inline styles), font, font size, text color, insert image, insert table, insert/remove numbered list, insert list, bold, italic, underline, strikethrough, subscript, superscript, align left, center, align right, justify, insert horizontal line, link instructional material, insert Anchor link, insert special character, insert variable, insert/edit/remove link and add media.
Via this interactive Move you can insert and configure flashcards. You can use this Move for asking for definitions or for supplementary information on the back side, to come up to different learning levels, for example.

To insert a flashcard, click on the menu item Flashcard in the menu Interactive and drag it via drag and drop on your favored place or you click on the menu item Flashcard.
To configure flashcards, click on the Pencil of the dialog window of the flashcard and the left editing window opens.
Left editing window
To define the cards per line, click on the arrow on the left side besides Cards per line and select between Automatic or 1 to 6.
To define the height of the cards, click on the arrow on the left side besides Height of the cards and select between Standard (300px), Small (200px) or Large (400px).
To select the background color of the front, click on the arrow on the left side besides Background color Front and select (via Color Picker) the basic color via the vertical bar and then selecting the background color in the field on the left side. Alternatively you enter directly a hexadecimal value.
To select the background color of the back, click on the arrow on the left side besides Background color Back and select (via Color Picker) the basic color via the vertical bar and then selecting the background color in the field on the left side. Alternatively you enter directly a hexadecimal value.
To change the background color of the cards, click on the arrow besides Background color. You can select via Color Picker by selecting the basic color via the vertical bar and then selecting the background color in the field on the left side. Alternatively you can enter directly a hexadecimal value. Via a slider bar you can define the Opacity in percentage.
To change the background picture of the cards, click on the arrow on the left side besides Background picture and click on the button Select picture. You can select under Scroll effect Fixed, Fill out, Adjust or Repeat. Furthermore you can remove the picture again via the button Remove picture. Furthermore you can move the the picture selection via the navigation arrow or/and you can Center per click. Additionally you can remove the picture via the button Remove picture.
To change the maximum width (px) of the cards, click on the arrow besides Maximum width (px) and enter the width (px) via the arrow buttons. Futhermore you can choose the alignment (Left, Centered or Right) and if Full width should be set. Via the alignment Centered you can change from a value 1150 downwards to Left or Right.
To enter the inner padding in pixels for the cards, click on the tab Inner padding (PX) and select the appropriate values.
To configure an animation for the flashcards, for example Fade in, Zoom in, Fly in from the top, click on the arrow on the left side besides Animation and select the type and the duration. You can test all animations via the button Test all animations.
To define the conditional display for the flashcard, click the tab Conditional display and select depending on the display size under Only show, if.. the option Desktop, Tablet or Smartphone under Is. You can add further rules for conditional display via clicking the button Further rule. Via Recycle bin you can remove the rules.
If you add a flashcard Move on the End page of a knowledge test, you can additionally select, if it should be shown, when the knowledge test is Passed or Failed.
If you don’t define any rule for the conditional display, the flashcard Move will always be shown to the user.
Right editing window
If you have inserted flashcards (2 sets with front and back), you can remove a set via the recycle bin on the upper right corner of the front card and you can insert a set via + below the last set. You can duplicate a set via Duplicate in the upper left corner of the editing window.
If you click into the text block of the front or the back, you can do the following changes: Paragraph styles, styles (block styles and inline styles), font, font size, text color, insert image, insert table, insert/remove numbered list, insert list, bold, italic, underline, strikethrough, subscript, superscript, align left, center, align right, justify, insert horizontal line, link instructional material, insert Anchor link, insert special character, insert variable, insert/edit/remove link and add media.
Via this interactive Move of the interaction package you can insert and configure lightboxes. You can insert and configure additional information, which supports the interactivity, or further information on a new level of the current page for example.

To insert a lightbox, click on the menu item Lightbox in the menu Interactive and drag it via drag and drop on your favored place or you click on the menu item Lightbox.
To configure lightboxes, click on the Pencil of the dialog window of the lightbox and the left editing window opens.
Left editing window
To define the button style of the button above the lightbox, click on the arrow on the left side besides Button style and define:
- how the button should look like (Button or Link)
- the button color (Primary color or Secondary color)
- the position (Left, Centered or Right)
- the icon position (No icon, Left or Right) and
- which icon (Info, Plus, Magnifier, Details, Zoom in, Play oder Arrow to right)
To define the animation of the lightbox, click on the arrow on the left side besides Animation of the lightbox and select between Fade in, Zoom in, Fly in from the top, Fly in from the right, Fly in from the bottom or Fly in from the left and select the type and the duration. You can test all animations via the button Test all animations.
To select the background color of the lightbox, click on the arrow on the left side besides Background color Lightbox and select (via Color Picker) the basic color via the vertical bar and then selecting the background color in the field on the left side. Alternatively you enter directly a hexadecimal value.
To select the background color, click on the arrow on the left side besides Background color Back and select (via Color Picker) the basic color via the vertical bar and then selecting the background color in the field on the left side. Alternatively you enter directly a hexadecimal value. Via a slider bar you can define the Opacity in percentage.
To change the background picture of the lightbox, click on the arrow on the left side besides Background picture and click on the button Select picture. You can select under Scroll effect Fixed, Fill out, Adjust or Repeat. Furthermore you can remove the picture again via the button Remove picture. Furthermore you can move the picture selection via the navigation arrow or/and you can Center per click. Additionally you can remove the picture via the button Remove picture.
To change the maximum width (px) of the lightbox, click on the arrow besides Maximum width (px) and enter the width (px) via the arrow buttons. Futhermore you can choose the alignment (Left, Centered or Right) and if Full width should be set. Via the alignment Centered you can change from a value 1150 downwards to Left or Right.
To enter the inner padding in pixels for the lightbox, click on the tab Inner padding (PX) and select the appropriate values.
To configure an animation for the lightbox, for example Fade in, Zoom in, Fly in from the top, click on the arrow on the left side besides Animation and select the type and the duration. You can test all animations via the button Test all animations.
To define the conditional display for the lightbox, click the tab Conditional display and select depending on the display size under Only show, if.. the option Desktop, Tablet or Smartphone under Is. You can add further rules for conditional display via clicking the button Further rule. Via Recycle bin you can remove the rules.
If you add a lightbox Move on the End page of a knowledge test, you can additionally select, if it should be shown, when the knowledge test is Passed or Failed.
If you don’t define any rule for the conditional display, the lightbox Move will always be shown to the user.
Right editing window
If you have inserted a lightbox, you can remove it if required via the recycle bin on the upper right corner.
To insert, move or remove content in a lightbox do the following steps: Drag the favored Move element (text, picture etc.), which should be content of the lightbox, directly from the menu via Drag and Drop into the lightbox. Alternatively, you insert the Move element above or beneath the lightbox and then drag it via the Move symbol (upper left corner) into the lightbox. You can also move the Move elements in the lightbox via the Move symbol. You can remove the inserted moves via the recycle bin on the upper right corner.
You can duplicate lightboxes via Duplicate in the upper left corner of the editing window. Also you can move the lightbox.
If you click on the text of the button, you can adjust this text.
Via the arrow up you can show or hide the lightbox.
Via this interactive Move of the interaction package you can insert and configure image comparisons. You can insert and configure a before and after picture, which enables a quick comprehension of complex content or processes for example.

To insert an image comparison, click on the menu item Image comparison in the menu Interactive and drag it via drag and drop on your favored place or you click on the menu item Image comparison.
To configure image comparisons, click on the Pencil of the dialog window of the image comparison and the left editing window opens.
Left editing window
To define the images of the image comparison, click on the arrow on the left side besides Images and click on the Button Select picture under To the left and To the right and confirm your new selection via a click on the button Select. Furthermore you can switch the image on the left side with the image on the right side via the button Switch images.
To define the display of the description text, click on the arrow on the left side besides Description text and select Display or Do not display.
To define the initial horizontal and the vertical position of the slider, click on the arrow on the left side besides Slider and select Left, Center, Right or Customized under Initial position and Center, Top or Bottom under Vertical postion.
To select the background color, click on the arrow on the left side besides Background color Back and select (via Color Picker) the basic color via the vertical bar and then selecting the background color in the field on the left side. Alternatively you enter directly a hexadecimal value. Via a slider bar you can define the Opacity in percentage.
To change the background picture of the image comparison, click on the arrow on the left side besides Background picture and click on the button Select picture. You can select under Scroll effect Fixed, Fill out, Adjust or Repeat. Furthermore you can remove the picture again via the button Remove picture. Furthermore you can move the picture selection via the navigation arrow or/and you can Center per click. Additionally you can remove the picture via the button Remove picture.
To change the maximum width (px) of the image comparison, click on the arrow besides Maximum width (px) and enter the width (px) via the arrow buttons. Futhermore you can choose the alignment (Left, Centered or Right) and if Full width should be set. Via the alignment Centered you can change from a value 1150 downwards to Left or Right.
To enter the inner padding in pixels for the image comparison, click on the tab Inner padding (PX) and select the appropriate values.
To configure an animation for the image comparison, for example Fade in, Zoom in, Fly in from the top, click on the arrow on the left side besides Animation and select the type and the duration. You can test all animations via the button Test all animations.
To define the conditional display for the image comparison, click the tab Conditional display and select depending on the display size under Only show, if.. the option Desktop, Tablet or Smartphone under Is. You can add further rules for conditional display via clicking the button Further rule. Via Recycle bin you can remove the rules.
If you add an image comparison Move on the End page of a knowledge test, you can additionally select, if it should be shown, when the knowledge test is Passed or Failed.
If you don’t define any rule for the conditional display, the image comparison Move will always be shown to the user.
Right editing window
If you have inserted an image comparison, you can remove it via the recycle bin on the upper right corner. You can insert all moves via drag and drop onto the + area and finally you can sort them. You can remove the inserted moves via the recycle bin on the upper right corner.
You can duplicate image comparisons via Duplicate in the upper left corner of the editing window. Also you can move the image comparison.
If you click on the text in the image, you can adjust this text.
Via this Layout Move you can insert and configure 2 columns. You can use this Move for vocabulary or a comparison of picture and text.
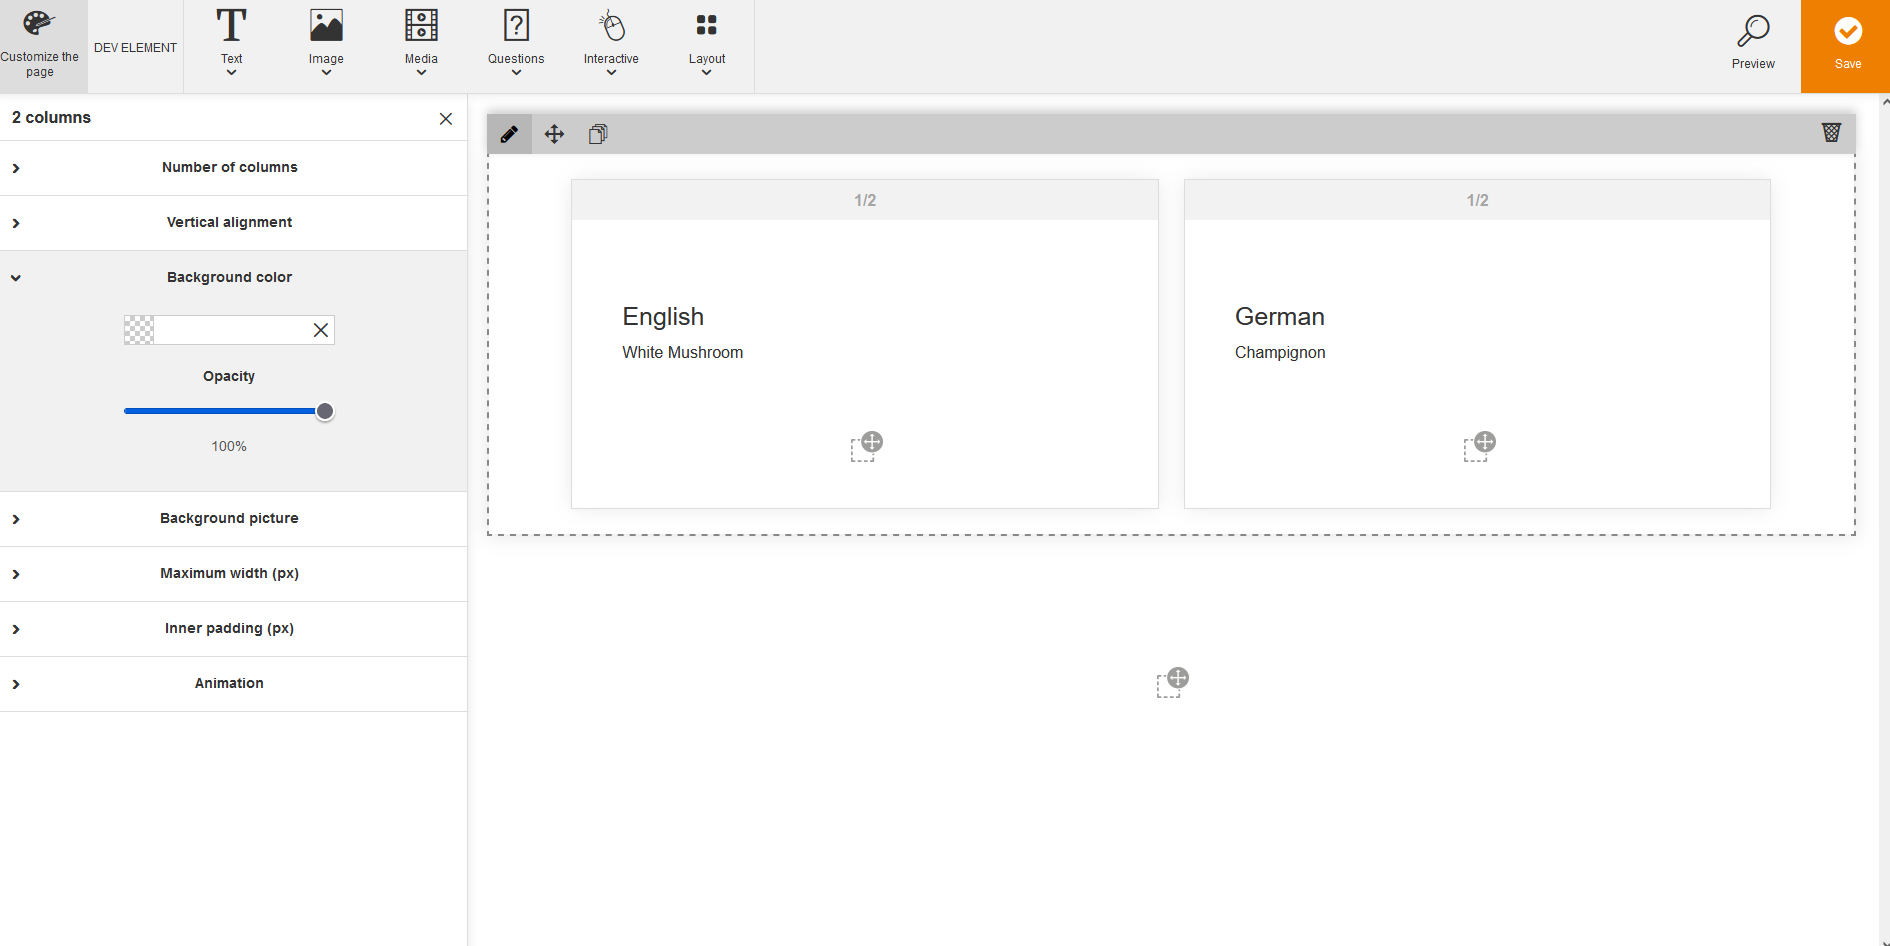
To insert 2 columns, click the menu item 2 columns and drag it via drag and drop on your favored place or you click the menu item 2 columns.
It’s not possible to insert columns in columns.
Additionally, you can’t insert light boxes into light boxes.
But you can insert columns in a light box and a light box into a column.
Also, you can drag and drop a column into a light box, which is also placed in a column.
To configure 2 columns, click the Pencil of the dialog window and the left editing window opens.
Left editing window
To change the number of columns, click the arrow besides Number of columns and choose the favored number of columns.
To change the vertical alignment, click the arrow besides Vertical alignment and choose the favored vertical alignment.
To change the background color for 2 columns, click the arrow besides Background color. You can select via Color Picker by selecting the basic color via the vertical bar and then selecting the background color in the field on the left side. Alternatively, you can enter directly a hexadecimal value. Via a slider bar you can define the Opacity in percentage.
To change the background picture for 2 columns, click the arrow on the left side besides Background picture and click the button Select picture. You can select under Scroll effect Fixed, Fill out, Adjust or Repeat. Furthermore you can remove the picture again via the button Remove picture. Furthermore you can move the the picture selection via the navigation arrow or/and you can Center per click. Additionally, you can remove the picture via the button Remove picture.
To change the maximum width (px) for 2 columns, click the arrow besides Maximum width (px) and enter the width (px) via the arrow buttons. Futhermore you can choose the alignment (Left, Centered or Right) and if Full width should be set. Via the alignment Centered you can change from a value 1150 downwards to Left or Right.
To enter the inner padding in pixels for 2 columns on list above or below, click the arrow besides Inner padding (PX) and select the appropriate values.
To configure an animation for 2 columns, for example Fade in, Zoom in, Fly in from the top, click the arrow besides Animation and select the type and the duration. You can test all animations via the button Test all animations.
To define the conditional display for 2 columns, click the tab Conditional display and select depending on the display size under Only show, if.. the option Desktop, Tablet or Smartphone under Is. You can add further rules for conditional display via clicking the button Further rule. Via Recycle bin you can remove the rules.
If you add 2 columns Move on the End page of a knowledge test, you can additionally select, if it should be shown, when the knowledge test is Passed or Failed.
If you don’t define any rule for the conditional display, the 2 columns Move will always be shown to the user.
Right editing window
To change the column width, click + or – besides the column width. The second column will be automatically adjusted.
You can remove 2 columns via the button Remove if applicable.
Via this Layout Move you can insert and configure 3 columns. You can use this Move for a product comparison or for an overview of chapters for example.
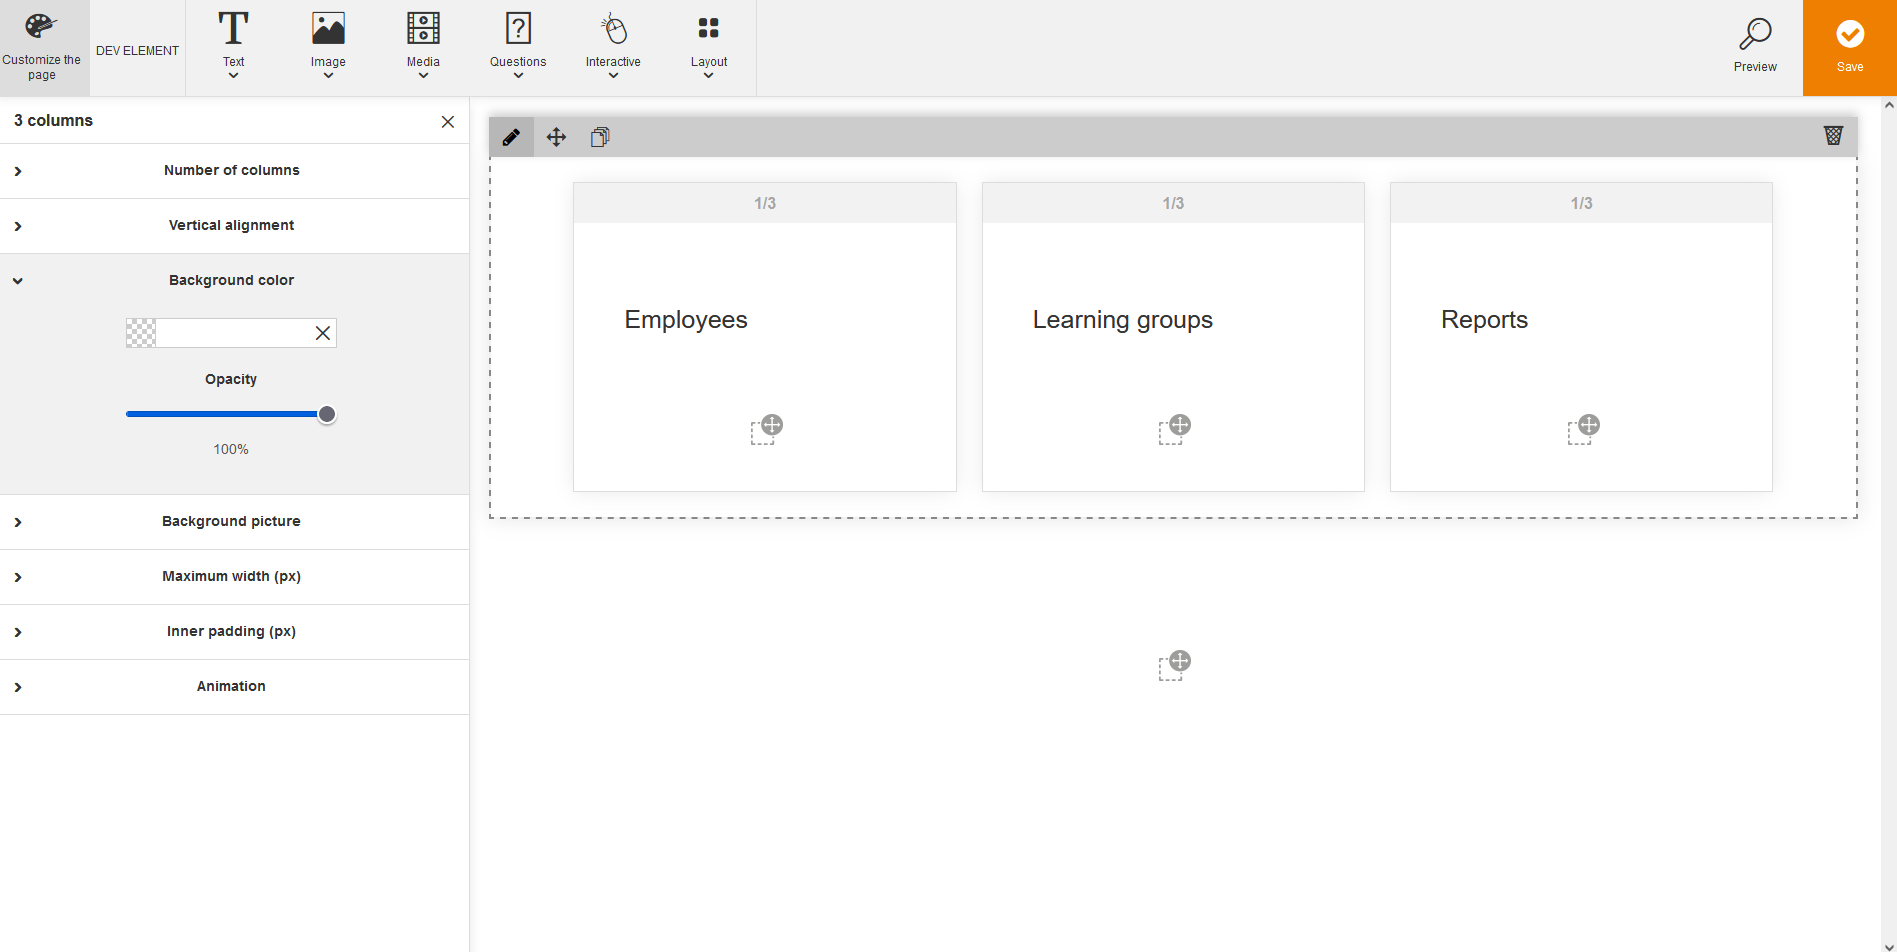
To insert 3 columns, click the menu item 3 columns and drag it via drag and drop on your favored place or you click the menu item 3 columns.
It’s not possible to insert columns in columns.
Additionally, you can’t insert light boxes into light boxes.
But you can insert columns in a light box and a light box into a column.
Also, you can drag and drop a column into a light box, which is also placed in a column.
To configure 3 columns, click the Pencil of the dialog window and the left editing window opens.
Left editing window
To change the number of columns, click the arrow besides Number of columns and choose the favored number of columns.
To change the vertical alignment, click the arrow besides Vertical alignment and choose the favored vertical alignment.
To change the background color for 3 columns, click the arrow besides Background color. You can select via Color Picker by selecting the basic color via the vertical bar and then selecting the background color in the field on the left side. Alternatively you can enter directly a hexadecimal value. Via a slider bar you can define the Opacity in percentage.
To change the background picture for 3 columns, click the arrow on the left side besides Background picture and click the button Select picture. You can select under Scroll effect Fixed, Fill out, Adjust or Repeat. Furthermore you can remove the picture again via the button Remove picture. Furthermore you can move the the picture selection via the navigation arrow or/and you can Center per click. Additionally, you can remove the picture via the button Remove picture.
To change the maximum width (px) for 3 columns, click the arrow besides Maximum width (px) and enter the width (px) via the arrow buttons. Futhermore you can choose the alignment (Left, Centered or Right) and if Full width should be set. Via the alignment Centered you can change from a value 1150 downwards to Left or Right.
To enter the inner padding in pixels for 3 columns on list above or below, click the arrow besides Inner padding (PX) and select the appropriate values.
To configure an animation for 3 columns, for example Fade in, Zoom in, Fly in from the top, click on the arrow besides Animation and select the type and the duration. You can test all animations via the button Test all animations.
To define the conditional display for 3 columns, click the tab Conditional display and select depending on the display size under Only show, if.. the option Desktop, Tablet or Smartphone under Is. You can add further rules for conditional display via clicking the button Further rule. Via Recycle bin you can remove the rules.
If you add 3 columns Move on the End page of a knowledge test, you can additionally select, if it should be shown, when the knowledge test is Passed or Failed.
If you don’t define any rule for the conditional display, the 3 columns Move will always be shown to the user.
Right editing window
To change the column width, click + or – besides the column width. The second column will be automatically adjusted.
You can remove 3 columns via the button Remove if applicable.
Via this Layout Move you can insert and configure 4 columns. You can use this Move for showing sequences, departments, steps for example.
To insert 4 columns, click the menu item 4 columns and drag it via drag and drop on your favored place or you click the menu item 4 columns.
It’s not possible to insert columns in columns.
Additionally, you can’t insert light boxes into light boxes.
But you can insert columns in a light box and a light box into a column.
Also, you can drag and drop a column into a light box, which is also placed in a column.
To configure 4 columns, click the Pencil of the dialog window and the left editing window opens.
Left editing window
To change the number of columns, click the arrow besides Number of columns and choose the favored number of columns.
To change the vertical alignment, click the arrow besides Vertical alignment and choose the favored vertical alignment.
To change the background color for 4 columns, click the arrow besides Background color. You can select via Color Picker by selecting the basic color via the vertical bar and then selecting the background color in the field on the left side. Alternatively, you can enter directly a hexadecimal value. Via a slider bar you can define the Opacity in percentage.
To change the background picture for 4 columns, click the arrow on the left side besides Background picture and click the button Select picture. You can select under Scroll effect Fixed, Fill out, Adjust or Repeat. Furthermore you can remove the picture again via the button Remove picture. Furthermore you can move the the picture selection via the navigation arrow or/and you can Center per click. Additionally, you can remove the picture via the button Remove picture.
To change the maximum width (px) for 4 columns, click the arrow besides Maximum width (px) and enter the width (px) via the arrow buttons. Futhermore you can choose the alignment (Left, Centered or Right) and if Full width should be set. Via the alignment Centered you can change from a value 1150 downwards to Left or Right.
To enter the inner padding in pixels for 4 columns on list above or below, click the arrow besides Inner padding (PX) and select the appropriate values.
To configure an animation for 4 columns, for example Fade in, Zoom in, Fly in from the top, click the arrow besides Animation and select the type and the duration. You can test all animations via the button Test all animations.
To define the conditional display for 4 columns, click the tab Conditional display and select depending on the display size under Only show, if.. the option Desktop, Tablet or Smartphone under Is. You can add further rules for conditional display via clicking the button Further rule. Via Recycle bin you can remove the rules.
If you add 4 columns Move on the End page of a knowledge test, you can additionally select, if it should be shown, when the knowledge test is Passed or Failed.
If you don’t define any rule for the conditional display, the 4 columns Move will always be shown to the user.
Right editing window
To change the column width, click + or – besides the column width. The second column will be automatically adjusted.
You can remove 4 columns via the button Remove if applicable.
Via this Layout Move you can insert and configure dividers. You can use this Move as graphical divider for themes or to mark learning paragraphs or content for example.
To insert a divider, click on the menu item Divider and drag it via drag and drop on your favored place or you click on the menu item Divider.
To configure a divider, click on the Pencil of the dialog window and the left editing window opens.
Left editing window
To change the type of the divider, click on the arrow besides Type and choose the favored type.
To change the color of the divider, click on the arrow besides Color and select via Color Picker a color.
To change the weight of the divider, click on the arrow besides Weight (px) and select the favored weight via slider.
To change the background color for the dividers, click on the arrow besides Background color. You can select via Color Picker by selecting the basic color via the vertical bar and then selecting the background color in the field on the left side. Alternatively you can enter directly a hexadecimal value. Via a slider bar you can define the Opacity in percentage.
To change the background picture for the dividers, click on the arrow on the left side besides Background picture and click on the button Select picture. You can select under Scroll effect Fixed, Fill out, Adjust or Repeat. Furthermore you can remove the picture again via the button Remove picture. Furthermore you can move the the picture selection via the navigation arrow or/and you can Center per click. Additionally you can remove the picture via the button Remove picture.
To change the maximum width (px) for the dividers, click on the arrow besides Maximum width (px) and enter the width (px) via the arrow buttons. Futhermore you can choose the alignment (Left, Centered or Right) and if Full width should be set. Via the alignment Centered you can change from a value 1150 downwards to Left or Right.
To enter the inner padding in pixels for the divider above or below, click on the arrow besides Inner padding (PX) and select the appropriate values.
To configure an animation for the divider, for example Fade in, Zoom in, Fly in from the top, click on the arrow besides Animation and select the type and the duration. You can test all animations via the button Test all animations.
To define the conditional display for divider, click the tab Conditional display and select depending on the display size under Only show, if.. the option Desktop, Tablet or Smartphone under Is. You can add further rules for conditional display via clicking the button Further rule. Via Recycle bin you can remove the rules.
If you add a divider Move on the End page of a knowledge test, you can additionally select, if it should be shown, when the knowledge test is Passed or Failed.
If you don’t define any rule for the conditional display, the divider Move will always be shown to the user.
Right editing window
You can remove the divider via the button Remove if applicable.