Basics
Prerequisites
To show and edit the individual notifications, you have under Resources (objects) the access rights Read, Select and Change, Create on your author account. Otherwise the menu item Individual Notifications in the menu Resources is hidden.
Use
Also Individual notifications are available in three communication channels like notifications in Avendoo®. The author defines the following channels in a notification together with the message text:
- Community message (in Avendoo® Community or in Avendoo® Progessive Web App (=PWA) visible)
- Push messages directly to Avendoo® PWA (only for Android)
Functions
Via Individual notifications you can decide, how to inform your users about processes in Avendoo®. You can create various variants of notifications for all message types. You can individually define the texts of the e-mails or the community messages.
Individual notifications are located in the categories under the different clients. Via these the author can create variants for the different message types, which are client or object specific, for example an individual notification for the invitation for a specific event.
Under Resources → Notifications you can show and edit the system standards for each notification type.
Individual notifications are used, if you want to create and edit:
- a notification on registration (for selecting the individual notification see information here (messages in the client) or here (communication in the course activation),
- an announcement of a run,
- a notification upon a deregistration from a course (for selecting the individual notification see information here (messages in the client) or here (communication in the course activation),
- a notification for approval for course activation registration (for selecting the individual notification see information here (messages in the client) or here (communication in the course activation),
- a notification regarding new documents in the course activation (for selecting the individual notification see information here (messages in the client) or here (communication in the course activation)
- a notification for sending of invitation e-mail (for selecting the individual notification see information here (messages in the client) or on the tab Notifications in the event,
- a notification for sending registration confirmation regarding the event (for selecting the individual notification see information here (messages in the client),
- a notification for sending registration confirmation (waiting list) regarding the event (for selecting the individual notification see information here (messages in the client),
- a notification for Double opt-in (information about activating Double opt-in you find here (chapter Configuration)),
- a certification notification (for selecting the individual notification see information here (messages in the client),
- a hotel notification regarding booking request (for selecting the individual notification see information here (messages in the client),
- a notification for the fall of the time ostacle in the course activation (for selecting the individual notification see information here (messages in the client) or here (communication in the course activation),
- a room booking notification (for selecting the individual notification see information here (messages in the client),
- a task notification, when a task is created (for selecting the individual notification see information here (messages in the client),
- a task notification, when a task is due (for selecting the individual notification see information here (messages in the client),
- a task reminder for the course activation regarding the participants (for selecting the individual notification see information here (messages in the client) or here (communication in the course activation),
- a summed up task reminder for the course activation (for selecting the individual notification see information here (messages in the client) or here (communication in the course activation),
- an escalation notification for the participants (for selecting the individual notification see information here (messages in the client) or here (communication in the course activation),
- a summed up escalation notification (for selecting the individual notification see information here (messages in the client) or here (communication in the course activation),
- a notification for IDD transmission error (for selecting the individual notification see information here (messages in the client),
- a notification if there was no participation in the event (for selecting the individual notification see information here (messages in the client) or on the tab Notifications in the event,
- a notification if an approval request of a course activation was declined (for selecting the individual notification see information here (messages in the client) or here (communication in the course activation),
- a notification about an escalation of an approval request of a course activation (for selecting the individual notification see information here (messages in the client) or here (communication in the course activation),
- a notification if there is a new document in the event (for selecting the individual notification see information here (messages in the client) or on the tab Notifications in the event,
- a notification if a knowledge test did not pass (for selecting the individual notification see information here (messages in the client) or here (communication in the course activation),
- a notification about an approval request for joining the group in the community (for selecting the individual notification see information here (messages in the client)),
- a notification about an accepted entry to group in the community (for selecting the individual notification see information here (messages in the client)),
- a notification about a denied entry to group in the community (for selecting the individual notification see information here (messages in the client)),
- a notification if a new topic was created in the forum (for selecting the individual notification see information here (messages in the client) or here (communication in the course activation),
- a notification if a new forum article regarding a course activation was created (for selecting the individual notification see information here (messages in the client) or here (communication in the course activation),
- a notification if a a forum article regarding a course activation was responded to (for selecting the individual notification see information here (messages in the client) or here (communication in the course activation),
- a notification about an automatic event date deregistration (for selecting the individual notification see information here (messages in the client) or on the tab Notifications in the event,
- a notification about a follow-up with event invitation (for selecting the individual notification see information here (messages in the client) or on the tab Notifications in the event (changes can be done in the Event manager),
- a notification for registering to a training plan (for selecting the individual notification see information here (messages in the client) or on the tab Notifications in the Training plan wizard,
- a notification for deregistering from a training plan (for selecting the individual notification see information here (messages in the client) or on the tab Notifications in the Training plan wizard,
- a notification for an approval request for deregistering (for selecting the individual notification see information here (messages in the client) or on the tab Notifications in the event,
- a notification for a declined approval request for deregistering (for selecting the individual notification see information here (messages in the client) or on the tab Notifications in the event,
- a notification about the answered date request for the speaker (for selecting the individual notification see information here (messages in the client) or on the tab Notifications in the event,
- a notification about the accepted date request for the speaker (for selecting the individual notification see information here (messages in the client) or on the tab Notifications in the event,
- a notification about the declined date request for the speaker (for selecting the individual notification see information here (messages in the client) or on the tab Notifications in the event,
- a notification about an unauthorized deregistration from an event date (for selecting the individual notification see information here (messages in the client) or on the tab Notifications in the event,
- a notification about a liked message (for selecting the individual notification see information here (messages in the client),
- a notification about a liked comment (for selecting the individual notification see information here (messages in the client),
- a notification about the feedback of an event (for selecting the individual notification see information here (messages in the client) or on the tab Notifications in the event,
- a notification about an event date announcement (for selecting the individual notification see information here (messages in the client) or on the tab Notifications in the event,
- a notification about a change from the waiting list to an event slot (for selecting the individual notification see information here (messages in the client) or on the tab Notifications in the event,
- a notification about a change from the waiting list to an event slot (invitation) (for selecting the individual notification see information here (messages in the client) or on the tab Notifications in the event,
- a notification about a manual deregistration in an event (for selecting the individual notification see information here (messages in the client) or on the tab Notifications in the event,
- a notification about a booking of user’s absence (for selecting the individual notification see information here (messages in the client),
- a notification about a calendar booking for a room (for selecting the individual notification see information here (messages in the client),
- a notification about a calendar booking for a material (for selecting the individual notification see information here (messages in the client),
- a notification about an approval for a run registration (for selecting the individual notification see information here (messages in the client) or here (communication in the course activation),
- a notification about the confirmation of an assessment (for selecting the individual notification see information here (messages in the client) or here (communication in the course activation),
- a notification about a fill-out request for an assessment (for selecting the individual notification see information here (messages in the client) or here (communication in the course activation),
- a notification about a learning transfer for an assessment (for selecting the individual notification see information here (messages in the client) or here (communication in the course activation)
- a notification about a plan learning transfer interview of assessment (for selecting the individual notification see information here (messages in the client) or here (communication in the course activation) and
- a notification for user registration by login (for selecting the individual notification see information here (messages in the client).
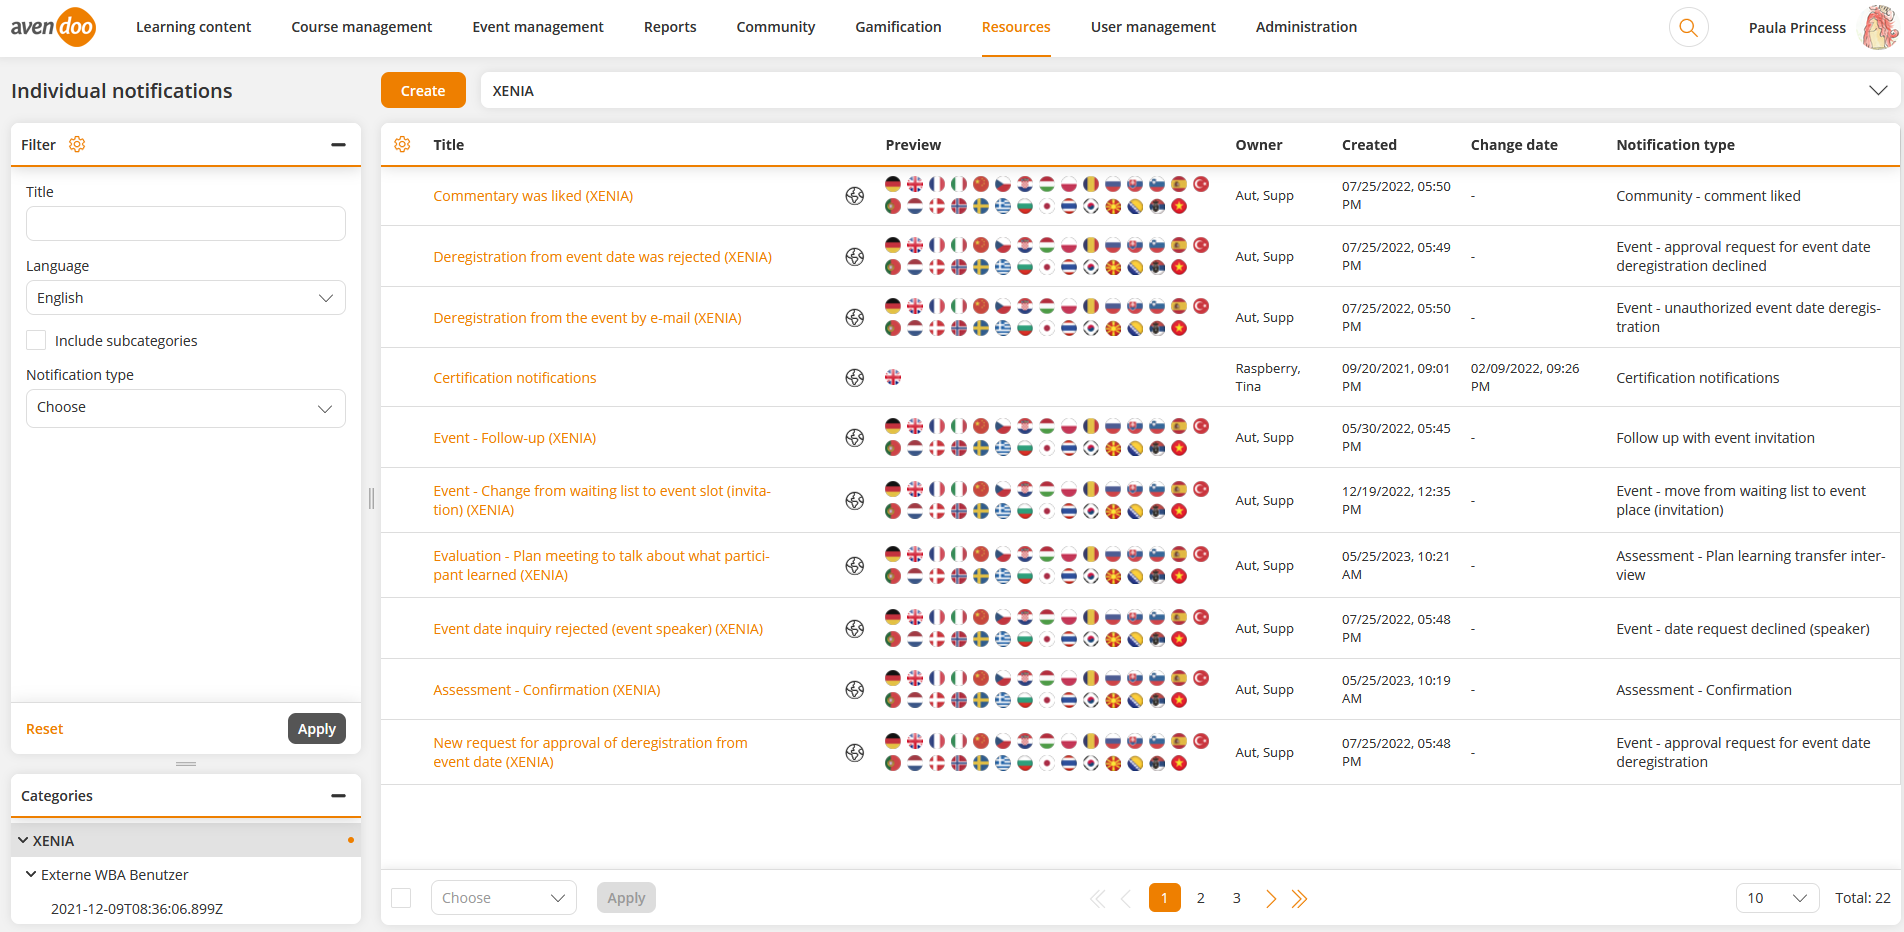
You see the notifications in the overview table, listed by Title, Translation area, Preview, Change date and Notification type. Via a right click on the table header you can Edit the display of columns and order.
Via click on the symbol of the translation area you get into the translation management of the appropriate individual notification. Via click on the national flag you can show the preview of the appropriate individual notification (community message or e-mail).
You can filter by the following criteria: Title, Language and Notification type (multi-select filter).
There are the mass processing functions Copy, Move, Change owner and Delete. More information about the mass processing functions of the individual notifications you find under Individual notifications: Mass processing functions.
The following functions are available via the context menu of the appropriate individual notification title.
Create individual notification
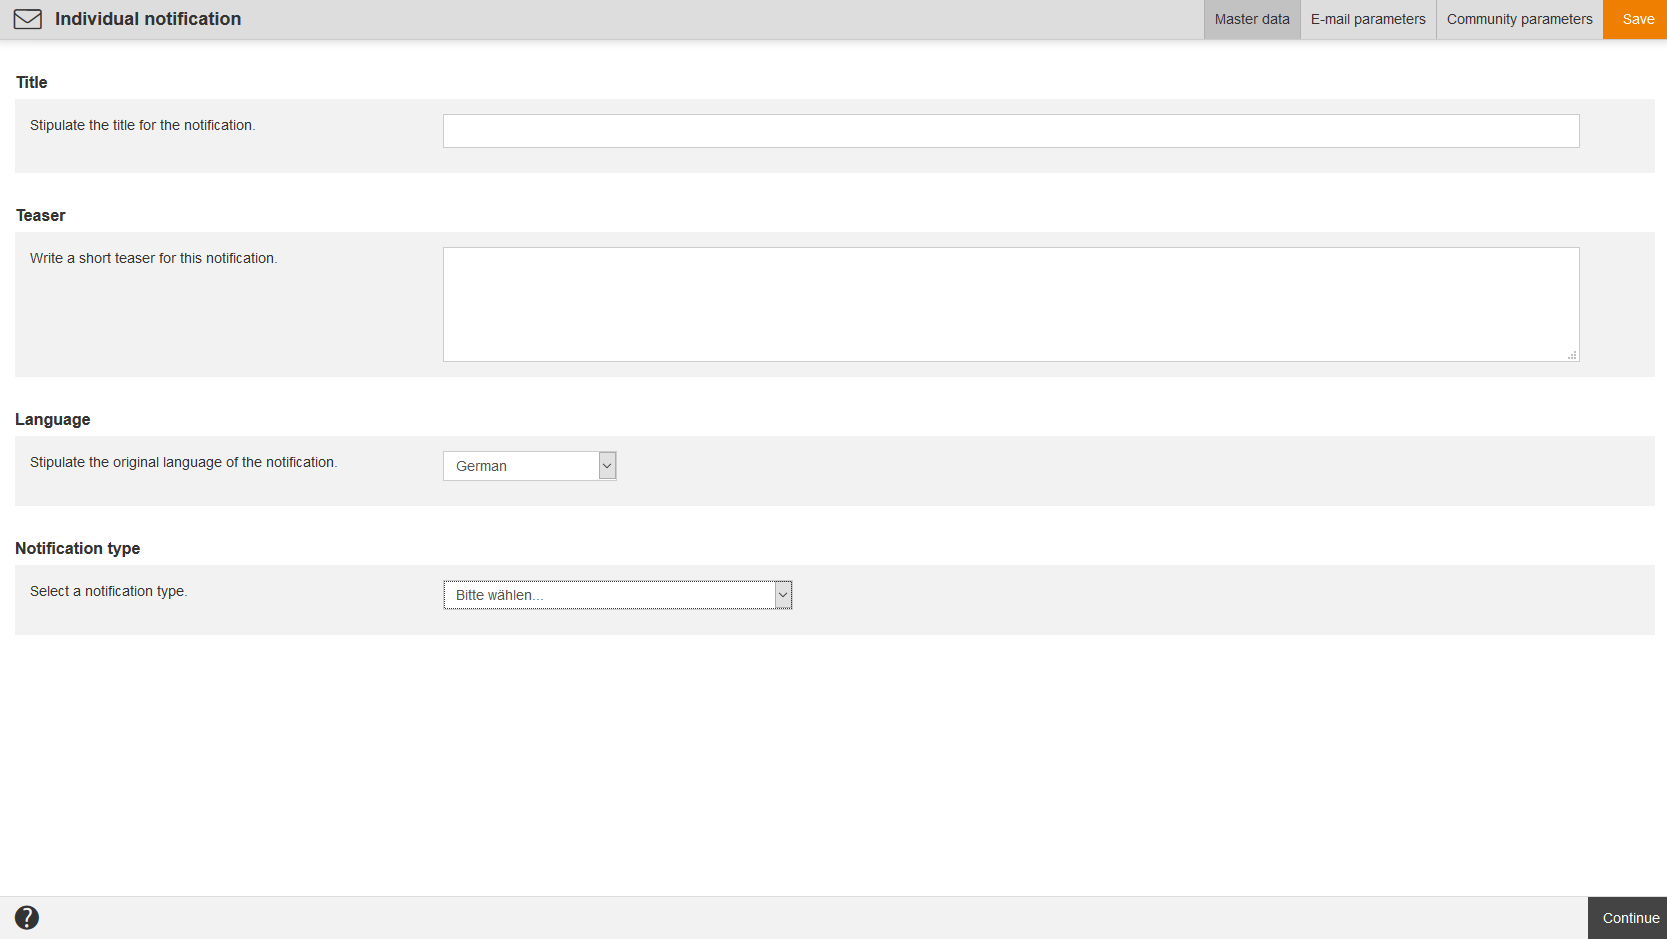
Master data
Enter a title and teaser for the corresponding individual notification. Further select a language and a notification type for the corresponding individual notification.
E-mail parameters
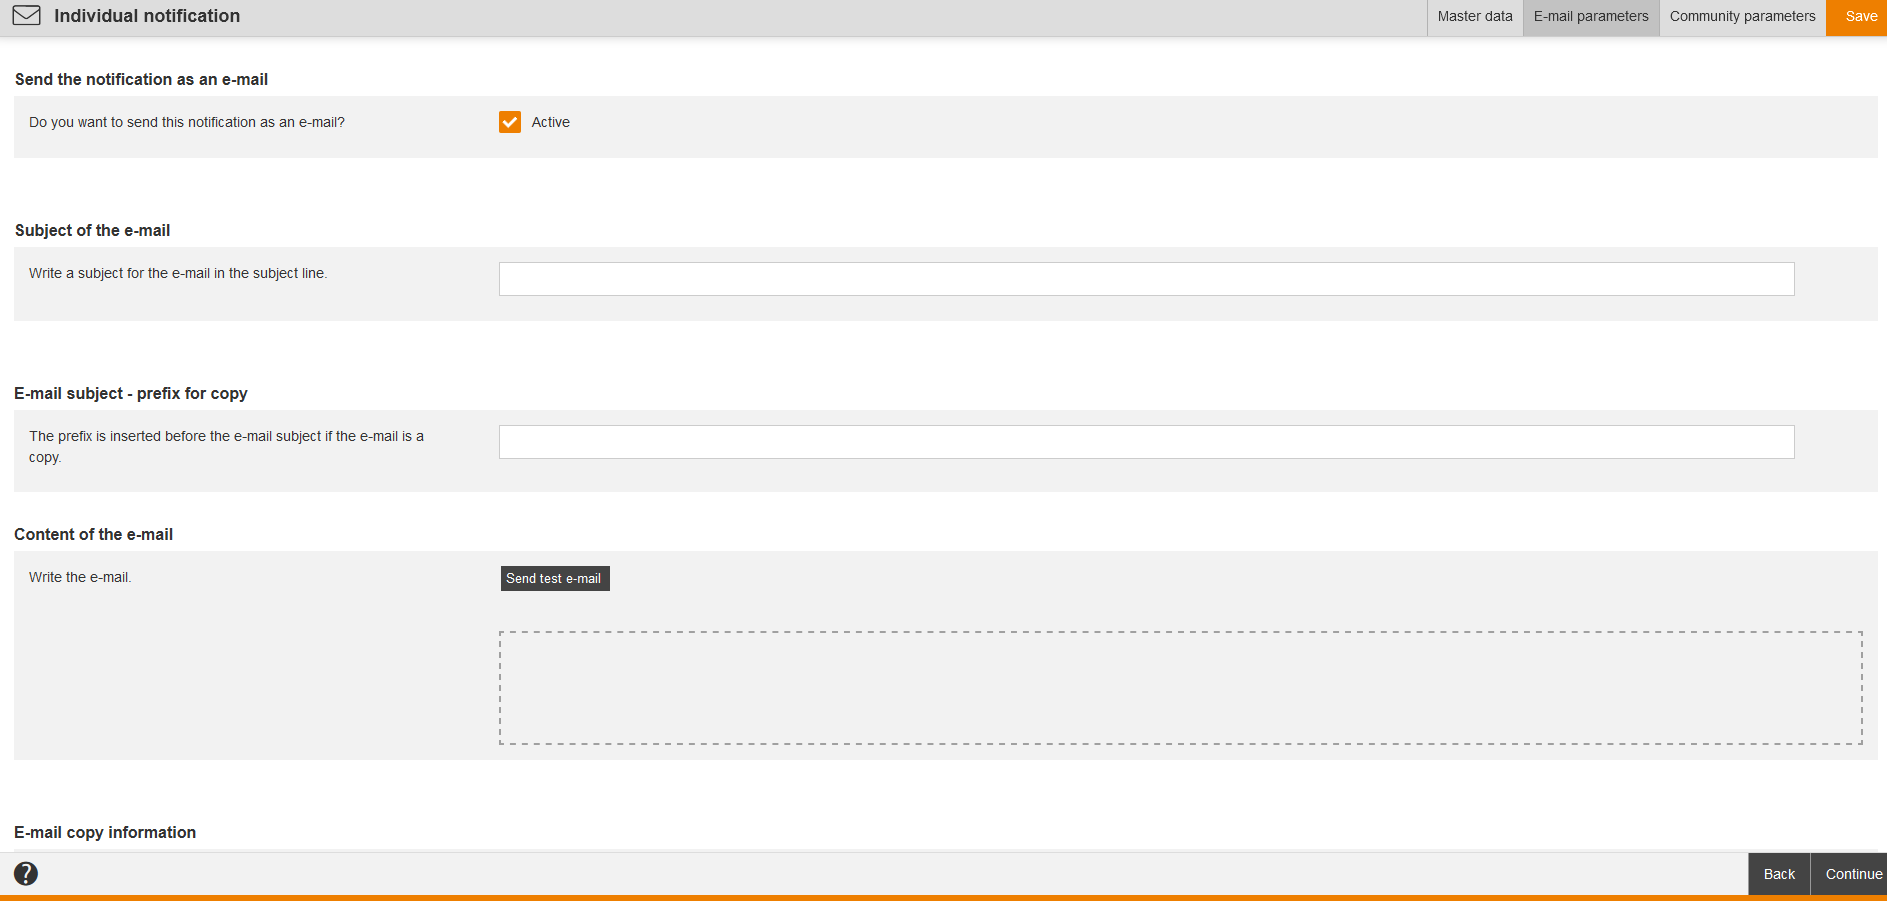
Send the notification as an e-mail
If you want to send this notification as an e-mail, set the check mark Active.
Subject of the e-mail (only shown if the first check mark Active is set)
Write a subject for the e-mail in the subject line.
E-mail subject – prefix for copy
The prefix is inserted before the e-mail subject if the e-mail is a copy. Enter this prefix for copy in this field.
Content of the e-mail (only shown if the first check mark Active is set)
Write the e-mail via the Editor.
You find information about the variables under “Available mail variables in the event management and in the notifications“.
The following variables dependent on the notification type are available:
- $ActivityBookings$
- $Address$
-
$ApproverTitle$
-
$ApproverSecondTitle$
-
$ApproverFirstname$
-
$ApproverLastname$
-
$ApproverSex$
-
$ApproverOe$
-
$ApproverRegion$
-
$ApproverGroup$
-
$ApproverDivision$
-
$ApproverCountry$
- $AssignmentDeeplink$
-
$AssignmentDuration$
-
$AssignmentDurationReminder$
-
$AssignmentElearningPrice$
- $AssignmentId$
-
$AssignmentInningStartDate$
-
$AssignmentInningStartDateWithoutTime$
-
$AssignmentInningFirstEventOrOrgaBlockDate$
-
$AssignmentInningFirstEventOrOrgaBlockTime$
-
$AssignmentInningLastEventOrOrgaBlockDate$
-
$AssignmentInningLastEventOrOrgaBlockTime$
- $AssignmentPrice$
- $AssignmentSeminarPrice$
- $AssignmentStartDateWithoutTime$
-
$AssignmentTitleLink$
- $BillingAddress$
-
$BillingCompany$
-
$BillingStreet$
-
$BillingFirstname$
-
$BillingLastname$
-
$BillingPostcode$
-
$BillingLocation$
-
$BillingEMail$
-
$BookedHotel$
-
$BookingState$
- $Certificate$
- $CertificateExpiryDate$
- $CertificateUser$
- $Company$
- $CourseTitle$
- $ExternalReference$
- $Firstname$
-
$FullUsername$
- $LastBooking$
- $NewBooking$
- $Location$
- $Login$
- $Oe$
- $OptInLink$
-
$Participant$
-
$ParticipantLogin$
-
$ParticipantOe$
-
$ParticipantEmail$
-
$ParticipantPhone$
-
$ParticipantPhoneMobile$
-
$ParticipantTitle$
-
$ParticipantSecondTitle$
-
$ParticipantCostCenter$
-
$ParticipantAddress$
-
$ParticipantBillingAddress$
-
$PlaceTitle$
-
$PlaceStreet$
-
$PlacePostalCode$
-
$PlaceCity$
-
$PlaceRegion$
-
$PlaceCountry$
-
$PlaceLongitude$
-
$PlaceLatitude$
-
$PlacePhoneNumber$
-
$PlaceFax$
-
$PlaceEmail$
-
$PlaceUrl$
-
$PlaceContactPerson$
-
$PlaceTimeZone$
-
$PlaceTimeZoneId$
-
$PlaceDescription$
-
$PlaceAlternativeDescription$
-
$PlaceRoomTitle$
-
$PlaceRoomNumber$
-
$PlaceRoomFloor$
-
$PlaceRoomBuilding$
-
$PlaceRoomCapacity$
-
$PlaceRoomContactPerson$
-
$PlaceRoomInformation$
- $Postcode$
- $RegisteringUserFullName$
- $SecondTitle$
- $SelfCheckIn$
- $SeminarDeeplink$
- $SeminarEscortName$
-
$SeminarEventLocation$
-
$SeminarEventTimeZoneId$
-
$SeminarEventRoom$
-
$SeminarEventAddress$
-
$SeminarEventStart$
-
$SeminarEventEnd$
-
$SeminarEventGroupStart$
-
$SeminarEventGroupEnd$
-
$SeminarEventDeadline$
-
$SeminarEventClosing$
- $SeminarEventDeeplink$
- $SeminarEventDeeplinkVC$
-
$SeminarEventDescription$
-
$SeminarEventGroupDescription$
-
$SeminarEventUser$
-
$SeminarEventCoordinator$
-
$SeminarEventUserPhone$
-
$SeminarEventTrainers$
-
$SeminarEventStatus$
-
$SeminarEventHotelBookDays$
-
$SeminarEventHotelStreet$
-
$SeminarEventHotelPostalCode$
-
$SeminarEventHotelCity$
-
$SeminarEventHotelRegion$
-
$SeminarEventHotelCountry$
-
$SeminarEventHotelLongitude$
-
$SeminarEventHotelLatitude$
-
$SeminarEventHotelPhoneNumber$
-
$SeminarEventHotelFax$
-
$SeminarEventHotelEmail$
-
$SeminarEventHotelUrl$
-
$SeminarEventHotelContactPerson$
-
$SeminarEventHotelTimeZone$
-
$SeminarEventHotelTimeZoneId$
-
$SeminarEventHotelDescription$
-
$SeminarEventHotelAlternativeDescription$
- $SeminarEventParticipantPrice$
- $SeminarInvitationComment$
- $SeminarPrice$
Note: This variable is substituted by $SeminarEventParticipantPrice$. If you already use this variable, it will be filled correctly. - $SeminarPriceSource$
- $SeminarTitleWithDateAndTime$
- $Street$
- $Surname$
- $SystemPath$
- $Title$
- $UnsubscribeDate$
- $UpdateReason$
- $UserCountry$
- $UserDivision$
-
$UserFirstname$
-
$UserGroup$
-
$UserLastname$
- $UserOe$
-
$UserPhoneLandline$
-
$UserPhoneMobileBusiness$
-
$UserPhoneMobilePrivate$
- $UserRegion$
- $UserSex$
- $UserSecondTitle$
- $UserSso$
-
$UserTitle$
- $VCLink$
Via the button Send test e-mail you can send a test e-mail of the corresponding Individual notification.
E-mail copy information
Enter a text in this field. That text is replaced by the variable $mailSkeletonHtmlBodyCopyInfoReplacement$ in the mail template if the e-mail is a copy.
E-mail template
Select, which template should be used for designing the e-mail. If you have configured that the standard design should be used, that design will be used which is configured at the client of the recipient. If there’s nothing defined at the client, the system standard will be used.
Select between the following options:
- Use default-design or
- Use customized design (Prerequisite: You’ve created a custom page of the type E-mail template) by selecting the custom e-mail template and confirming your selection.
iCal (only shown if the check mark Active is set)
If the e-mail shoud have an iCal attachment, set the check mark Active.
Select between the attachment options:
- Request or
- File attachment.
iCal text (only shown, if the check mark Active is set)
You can select between the following options:
- Use content of the e-mail or
- Use customized text.
If you select this option, a text field with the editor functions Cut, Copy, Paste as plain text, Undo, Redo and Insert variable will be shown.
You can configure the trigger for the e-mail under Announcements for runs on the tab Communication in the Course activation wizard.
In the Participant management of the course activation you see a list of all sent notifications.
Community parameters
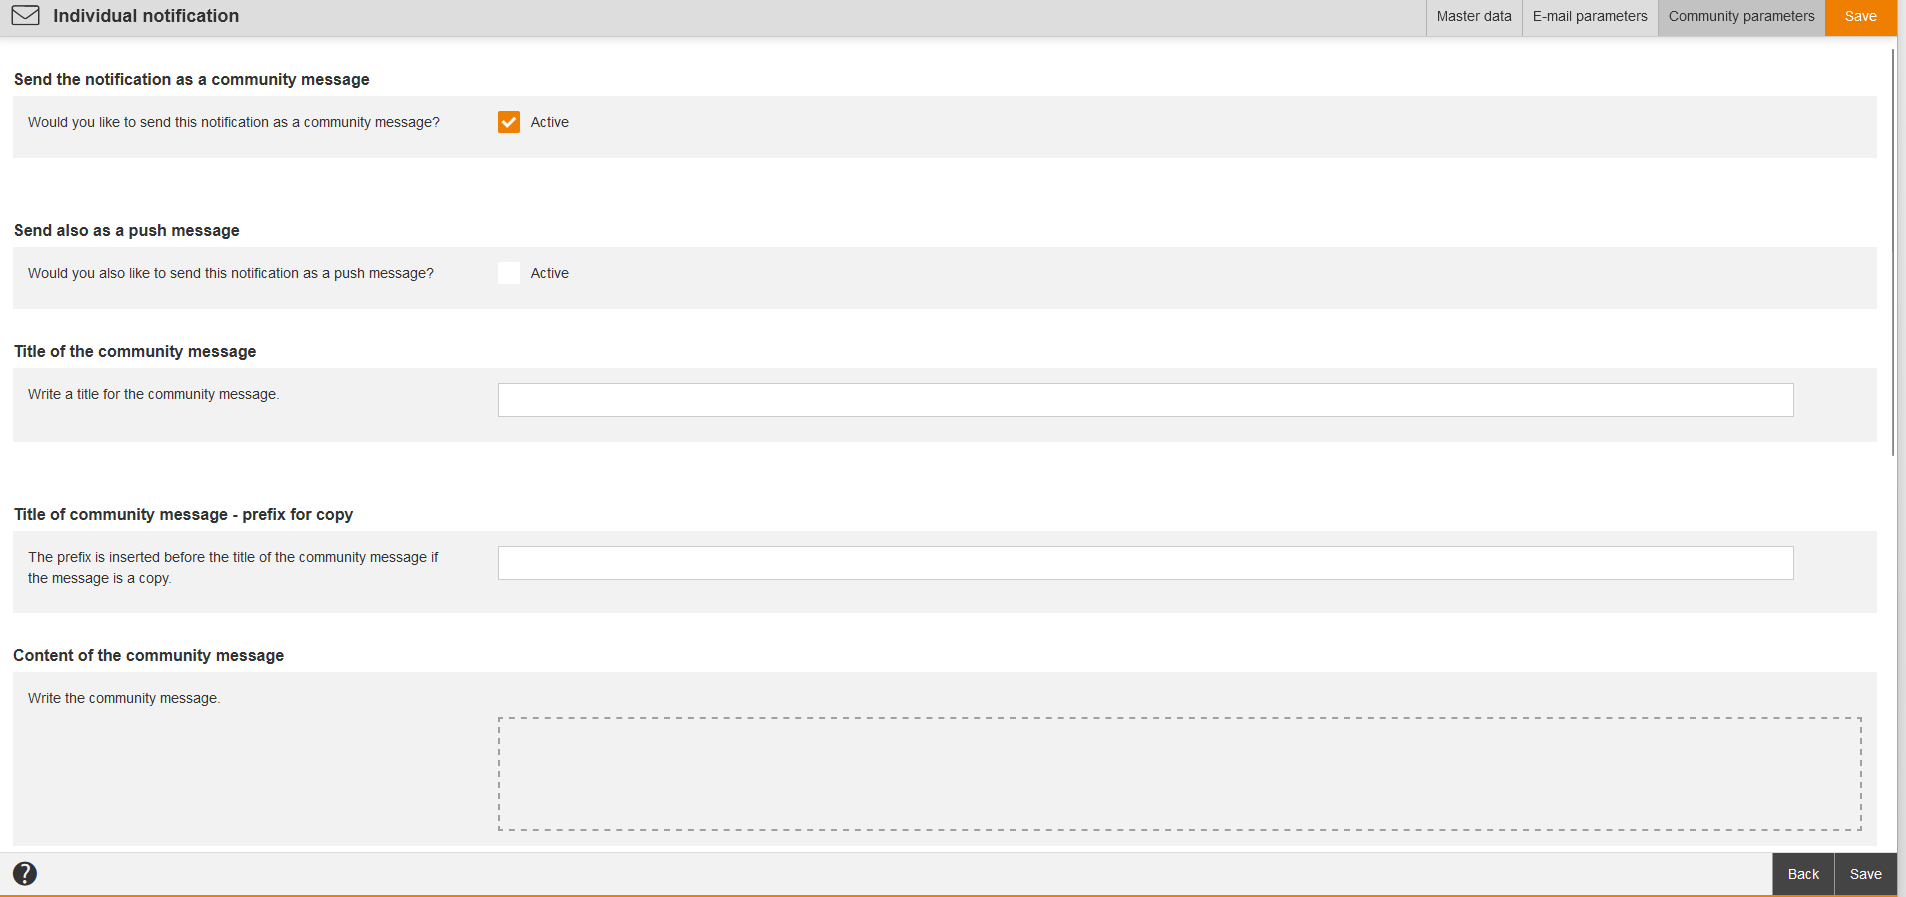
Send the notification as a community message
If you would like to send this notification as a community message, set the check mark Active.
Send also as a push message (only shown if the check mark Active is set)
If you would like to send this notification as a push message, set the check mark Active.
Title of the community message (only shown if the check mark Active is set)
Write a title for the community message.
Title of the community message – prefix for copy
The prefix is inserted before the community message if the e-mail is a copy. Enter this prefix for copy in this field.
Content of the community message (only shown if the check mark Active is set)
Write the community message.
You find information about the variables under “Available mail variables in the event management and in the notifications“.
The following variables are available:
-
$CourseTitle$
-
$AssignmentTitleLink$
-
$AssignmentDeeplink$
-
$AssignmentId$
-
$AssignmentIdOnly$
- $Login$
-
$SystemPath$
-
$UserFirstname$
-
$UserLastname$
-
$UserSex$
-
$UserOe$
-
$UserRegion$
-
$UserGroup$
-
$UserDivision$
-
$UserCountry$
-
$RegisteringUserFullName$
-
$FullUsername$
-
$UserTitle$
-
$UserSecondTitle$
-
$UserSso$
-
$AssignmentDuration$
-
$AssignmentDurationReminder$
-
$AssignmentElearningPrice$
-
$AssignmentSeminarPrice$
-
$AssignmentPrice$
- $DeregisteringUserFullName$
-
$ExternalReference$
-
$AssignmentInningStartDate$
-
$AssignmentInningStartDateWithoutTime$
-
$AssignmentInningFirstEventOrOrgaBlockDate$
-
$AssignmentInningFirstEventOrOrgaBlockTime$
-
$AssignmentInningLastEventOrOrgaBlockDate$
-
$AssignmentInningLastEventOrOrgaBlockTime$
-
$AssignmentInningTitle$
-
$ApproverTitle$
-
$ApproverSecondTitle$
-
$ApproverFirstname$
-
$ApproverLastname$
-
$ApproverSex$
-
$ApproverOe$
-
$ApproverRegion$
-
$ApproverGroup$
-
$ApproverDivision$
-
$ApproverCountry$
-
$ApprovalRequestComment$
-
$CertificateUser$
-
$Certificate$
-
$CertificateExpiryDate$
-
$SeminarTitleWithDateAndTime$
-
$SeminarEventInformation$
- $TaskName$
-
$TaskTeaser$
-
$TaskDueDate$
-
$TaskOwner$
-
$TaskStatus$
-
$TaskTrigger$
-
$TaskTriggerType$
-
$TaskTriggerUser$
-
$TaskAffectedObjectType$
-
$TaskAffectedObjectName$
-
$TaskEventExternalReference$
-
$TaskEventExternalReferenceType$
-
$Participant$
-
$ParticipantLogin$
-
$ParticipantOe$
-
$ParticipantEmail$
-
$ParticipantPhone$
-
$ParticipantPhoneMobile$
-
$ParticipantTitle$
-
$ParticipantSecondTitle$
-
$ParticipantCostCenter$
- $ParticipantDuration$
- $ParticipantList$
- $BookedHotel$
-
$SeminarEventHotelBookDays$
- $SeminarEventHotelStreet$
-
$SeminarEventHotelPostalCode$
-
$SeminarEventHotelCity$
-
$SeminarEventHotelRegion$
-
$SeminarEventHotelCountry$
-
$SeminarEventHotelLongitude$
-
$SeminarEventHotelLatitude$
-
$SeminarEventHotelPhoneNumber$
-
$SeminarEventHotelFax$
-
$SeminarEventHotelEmail$
-
$SeminarEventHotelUrl$
-
$SeminarEventHotelContactPerson$
-
$SeminarEventHotelTimeZone$
-
$SeminarEventHotelTimeZoneId$
-
$SeminarEventHotelDescription$
-
$SeminarEventHotelAlternativeDescription$
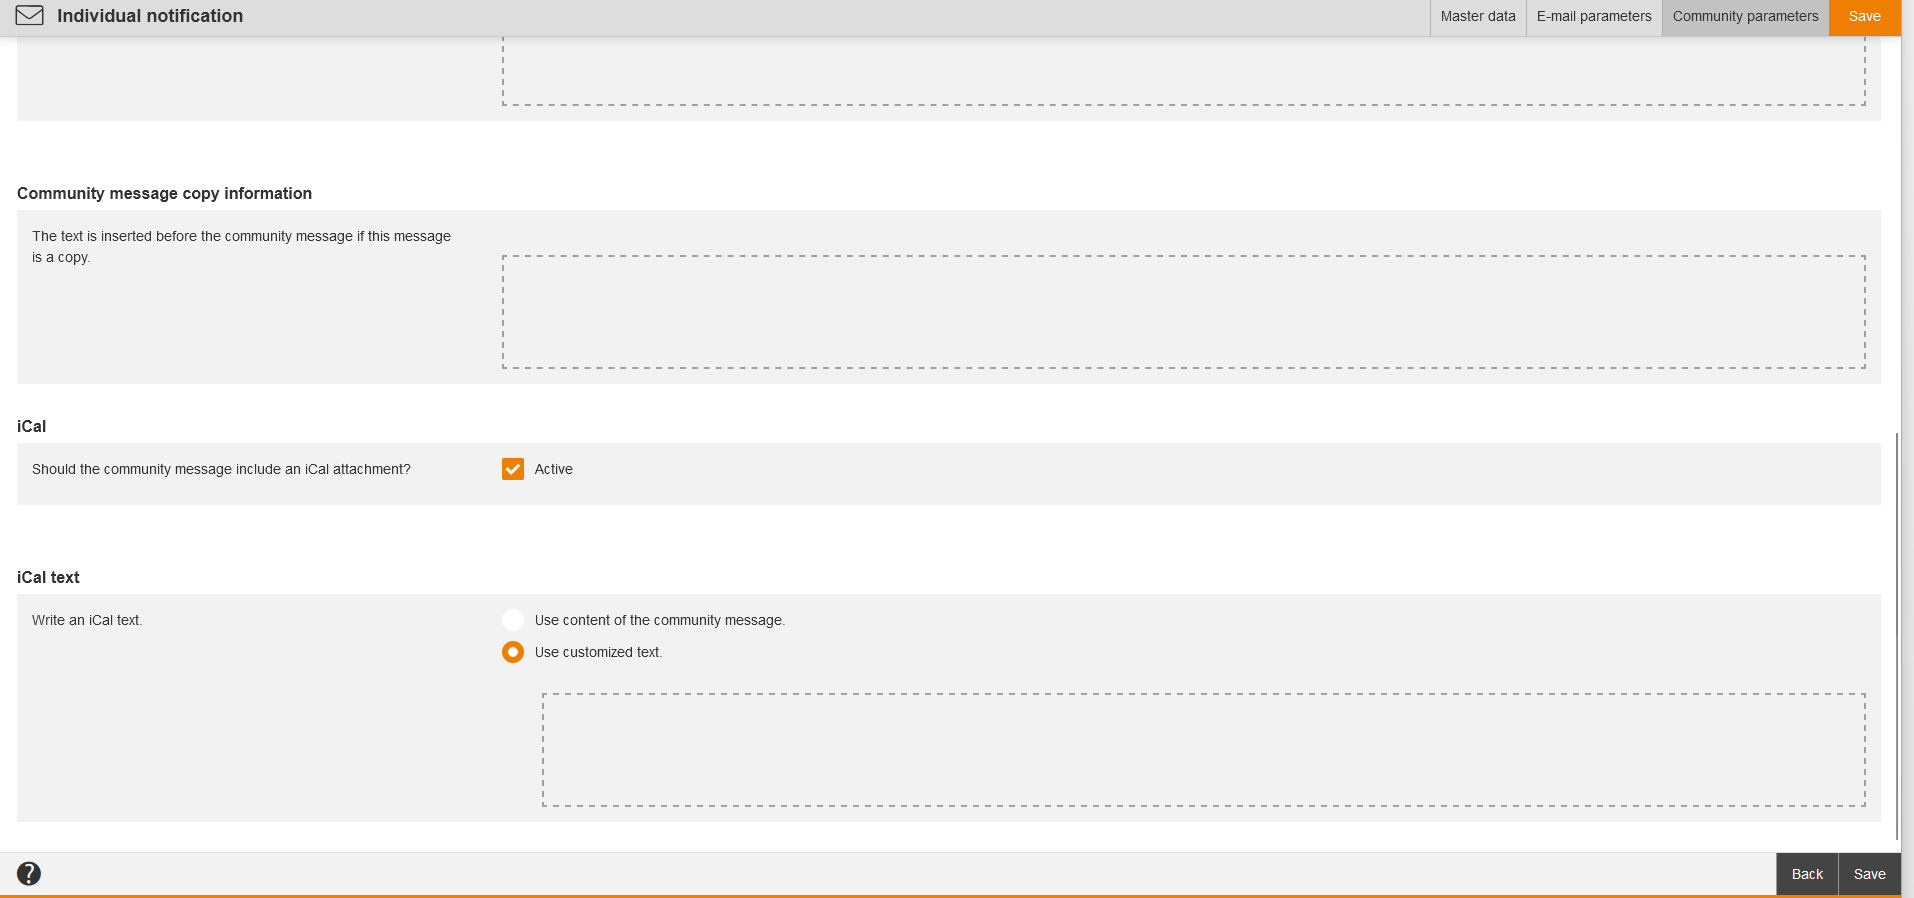
Community message copy information
Enter a text in this field. That text is inserted before the community message if this message is a copy.
iCal
If the e-mail shoud have an iCal attachment, set the check mark Active.
iCal text (only shown, if the check mark Active is set)
You can select between the following options:
- Use content of the community message or
- Use customized text.
If you select this option, a text field with the editor functions Cut, Copy, Paste as plain text, Undo, Redo and Insert variable will be shown.
In the Participant management of the course activation you see a list of all sent notifications.
Practical example
Registration to a course activation
You can select on the tab Communication of the appropriate course activation, if you want no notification, if you want to use the notification from the client standard (you configure the client standard on the tab Messages in the Client wizard; you select either Do not send a notification, Send notification (system standard) 0r Individual notification) or if you want to use an individual notification.
