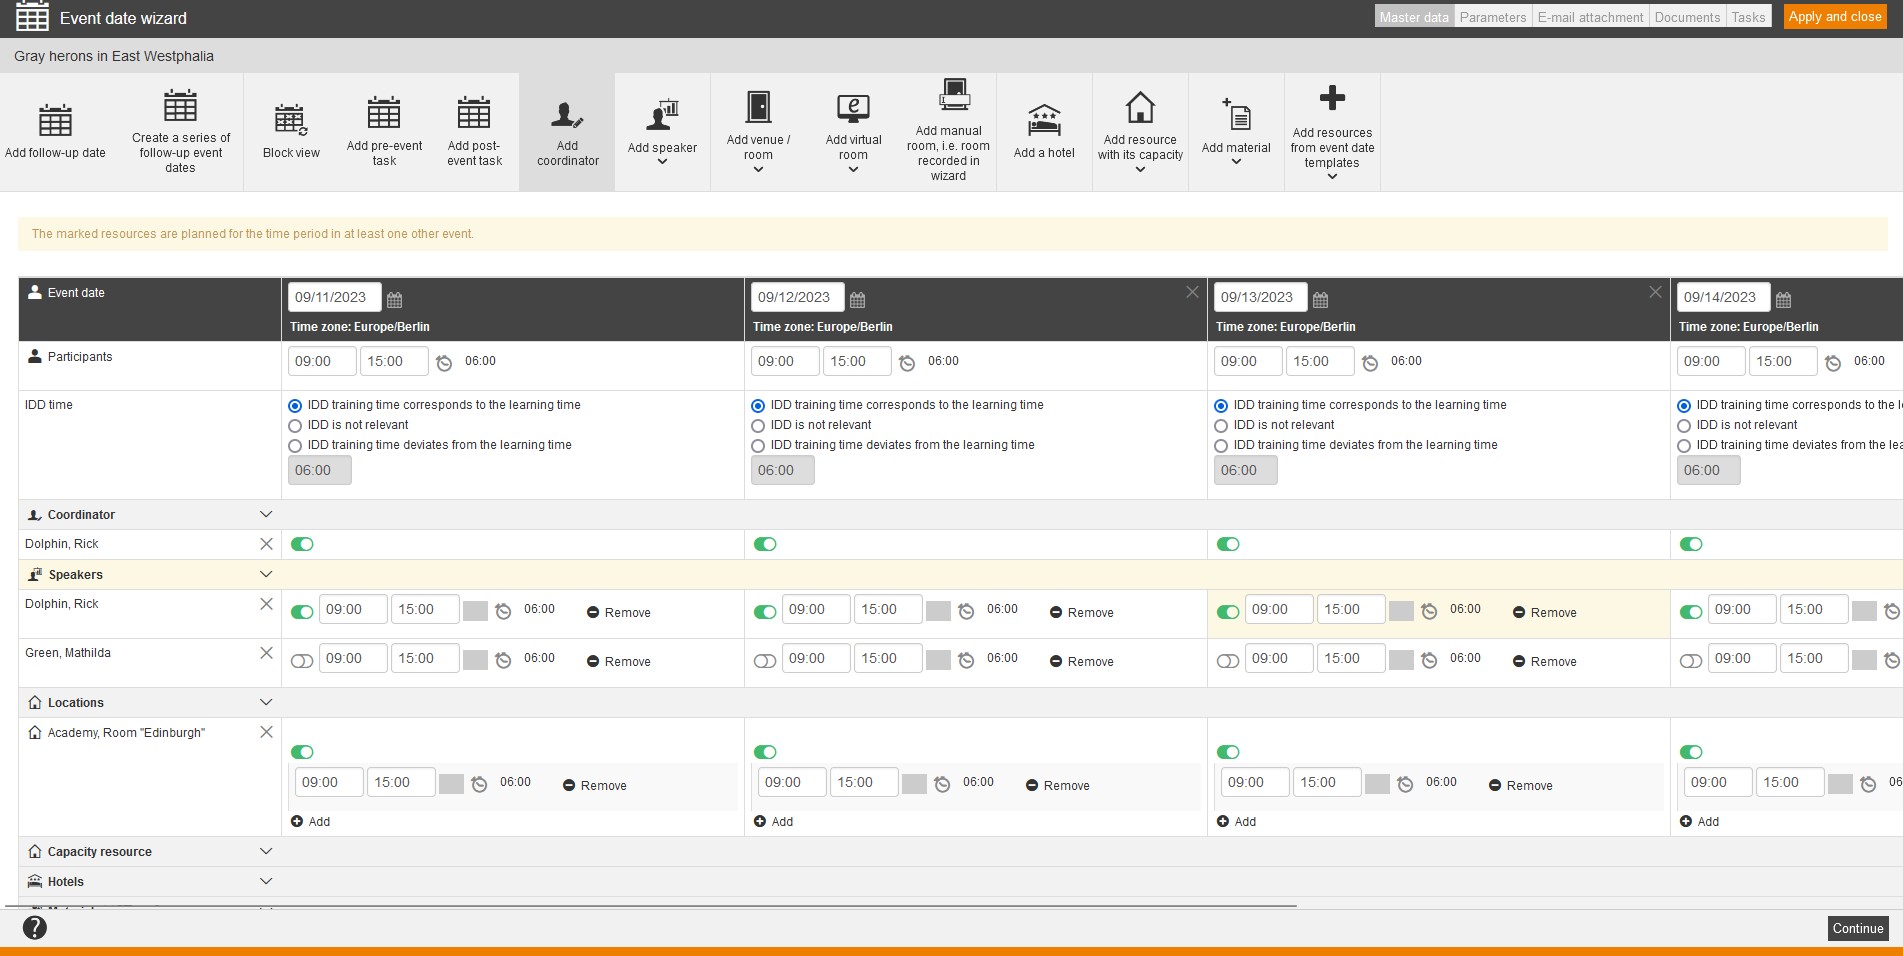
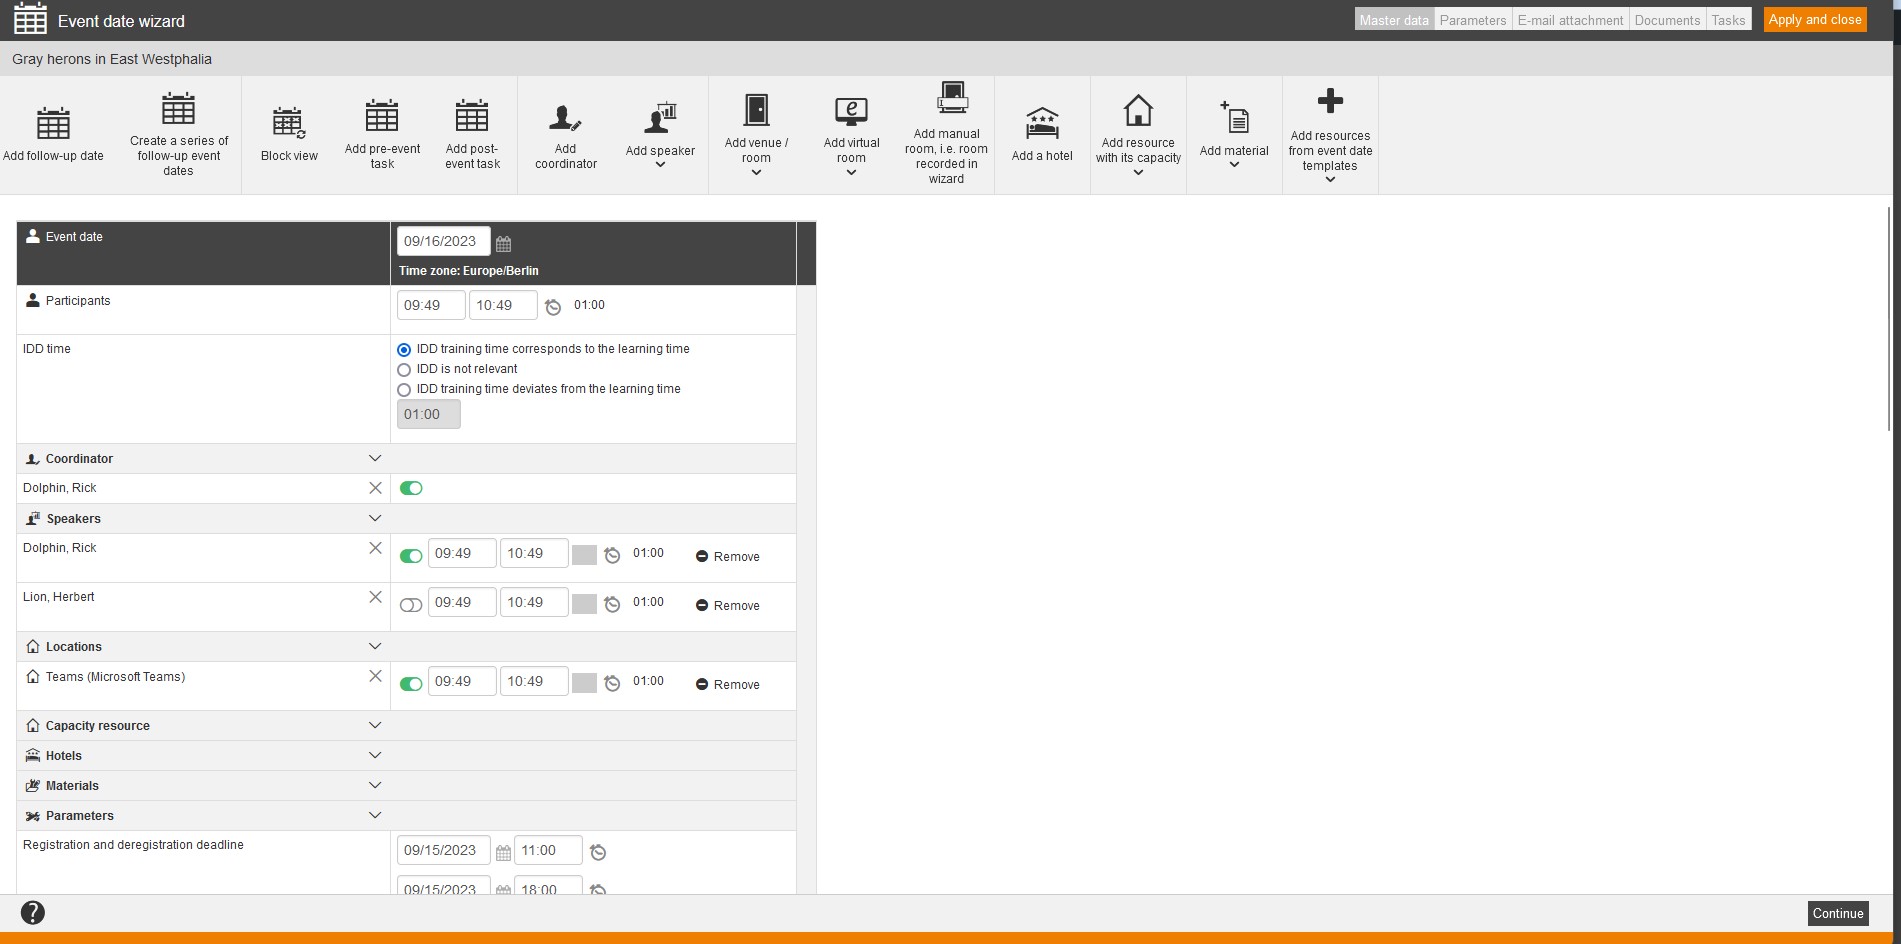
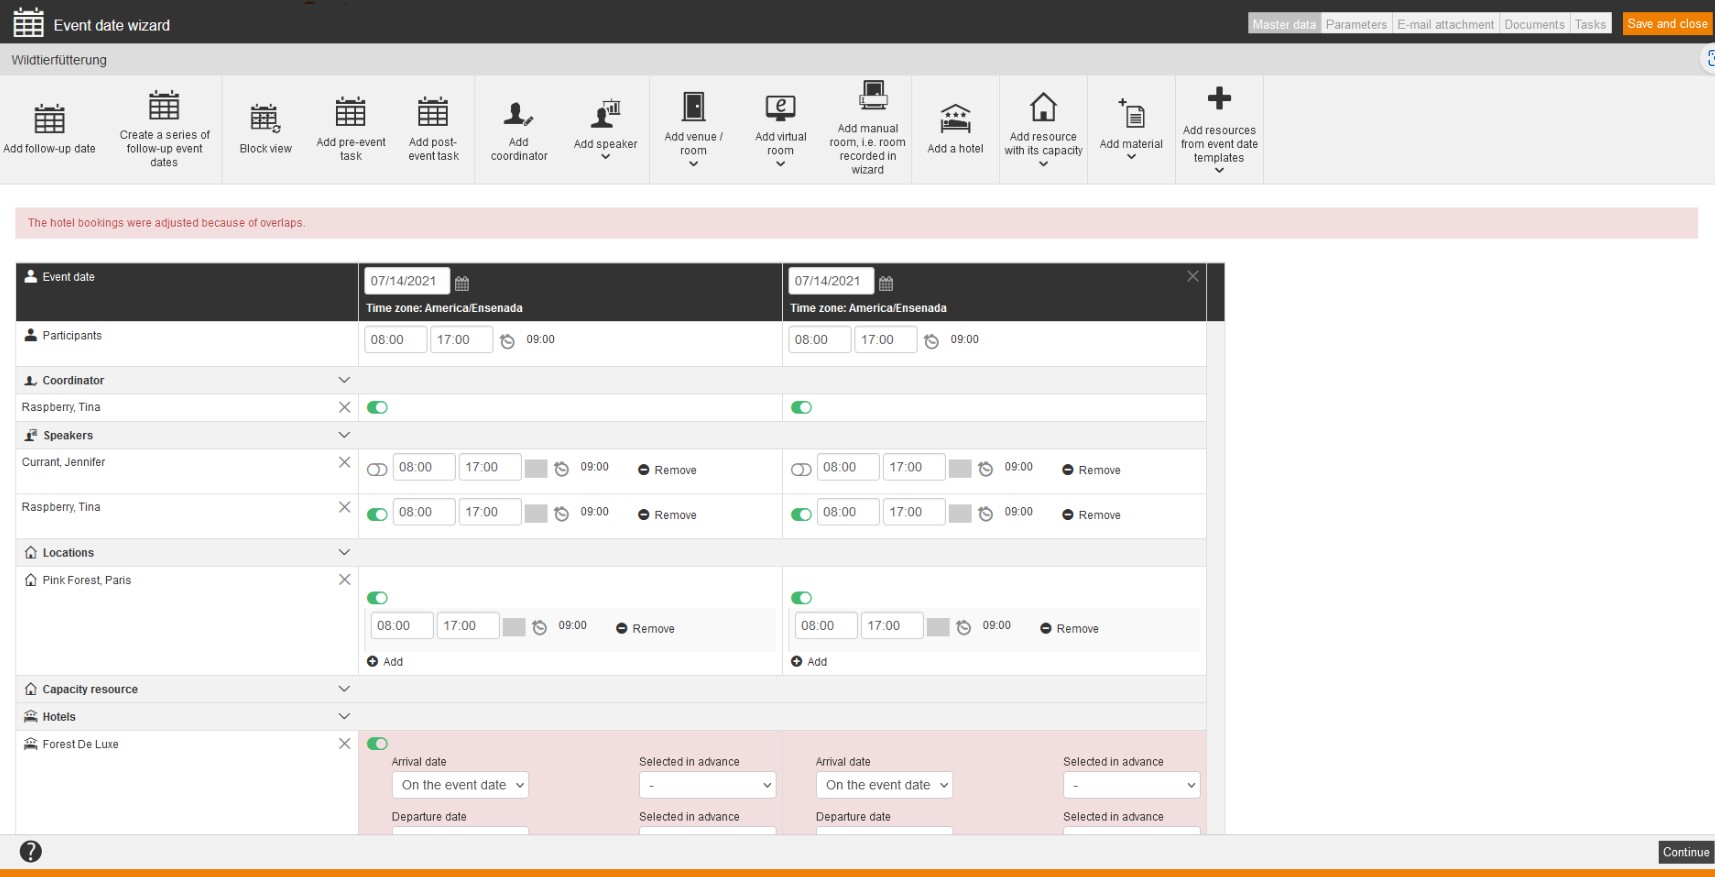
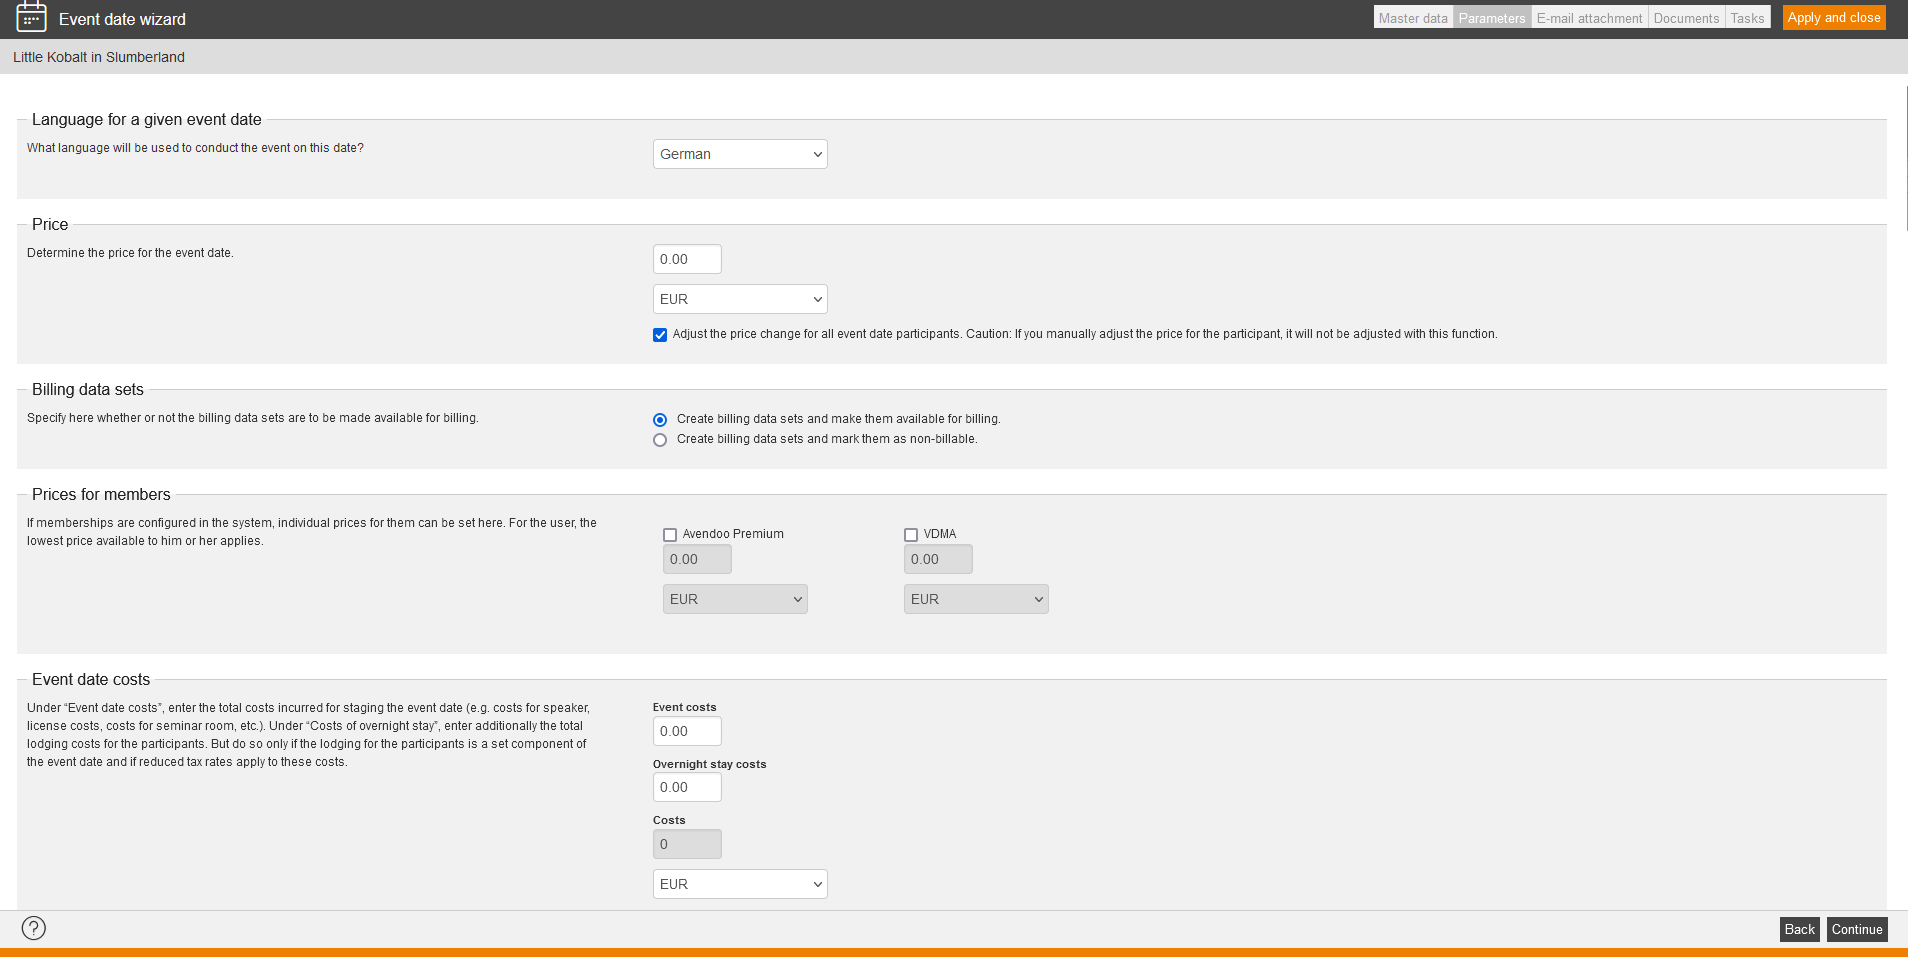
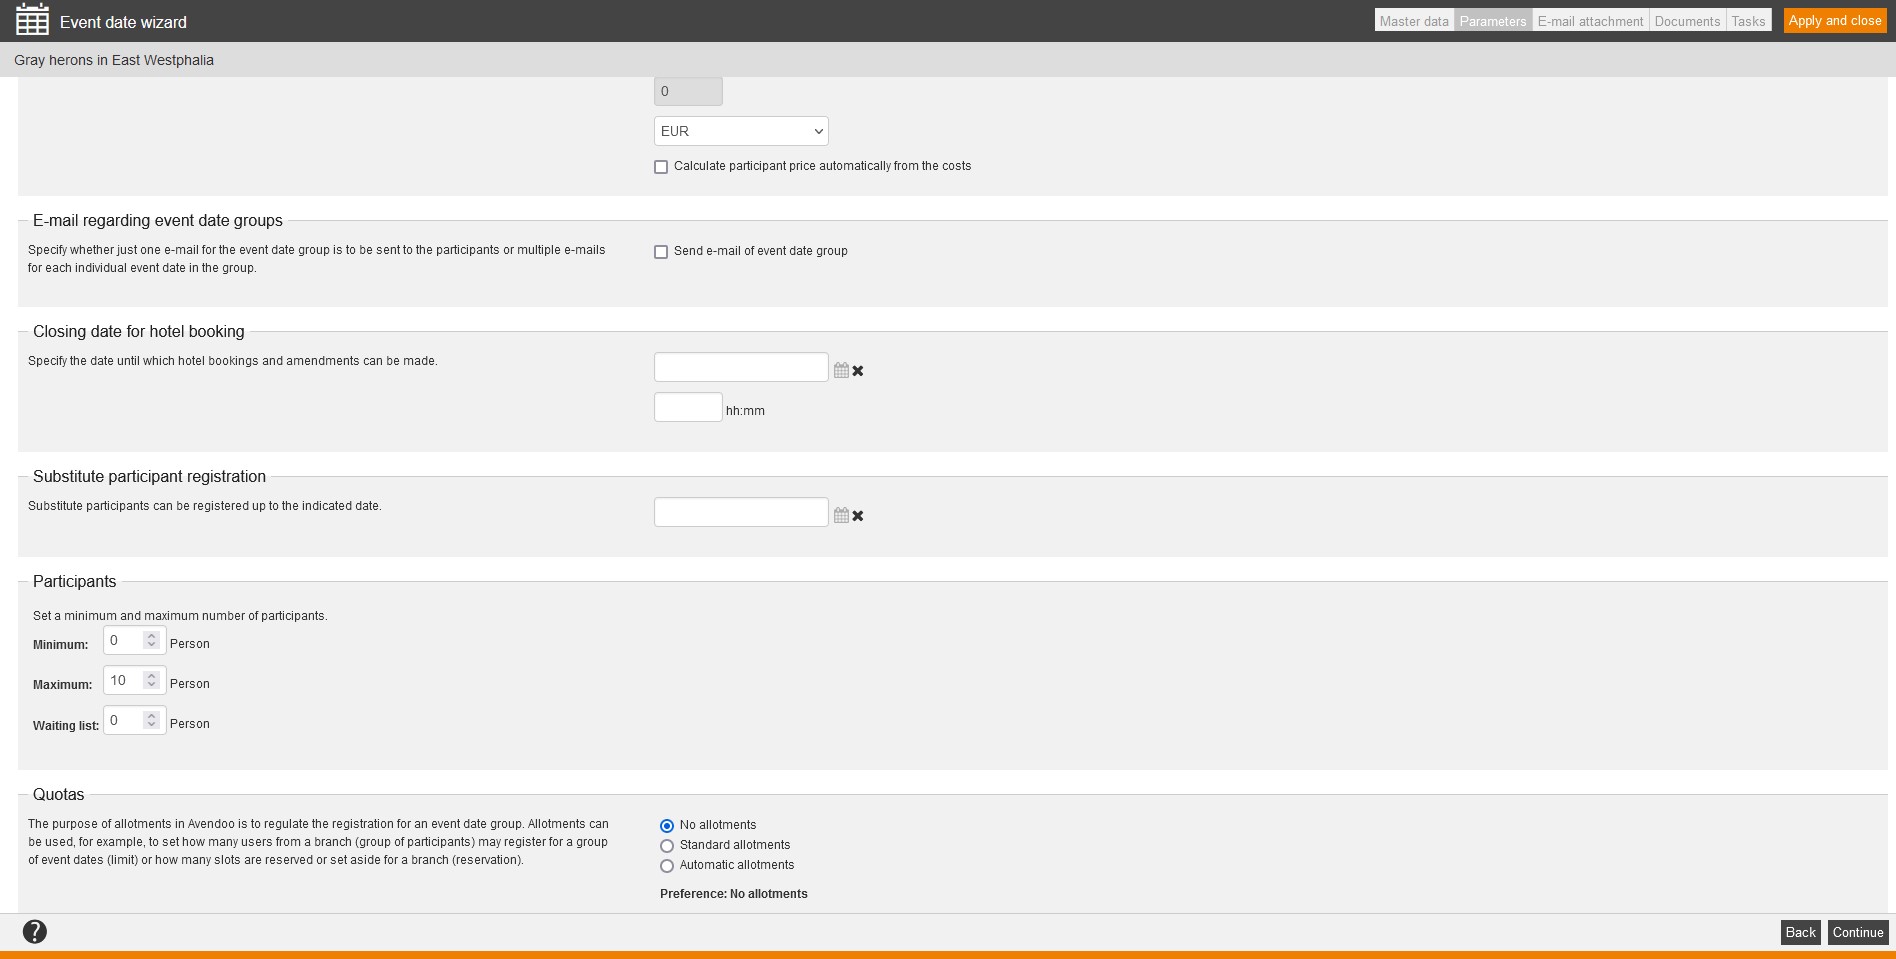
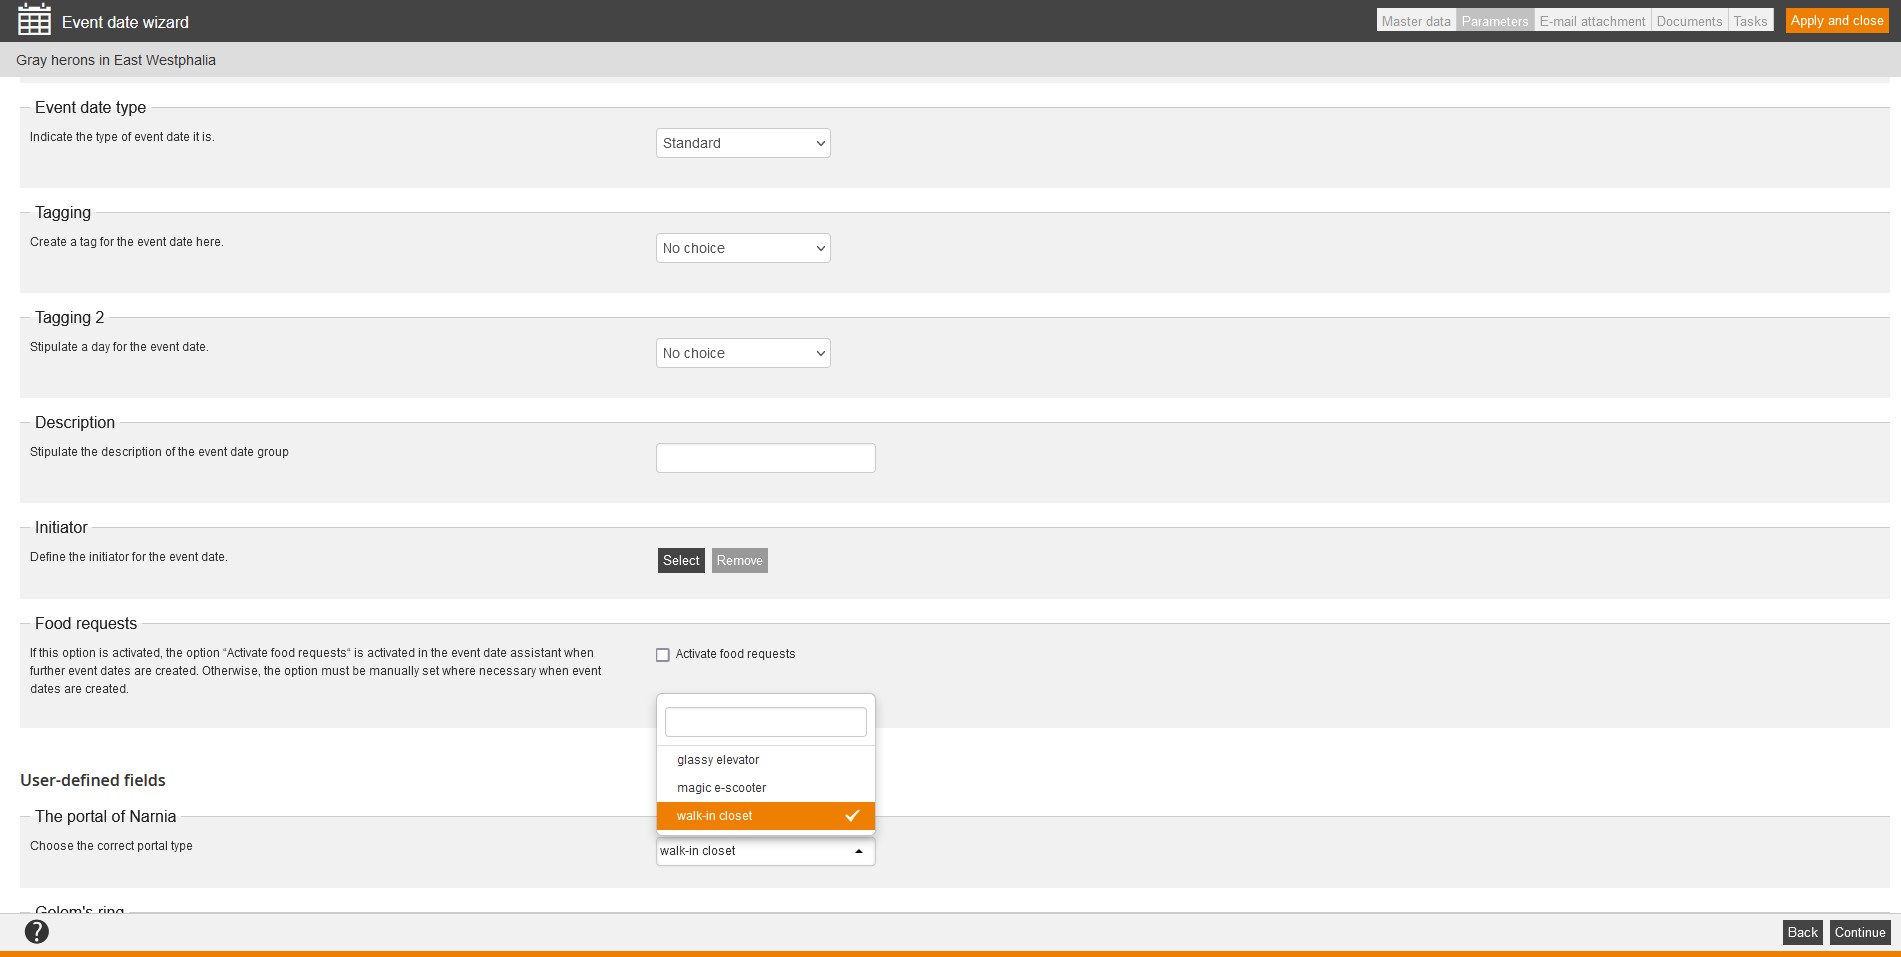
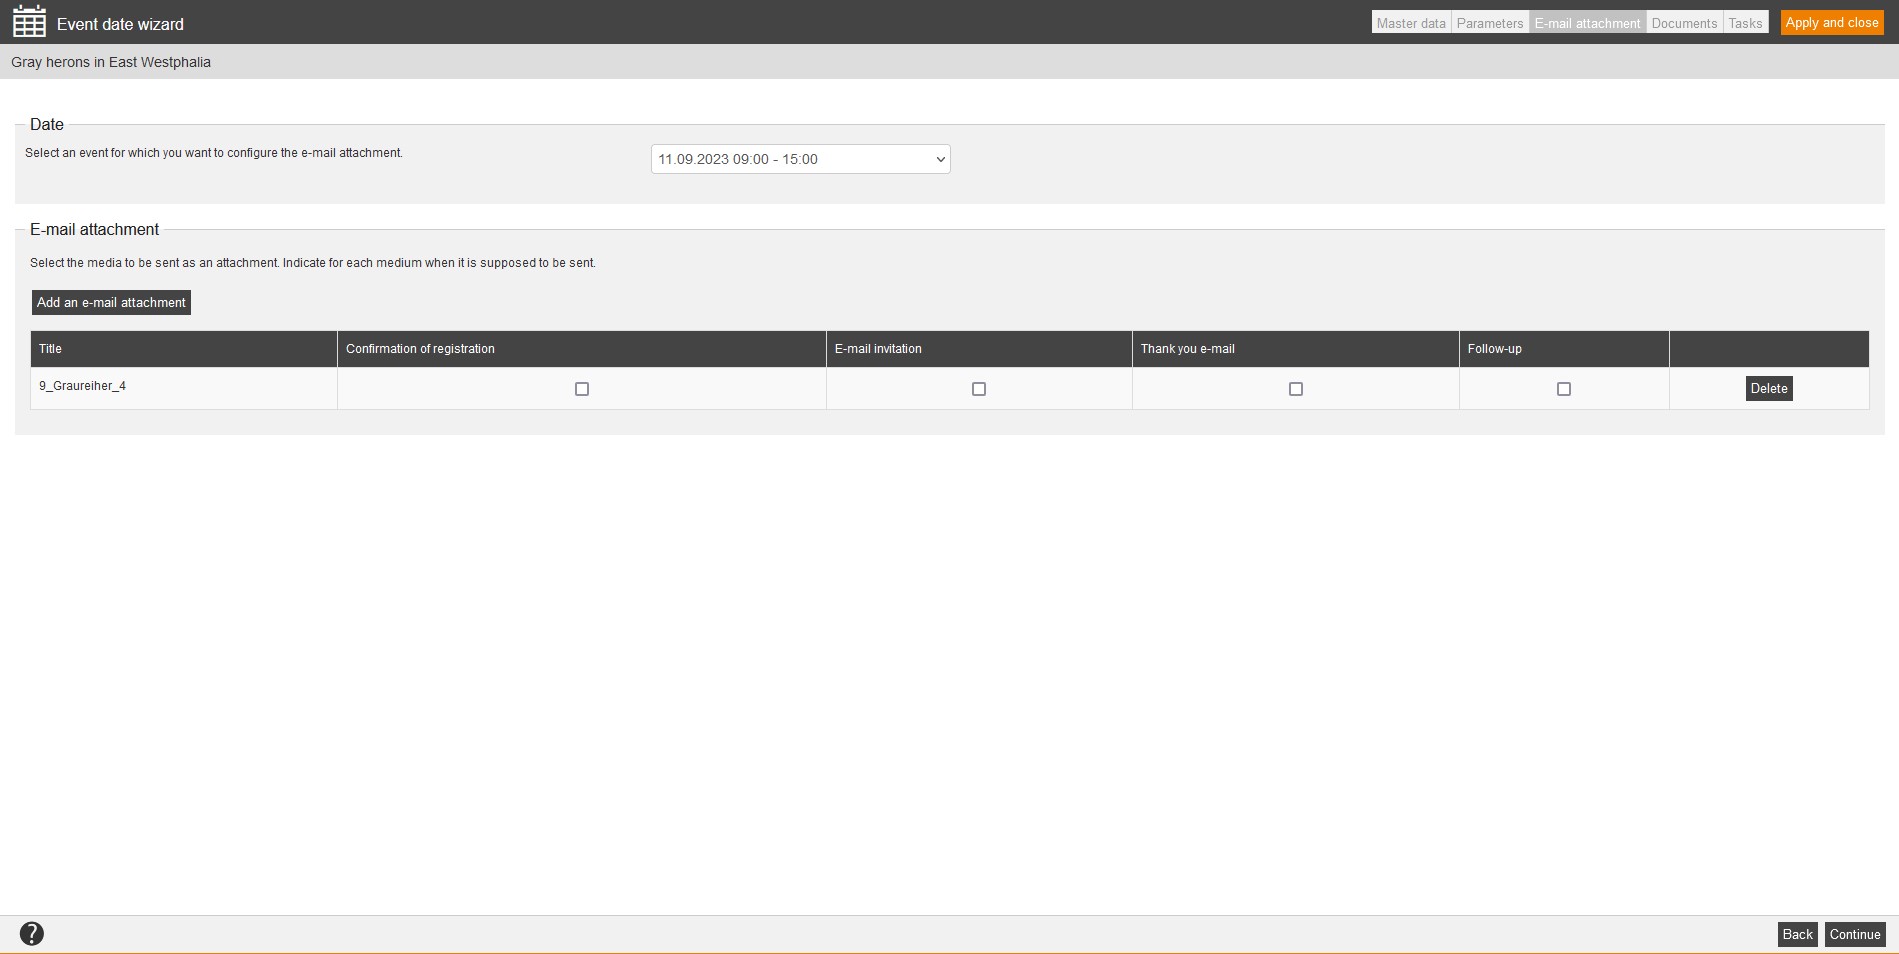
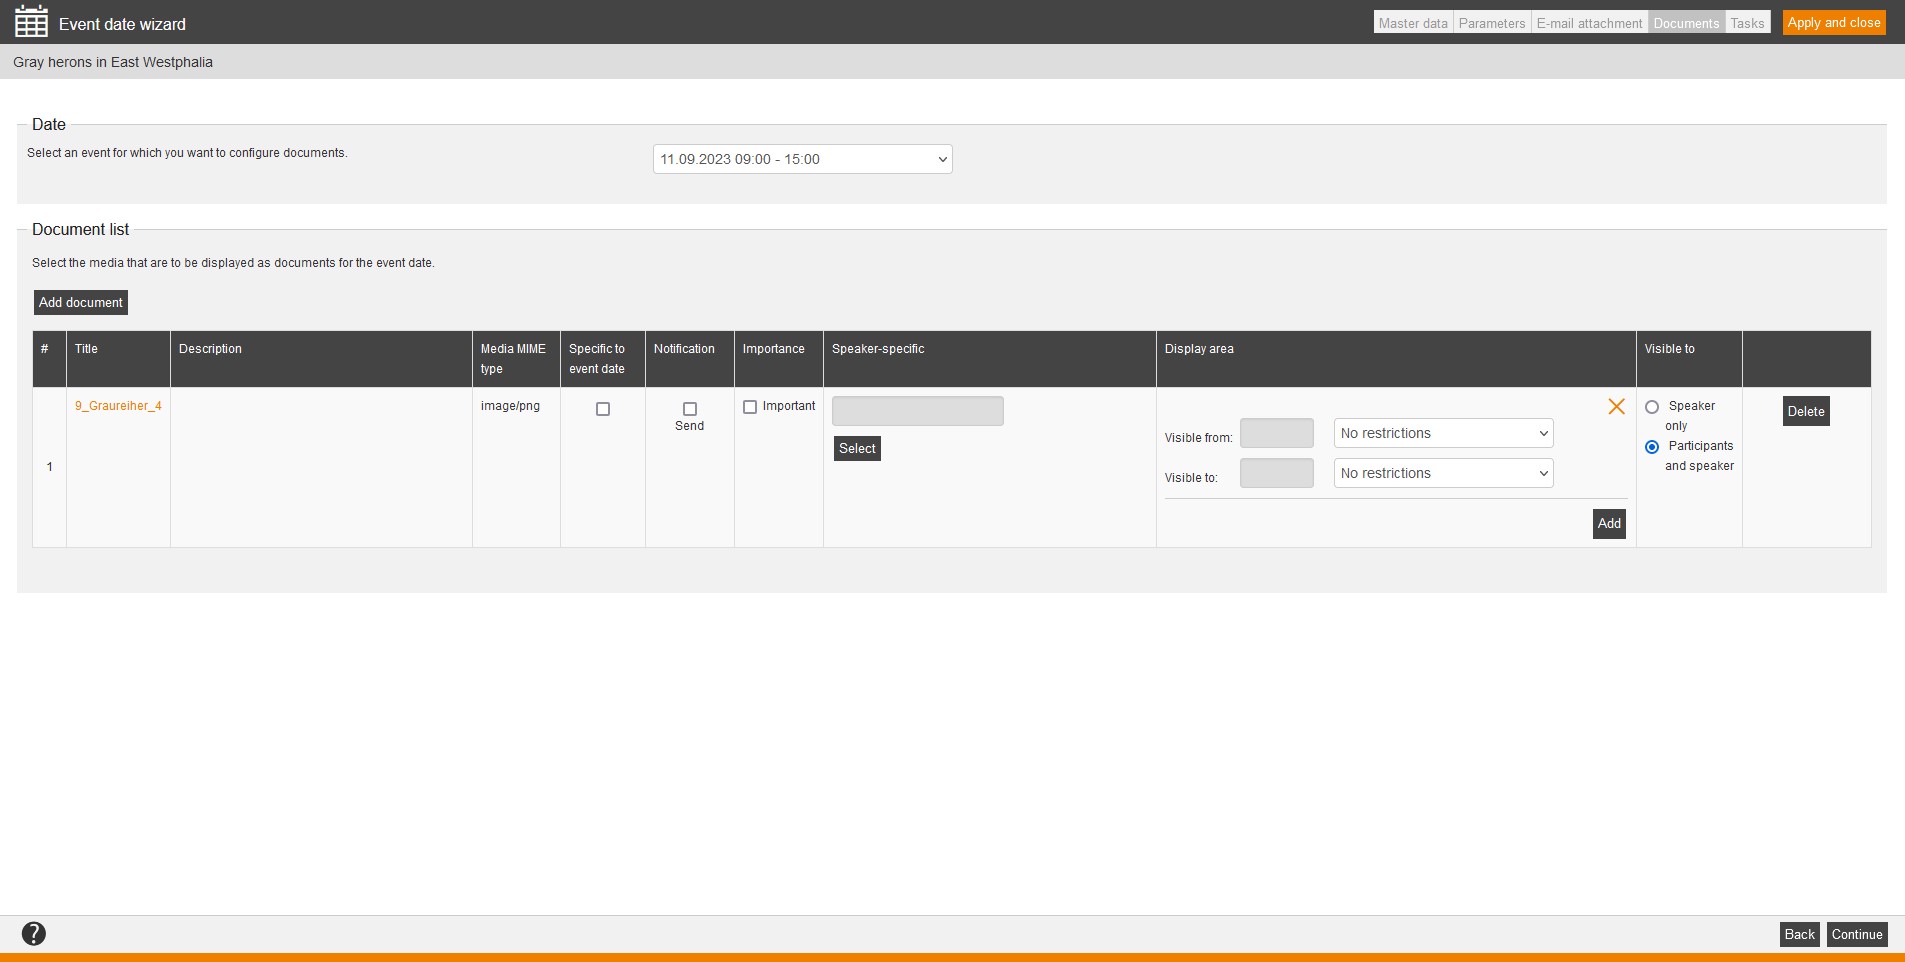
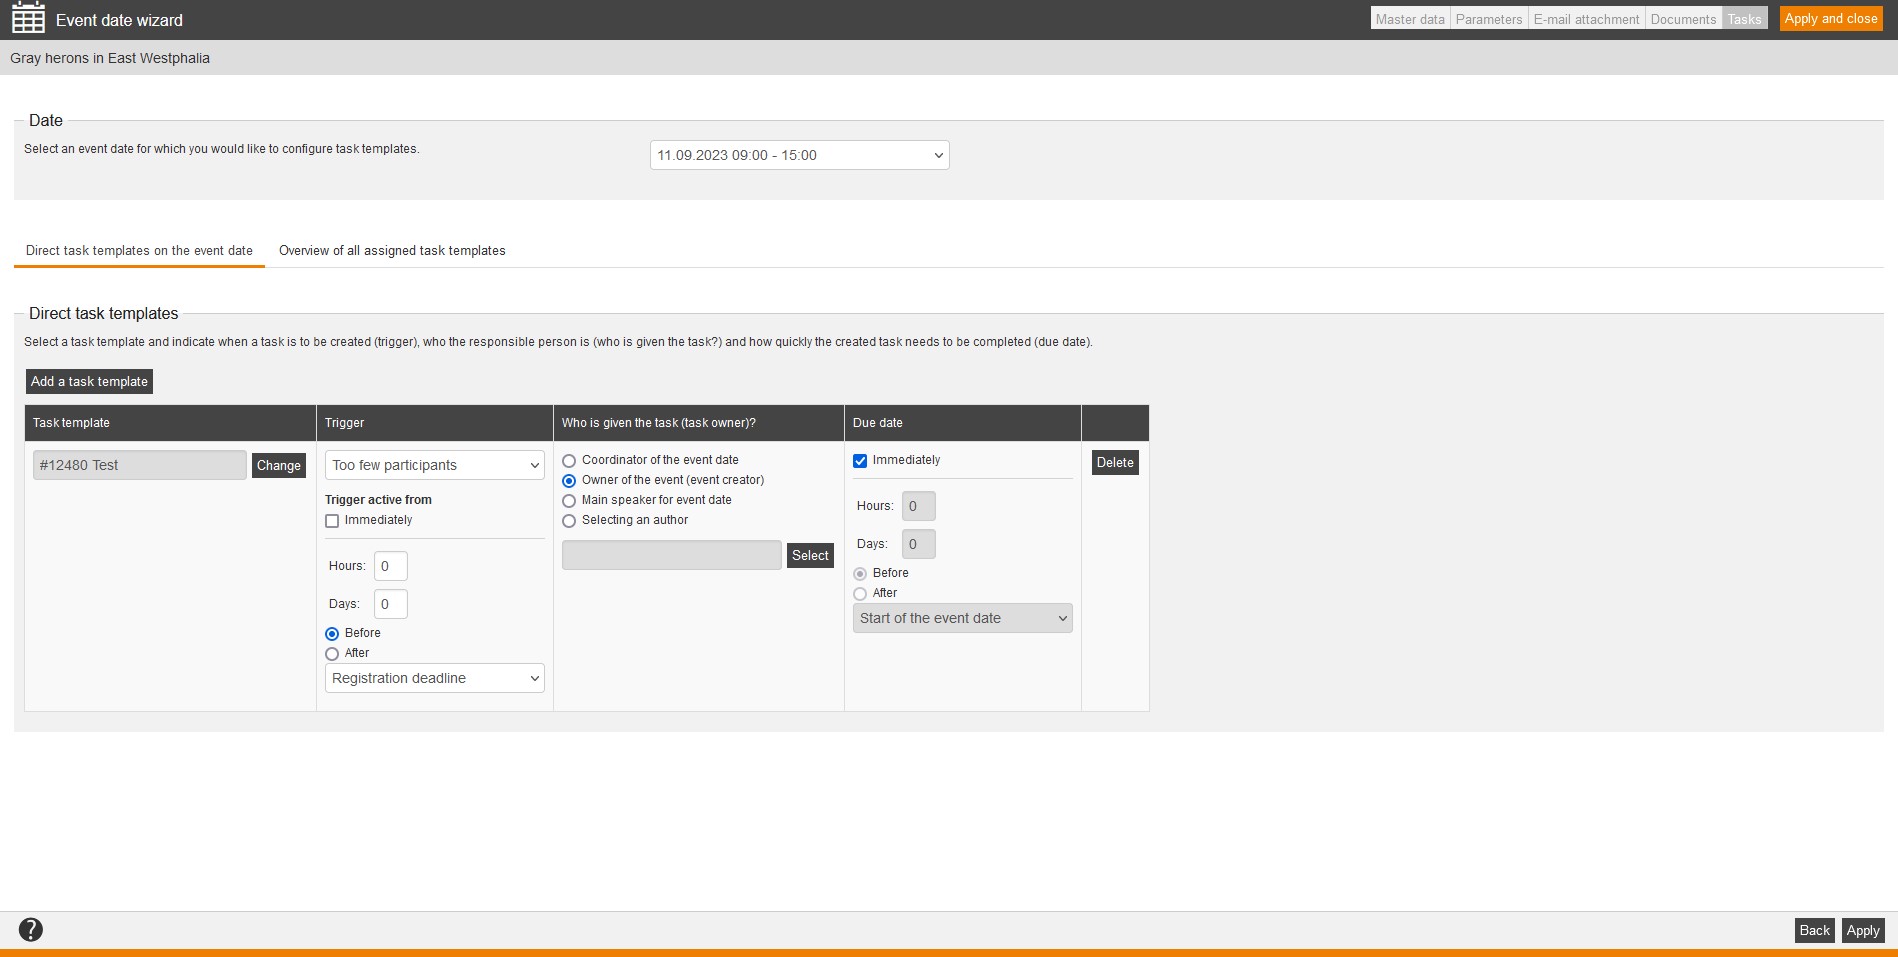
To create a new event date via the Event date wizard, click on this icon. The dialog window Event date wizard opens for defining details of the event date.
Create event date
To create an event date via the Event date wizard, do the following steps:
- Choose Learning content → Events and click the event. The Event wizard opens.
- Choose the tab Dates.
- Click the button Create event date. The Event date wizard opens.
5. Enter the data and click the button Apply and close.
6. Click the button Save in the Event wizard.
Event date and time zone
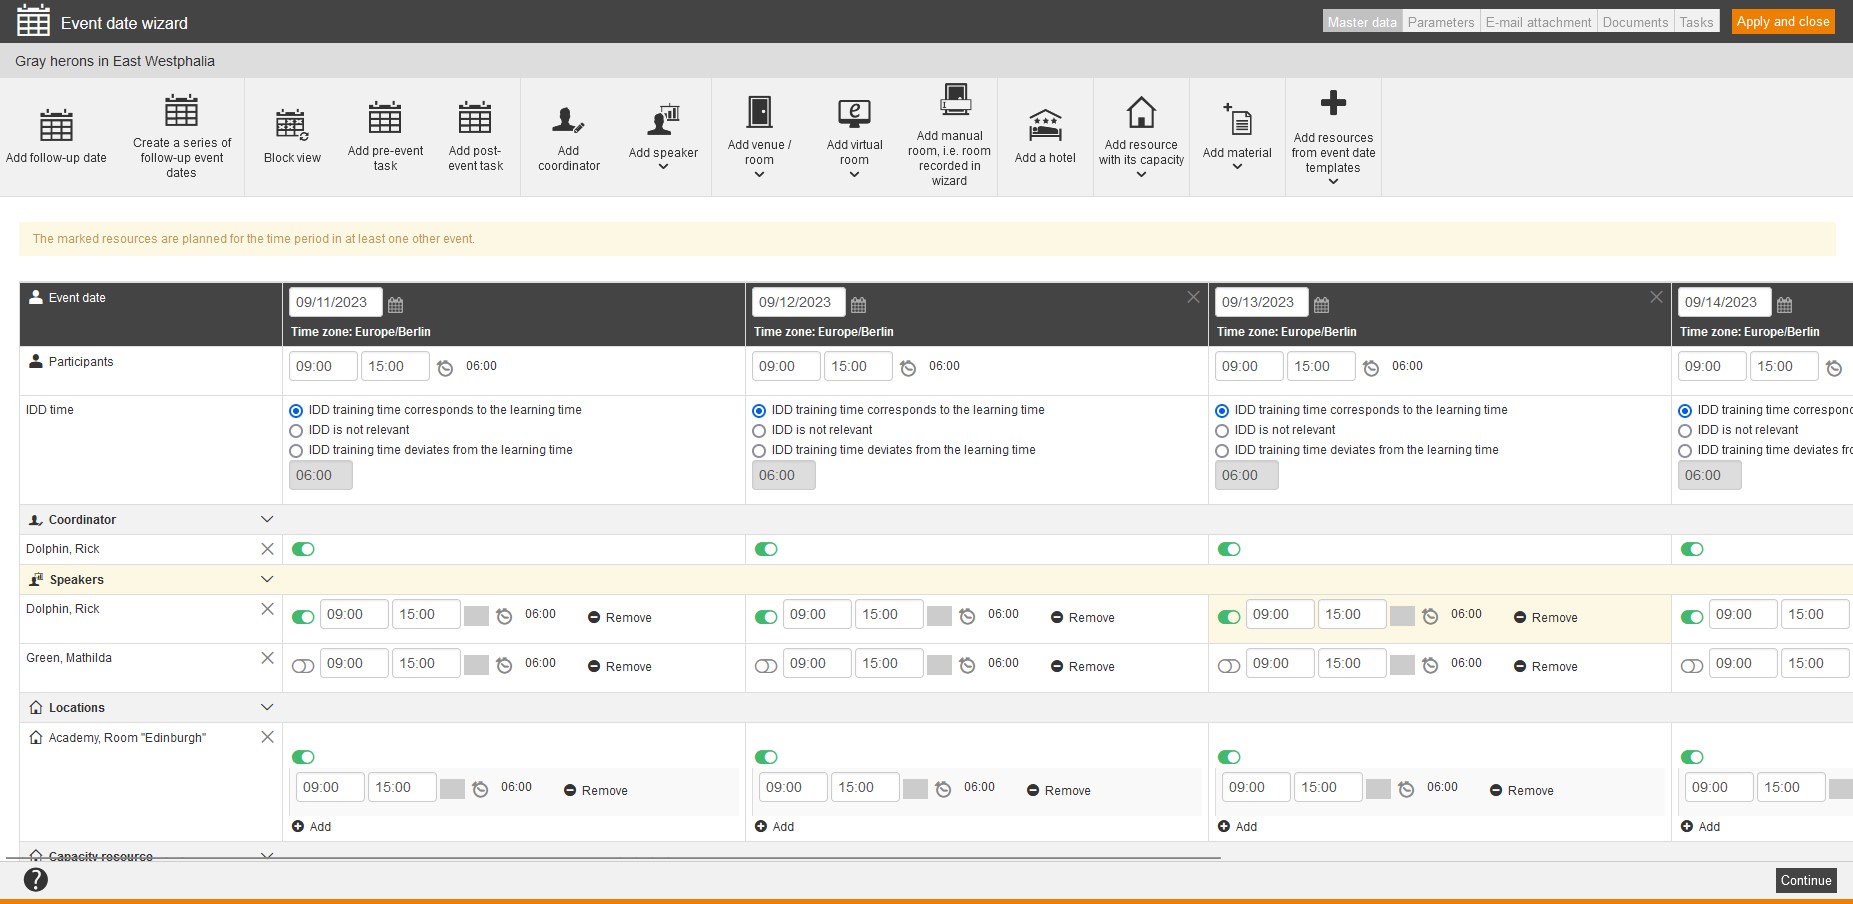
Select the appropriate event date. Besides the event date you find the time zone of the main location. If there is no main location, there will be the time zone of the server displayed. Further information for configuring the time zone you find here.
Enter the starting time and end time. Via click on the clock you can change the duration. It is possible, that you enter an event date, which ends on the following day, for example: Starting time 10/12 at 10 p.m. and end time 10/13 at 3 a.m.
You can select between the foll0wing options regarding the table entry IDD time:
- IDD training time corresponds to the learning time (set as default)
If you select this option the corresponding learning time for the participants of the event date will be completely tranferred into IDD time and into the traning inventory entries of the corresponding users. - IDD is not relevant
If you select this option the corresponding learning time for the participants of the event date will be not tranferred into the training inventory entries of the corresponding users. - IDD training time deviates from the learning time
If you select this option you can enter the IDD time which you want to be booked for the participants of the event date in the training inventory entries.
Prerequisite for showing IDD time
The author has maintained the system setting insuranceDistributionDirective and an IDD ID for the particpants or users exists.
Coordinator
Click the button Add coordinator, set the check box at the corresponding coordinator and then click Select. The green toggle symbolizes that the coordinator is active. If you click the green toggle, the circle gets gray and the corresponding coordinator is for the corresponding event date deactivated and on the next turn removed. You can remove the coordinator for all event dates at once by clicking X.
If you’ve added several coordinators via follow-up event dates, the green toggle is activated in the line of the coordinator. If needed, you change this activation. You can define only one coordinator per event date. If you’ve added an author, but this is not configured in no event date as coordinator, this one will not be shown in the list, if you open the event date next time.
Speakers
Select Add speaker, set the check box at the corresponding speaker and then click Select. You can enter more than once the user name, last name, first name and superior via the + button in the select dialog window.
The green toggle symbolizes that it is the main speaker. If you click the green circle gets gray and the main speaker turns to co-speaker, if the time is defined. You can remove the speaker for all event dates at once by clicking X. Additionally, you can remove the starting and end time and the duration.
Via the menue item Add speakers (Gantt) you get a selection of speakers in the Gantt view.
Locations
Add venue/room
Select Add venue/room, select the radio button of the appropriate venue or room and then click Select and in the next dialog window click the button Select room. If you select this function the time will be preallocated with the event time.
You can book a room by several times within an event date, by clicking Add on the added location/room. If applicable you can remove these several bookings via Remove.
The green circle symbolizes that it is the main location. If you click on the green circle the circle turns gray and the main location will be secondary location if the time is defined. You can remove the room for all event dates at once by clicking X. Additionally you can remove the starting and end time and the duration.
Via the menue item Add location/room (Gantt) you get a selection of locations or rooms in the Gantt view.
Add virtual room
To add a virtual classroom (Vitero, YuLinc or WebEx), choose the menu item Add virtual room, activate the toggle and set the check mark at the favored format.
More information about connecting a virtual classroom you find here.
To add a virtual location, choose the menu item Add virtual location and select the favored virtual location in the list. Then you activate the toggle and change the start and end time if applicable. The suggested start and end time of the virtual location is equivalent to the start and end time of the event date. There are the VC types Microsoft Teams, GoToWebinar, YuLinc or Link input regarding the VC type. If you have selected a virtual location of the VC type YuLinc, you got later on the button Record attendande/absence (YuLinc) on the tab Attendance list in the Event manager. If you use the virtual location YuLinc, you can also hand over co-speakers additionally as moderator to YuLinc. If you have selected a virtual location of the VC type Link input, you can insert in the dialog field Link for example a Teams Event URL. Further information about the Teams Event URL you find here.
More information about creating a virtual location you find here.
To add a virtual location in Gantt view selection, choose the menu item Add virtual location (Ganttt) and select the favored virtual location in Gantt view. Then you activate the toggle and change the start and end time if applicable. The suggested start and end time of the virtual location is equivalent to the start and end time of the event date.
More information about creating a virtual location you find here.
Add manual room
To create rooms manually, click the button Add manual room. Avendoo® shows the table entry Manually created room. To enter the room in the field, click on Add. There are three fields available, in which you can enter room designation, room number and floor.
If you add a manual room, Avendoo® defines it as main location.
Add hotel
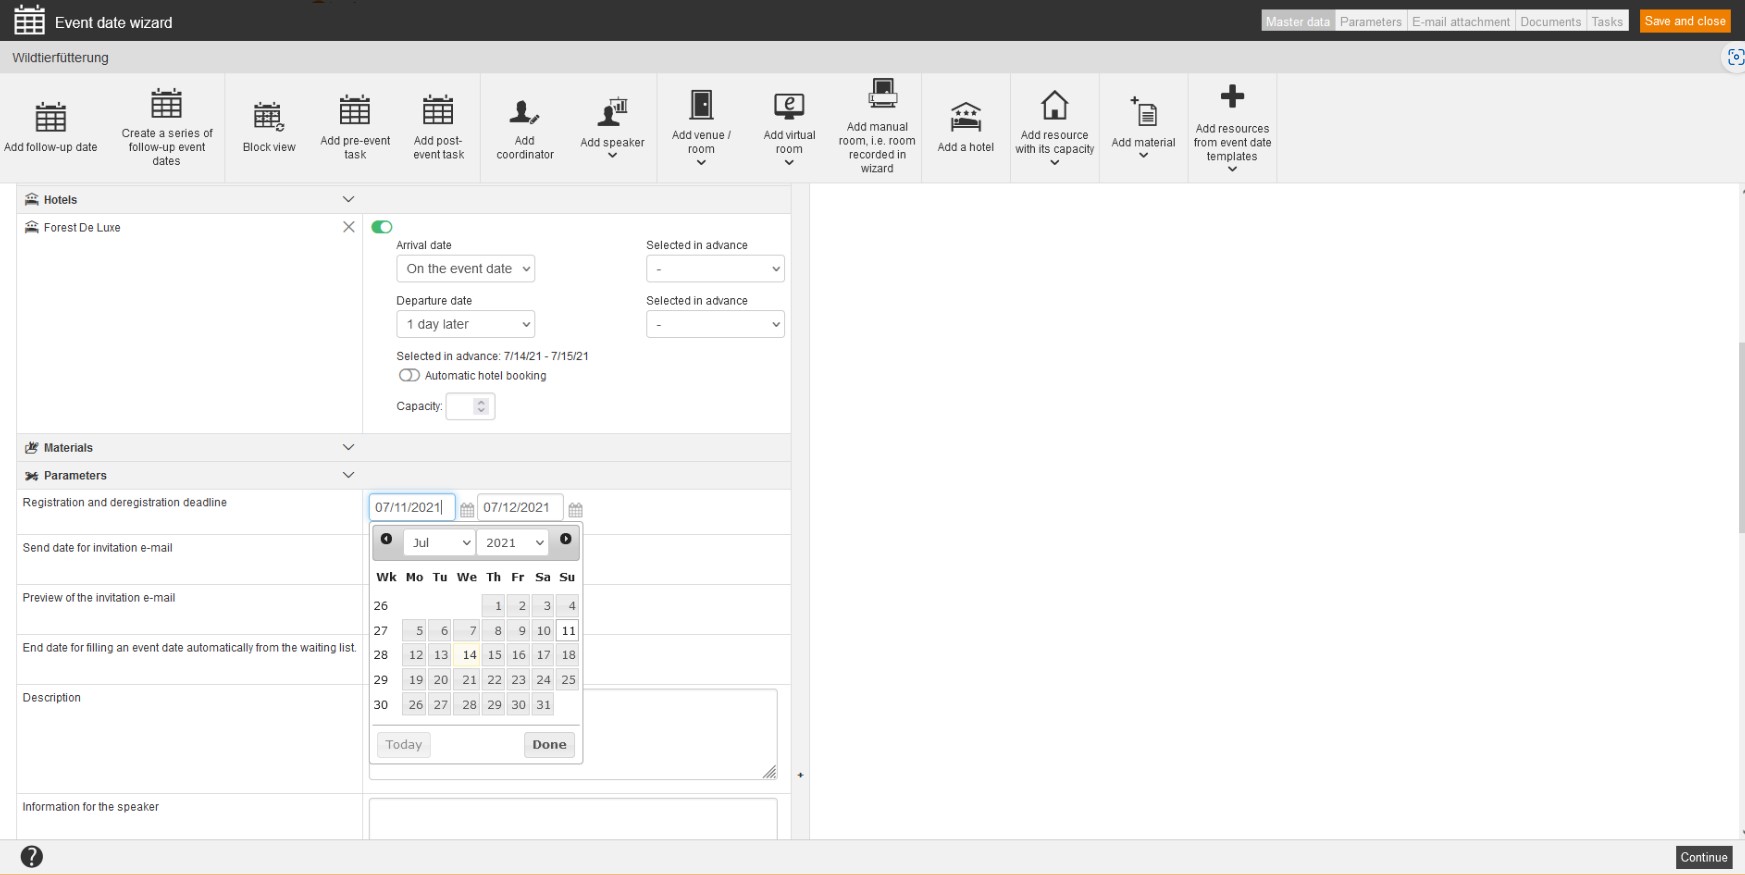
If you have selected the location type Hotel for the created hotel in the Venue assistant, you can add this, too. In contrary to the location you enable the participants of an event date to book the appropriate hotel. Authors see the details of the hotel in the Event date wizard and participants in the catalog only, if you have set the status to Active under Parameters in the Event date wizard.
Click the button Add hotel, select the radio button of the appropriate hotel and click on the button Select. The green circle symbolizes that it is the main lodging. If you add further hotels the circle is gray. If you click on the circle you can change the status.
Further you can define, if the arrival date is on the event day or x days beforehand (x=1 to 10) and you can select the selected days in advance in the same line in the field Selected in advance (corresponding the time period of the booking changes in the line Selected in advance under the field Departure date). Furthermore you can define if the departure date is on the event date or x days later (x=1 to 10) and you can select the selected days in advance in the same line in the field Selected in advance (corresponding the time period of the booking change in the line Selected in advance under the field Departure date).
As you have selected values in the field Selected in advance of the arrival or departure day, the toggle Automatic hotel booking is activated.
If the toggle Automatic hotel booking is active or you have acitivated it, Avendoo® books after successful registration the chosen arrival and departure days (field Selected in advance).
Also you can define the capacity of the appropriate hotel via arrow buttons, this means you define the number of places at the main event date. Without limit (no value) is default.
If you move or change event dates, Avendoo® adjust automatically the data regarding the event dates, but not regarding the hotel bookings. You have to check existing hotel bookings manually.
Block view
Click first on the button Add a hotel and select an appropriate hotel. To enable bookings for the participants for each block in different hotels, click on the button Block view.
Enter a block
Click for marking first on the header of the event date. Then you can click on the button Enter a block.
Add resource with its capacity
If you want to add resources with its capacity, click on this button. Only these rooms are listed, on which you have entered an appropriate number under Contingent on the tab Parameters in the Room assistant.
When you have added the resource with its capacity, you see in the table, which places are still available and how many places (total) are existing. You can select, if the booking should be till the registration deadline or if a booking should be till a chosen date. Furthermore you can edit the capacity and the time and you can activate the toggle Book at the time of registration. If you activate this toggle, also the participants who are registered to the event date are registered to the resource, too, as long as the capacity is not already full.
Via the button Add you can do more entries for time periods of the appropriate capacity. If applicable you can remove them via the button Remove.
When you have added resources with its capacity, users can book additional services or team leaders can book additional services for users.
Via the menue item Add resource with capacity (Gantt) you get a selection of resources with capacity in the Gantt view.
Add material
If you want to add a material, select Add material.
Via the menu item Add material (Gantt) you get a selection of materials in the Gantt view.
Parameters
Registration and deregistration deadline
Select the registration deadline and the deregistration deadline of the event date.
Send date for invitation e-mail
If you enter here the appropriate date for sending custom invitation, the option Invitation e-mail sent automatically at the start of an event date or sent on the event date have to be configured similar on the tab Configuration in the Event wizard. Further information you find here.
Preview of the invitation e-mail
Enter the date, which should be valid for the automatic sending of the invitation e-mail to the event speaker and the coordinator.
End date for filling an event date automatically from the waiting list
If you enter this end date, it has higher priority than the date from fill from the waiting list in the Event wizard.
Description
You can enter detailed information of the event date in the description.
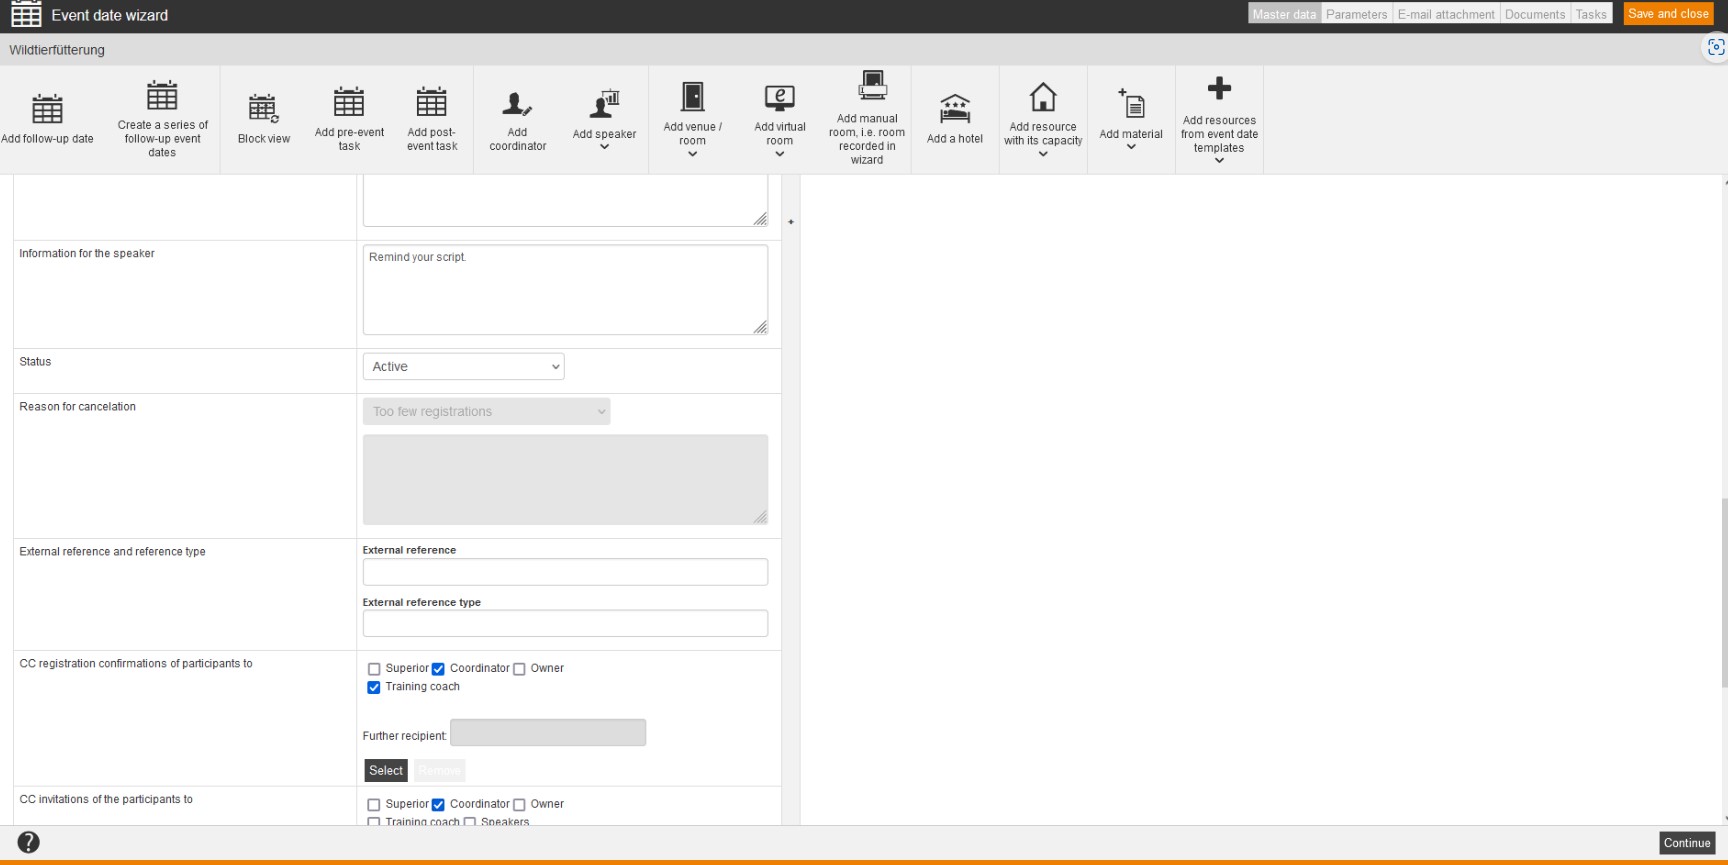
Information for the speaker
This information receives the speaker via Dynamic attendance list (e-mail pdf), suitable for the day. This information should be used for catering and other purpose. You can enter it per day of the event.
Status
Choose the status Being Planned, if you can’t do some bookings, this means the event date isn’t available for the registration process. This event date is not visible in the user and team leader frontend in every case. The status Being Planned contains the planning of resources, but no registration of participants and no sending of invitations.
Choose the status Initiated, if the event shouldn’t be available for the users for self-registration. Later you can change all event dates from status Initiated to Active. The status Initiated contains the option to register for participants as author, the sending of invitations to participants and speakers (if activated) and the update e-mails, if the author has to change resources. An event date with the status Initiated is only visible after registration of the participant in the user and team leader frontend.
Choose the status Active, if users should register as of now to this event date. This event date is for all users, which are added to the event, visible. The status Active contains the option to register for participants as author, team leader and user and the sending of invitations to participants and speakers (if activated) and the update e-mails, if the author has to change resources.
Avendoo® sets the status Carried out, when the event date is completed.
Reason for cancelation
Choose the reason for cancelation. Additionally you can add additional information regarding the processor of the reason for cancelation via clicking on +information and via choosing the user name or/and date/time.
External reference and reference type
External references are used for organizing and for linking to other systems. This you can use for manual assignments and on using interfaces, for example: REST API. You can search for external reference in the advanced filter function.
The external reference represents a reference value like ID, serial number or name. The external reference type describes which reference it is and how to understand the reference value. This is very important, if there are different sources or types of references, which use the same reference values.
Examples:
Reference type SAP customer number with the external reference 100234
Reference type SAP user ID with the external reference 000004
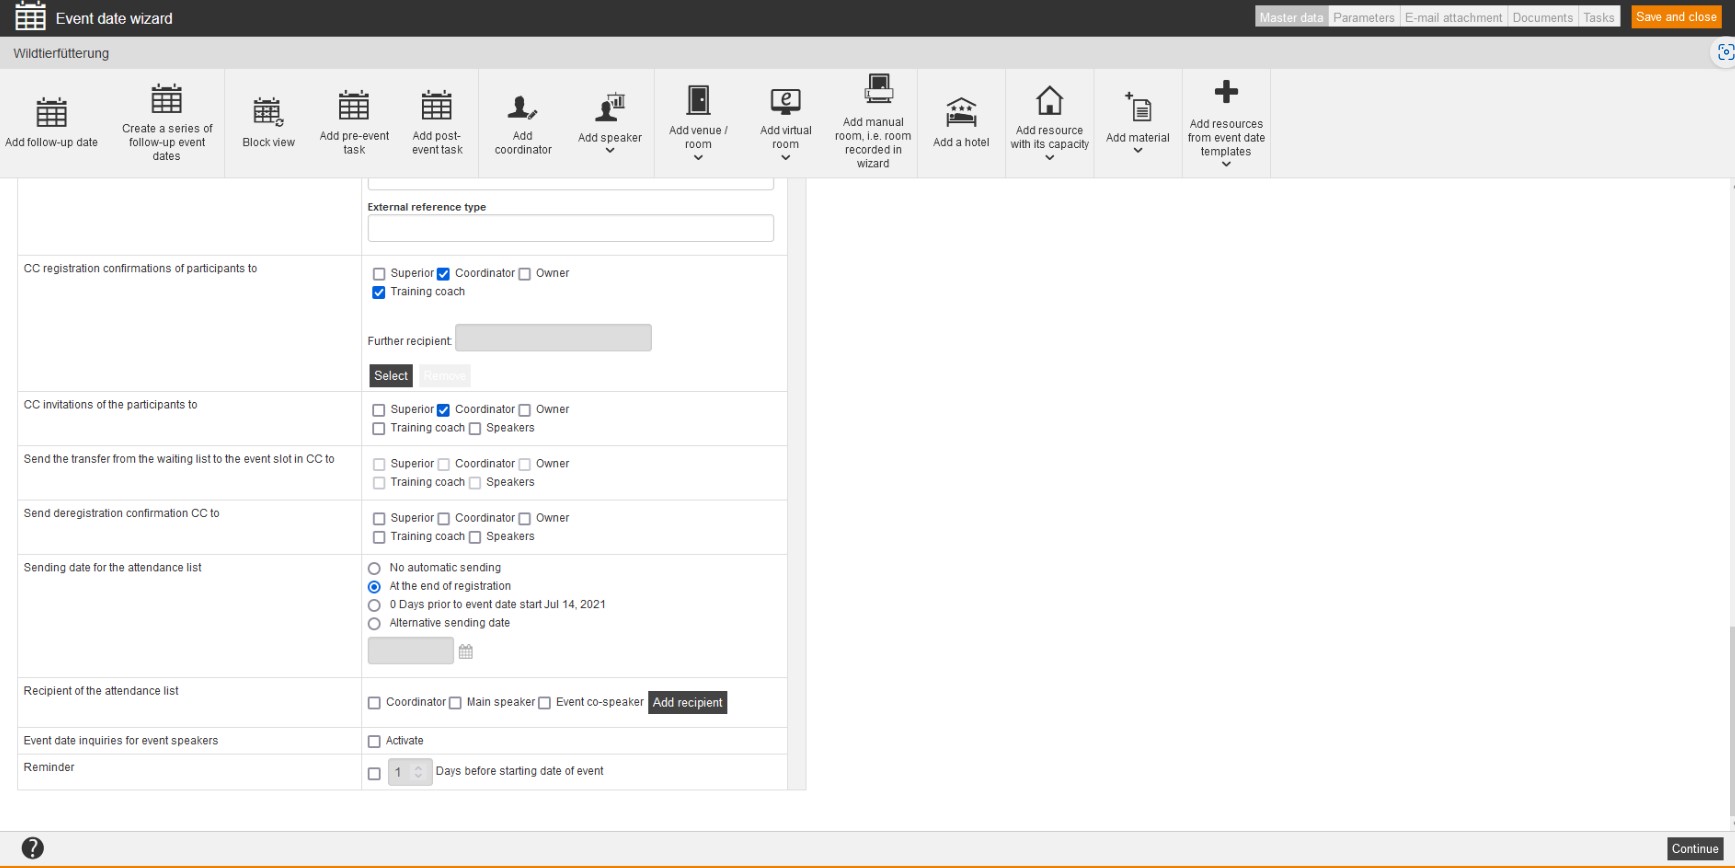
Send copy of the participants’ registration confirmations to
Set a check mark before Superior, Coordinator, Owner and/or Training coach (this one who is linked to the user), if to these a registration confirmation should be sent as copy. You select further recipients by clicking the button Select and selecting via radio button the appropriate recipient and finally confirming this via the button Select. Via a clicking the button Remove you can remove the corresponding recipient.
Send copy of the participants’ invitations to
Set a check mark before Superior, Coordinator, Owner and/or Training coach (this one who is linked to the user), if to these an invitation should be sent as copy. You can only select this function, if the invitation isn’t sent as meeting request, this means the Ical file isn’t in the invitation mail.
Further information about the parameters you find under System settings.
Send copy of change from waiting list to event place to
Set a check mark before Superior, Coordinator, Owner, Training coach (this one who is linked to the user) and/or Event speaker, if these persons should be informed about the switch from the waiting list to the event slot.
Send copy of deregistration confirmation to
Set a check mark before Superior, Coordinator, Owner, Training coach (this one who is linked to the user) and/or Event speaker, if these persons should be informed about the deregistration confirmation of a participant.
Sending date for the attendance list
If you want to define the date of the registration deadline from the event date as sending date for the attendance list, select necessarily At the end of registration.
If you select 0 days prior to event date start April 27, 2018, Avendoo® sends the attendance list, once the number of days is reached (defined in the Event wizard on the tab Communication). Avendoo® don’t use in this case the date of registration deadline of the appropriate event date.
You can select an individually defined sending date in the field Alternative sending date.
Avendoo® sends in both cases the attendance list to all speakers.
If you want to deactivate the automatic sending of the attendance list, select “No automatic sending”.
Recipient of the attendance list
Set the check box at the option Coordinator, if you want to define that Avendoo® sends the attendance list as additional information to the coordinator.
Set the check box at the option Main speaker (or Event co-speaker), if you want to define that Avendoo® sends the attendance list as additional information to the main speaker (or event co-speaker).
To add further recipients of the attendance list as information, click the button Add recipient.
Event date inquiries for event speakers
To send event date inquiries for event speakers, set the check box Activate on the appropriate event date.
If you have set the check box Send date inquiriy on the sub tab Registration confirmation of the tab Communication in the appropriate event, this is the default for all new created event dates and event date templates. That has no influence on already created event dates. You define the recipients of the date inquiries in the Event wizard on the sub tab Registration confirmation of the tab Communication.
Reminder
You can activate the reminder on event and event date level. The reminder is for participants, who haven’t done the pre-tasks for the event date. Pre-tasks are previous objects on the learning path, for example: hurdles and check points. The mail template reminder will be used.
Activate the sending of a reminder by setting the check box and define how many days before starting date of event this reminder of the appropriate event date should be sent.
Materials
Click the button Add material, select the appropriate material by setting a check box and finally click the button Select. The green circle symbolizes that the material is active. If you click on the green circle the circle turns gray and the appropriate material is for the appropriate event date deactivated and will be on the next turn removed. You can remove the material for all event dates immediately, if you click the X.
Add resources from event date templates
Click the button Add resources from event date templates and choose Coordinator, Speaker, Location/room, Hotel, Material or Capacity resource. Select from a sorted list the appropriate resource by setting a check box and click on the button Select.
Status of the event date inquiries
If you move with the mouse over the status display of the event date inquiry (gray, black, red or yellow box) in the column Event speaker, the description is shown.
To activate the event date inquiries, you have set the check boxes for event date inquiries for the event speaker or/and the event co-speaker on the sub tab Registration confirmation of the tab Communication of the Event wizard.
The e-mails will be sent only if the status has changed from Being Planned to Initiated or higher.
Add follow-up date
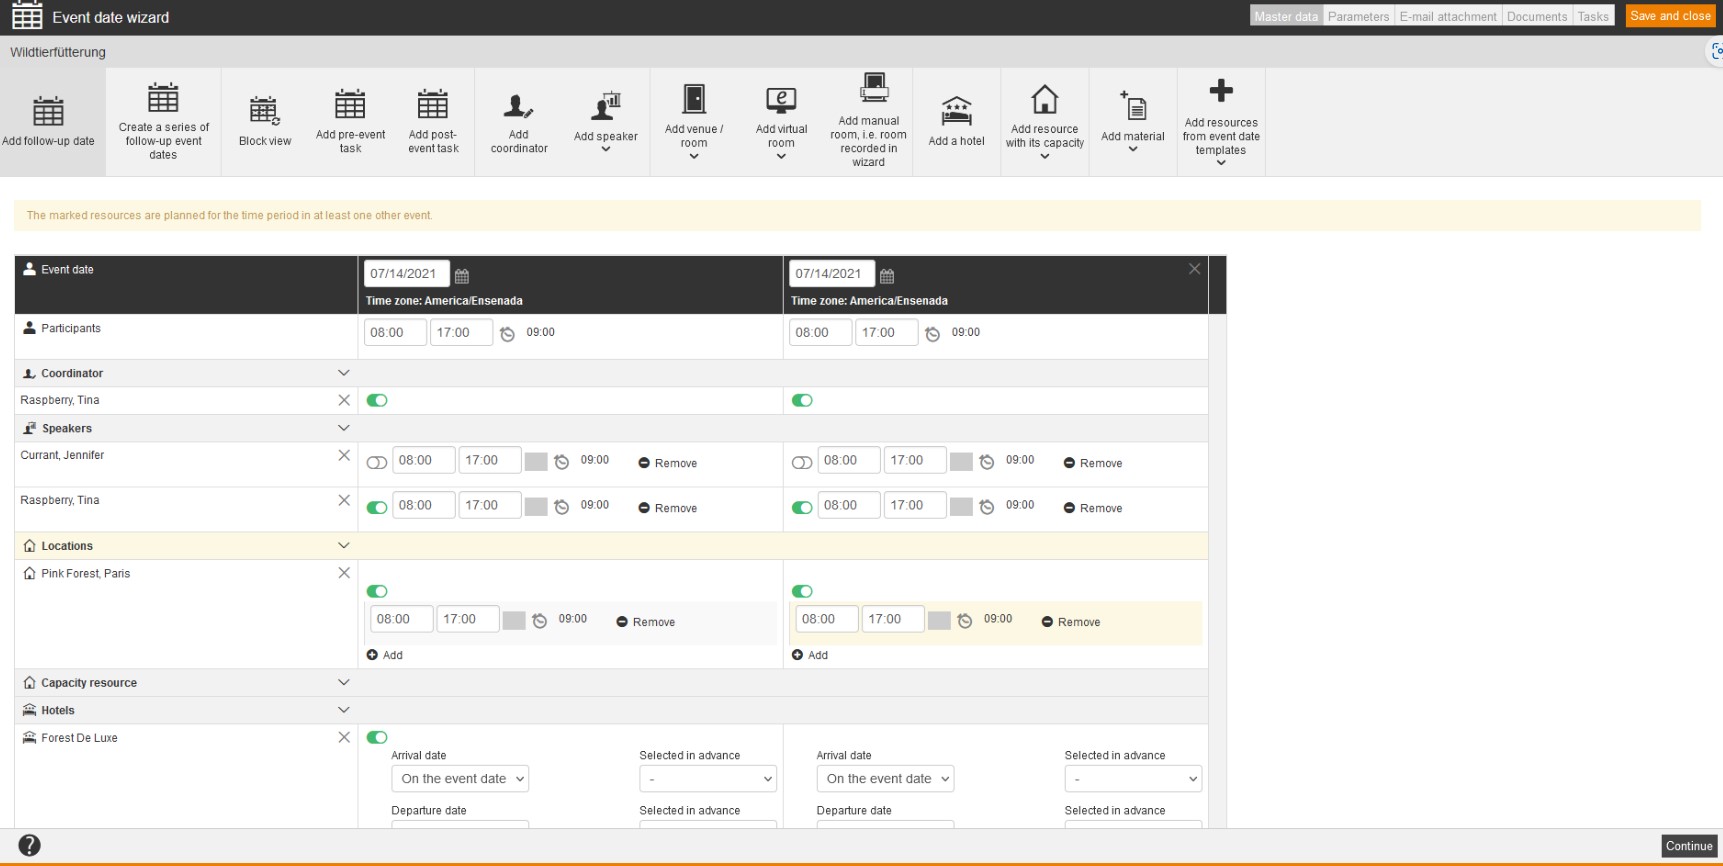
An event date can include several follow-up dates. A follow-up date is always assigned to a main event date. If the last event date of the event date group is in future, the follow-up date is automatically set to a day later. If the last event date of the event date group is in the past, the follow-up date is automatically set to today. But you can do adjustments if you want.
To add a follow-up date to your event, click on the button Add follow-up date. A second table entry with the follow-up date, which you can individually adjust, appears.
Create a series of follow-up event dates
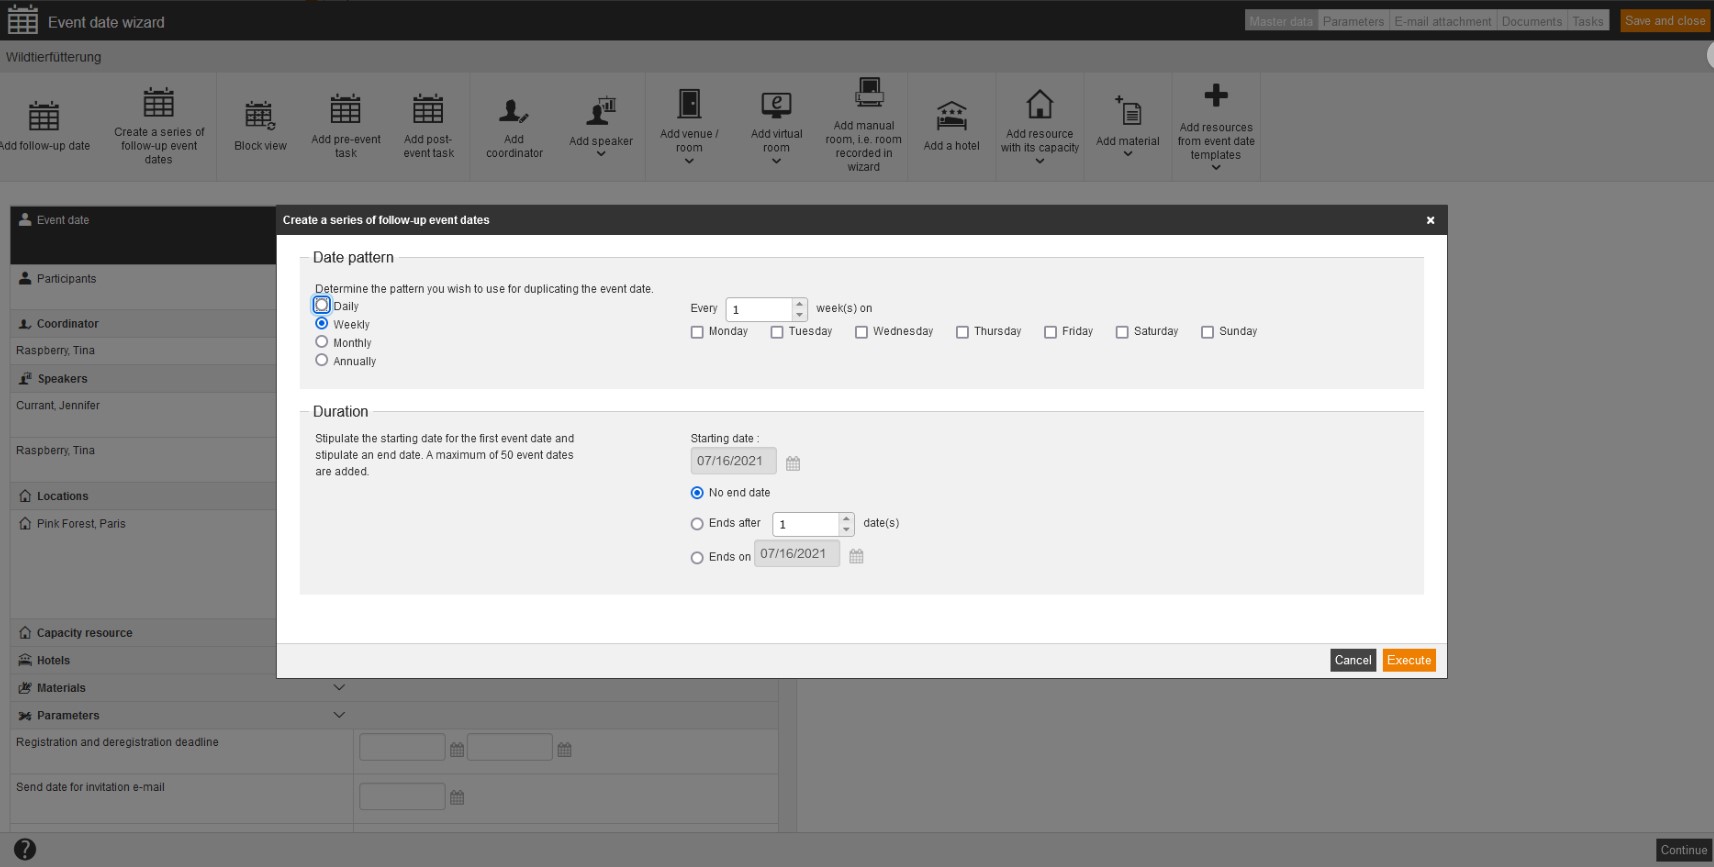
You can create and add a series of follow-up dates of up to 50 follow-up dates. If you click on this button, the dialog window Create a series of follow-up dates, in which you define the event date scheme for duplicating event dates first. This means, you define, if the next follow-up date should be Daily, Weekly, Monthly or Annually.
If you have selected Daily, you define regarding the date pattern, if the next follow-up date of the series of follow-up dates should be all x days or Every work day.
If you have selected Weekly, you define regarding the date pattern, if the next follow-up date of the series of follow-up dates should be all x weeks on a certain day.
If you have selected Monthly, you define regarding the date pattern, on which day of xth month the next follow-up date of the series of follow-up dates should be or if on the first, second, third, fourth or last day, work day or certain weekday of each xth month.
If you have selected Annually, you define regarding the date pattern, if the next follow-up date of the series of follow-up dates should be all x years, day and month or if on the first, second, third, fourth or last day, work day or weekday in a certain month.
Regarding the duration you have to define a starting date and you can define an end date. Thus you select between No end date or you define, after how many event date the the series of follow-up dates ends or if it ends on a certain day.
Add pre-event task
A pre-event task is necessary, if several speakers (authors and user-team leader and author-team leader) are participating on an event date. You and the speakers receive then an invitation e-mail for the pre-event task, if Activate event date invitations to speakers is activated on the tab Communication in the Event wizard.
To add your event a pre-event task, click on the button Add pre-event task. A further table entry with the pre-event task, which you can individually adjust, appears.
If you add a pre-event task for an event date group, there is no mandatory data (speaker, location) necessary.
Add post-event task
A post-event task is optionally necessary, if several speakers (authors and user-team leader and author-team leader) are participating on an event date. You and the speakers receive then an invitation e-mail for the post-event task, if Activate event date invitations to speakers is activated on the tab Communication in the Event wizard.
To add your event a post-event task, click on the button Add post-event task. A further table entry with the post-event task, which you can individually adjust, appears.
If you add a post-event task for an event date group, there is no mandatory data (speaker, location) necessary.
Edit event date
To edit an event date via the Event date wizard, do the following steps:
- Choose Learning content → Events and click the event. The Event wizard opens.
- Choose the tab Dates.
- Set the check box at the event and click the button Edit. The Event date wizard opens.
- Do the appropriate changes and click the button Apply and close.
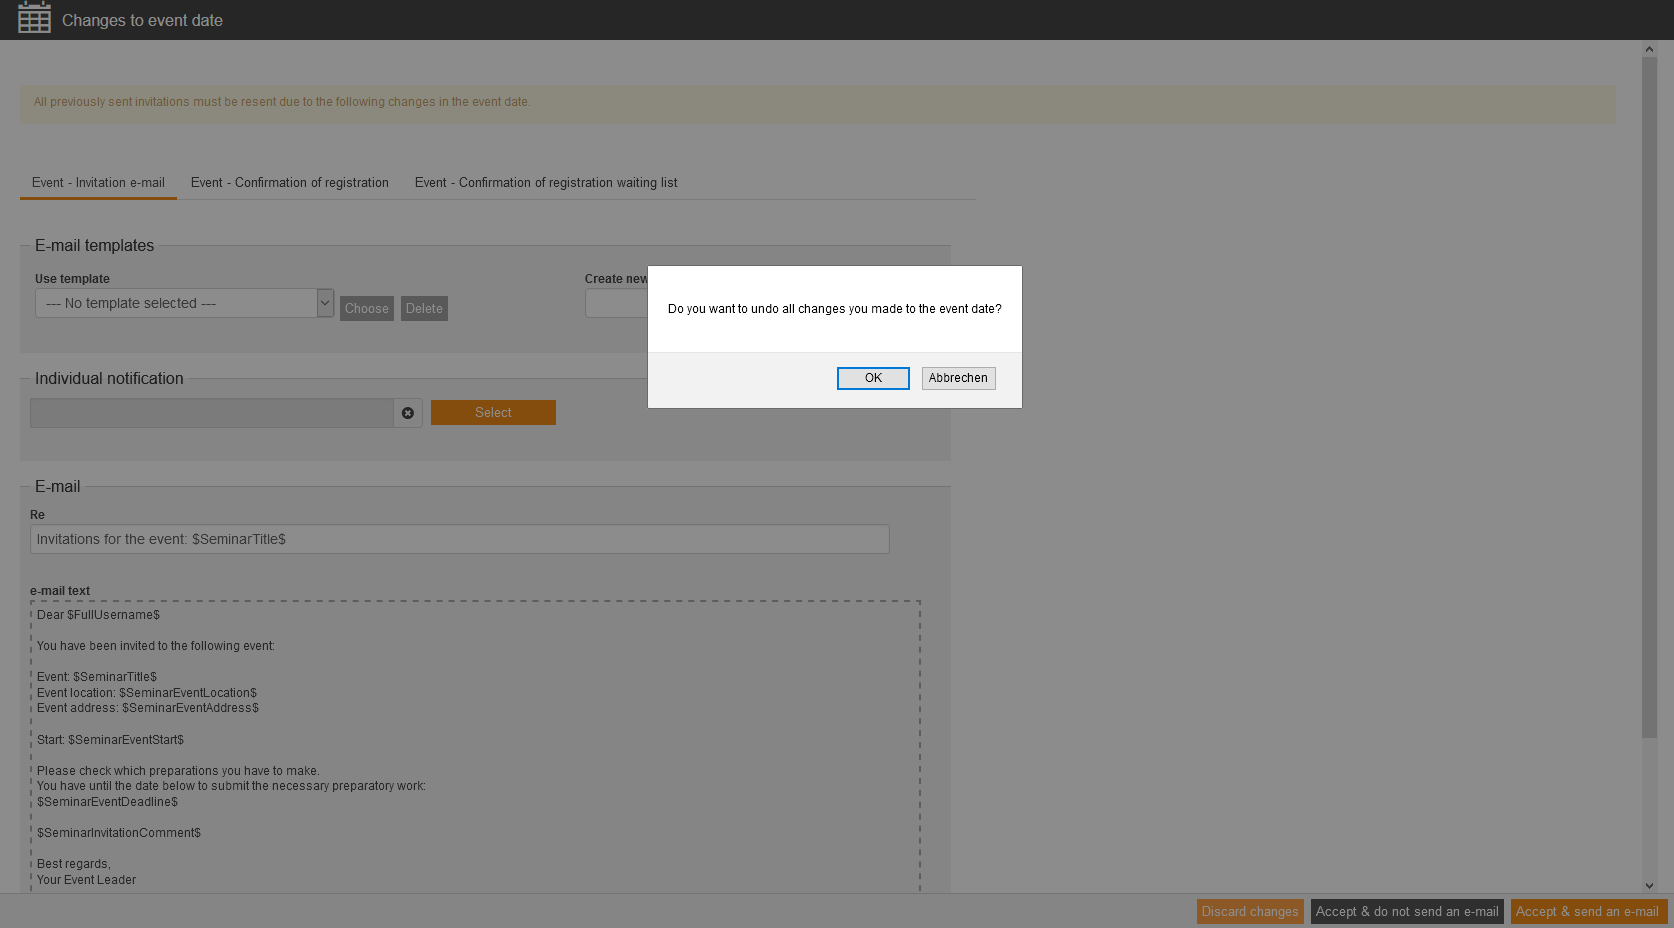
If you have selected for example the option Invitation e-mail sent immediately upon registration on the tab Configuration before and some participants have registered, the dialog window Changes to event date opens if there are changes to the event date. - Click the button Save in the Event wizard.
Explanation regarding the status view of speaker and room booking
You see behind each speaker or room the booking status, classified into:
 = No inquiry
 = Invited
Prerequisites:
– The check mark Date inquiry is set.
– The event date (and the event) has to be saved for sending the date inquiry and changing the status box for the date inquiry to Invited.
– The status of the event date shouldn’t be Being Planned. The status of the event date has to be Initiated or Active, and not Processed or being in the past. = Registered
 = Rejected
Changes to event date
- Choose under Use template your favored template and click on the button Choose. If applicable you can click on the button Delete.
Alternatively you can create a new template by entering the name and clicking on the button Save as template. - Select if applicable an Individual notification via the button Select.
- Change if applicable the subject of the e-mail and also the e-mail text. The available appendices are shown.
- You can discard changes, Accept & do not send an e-mail or Accept & send an e-mail.
Mass processing of event date groups
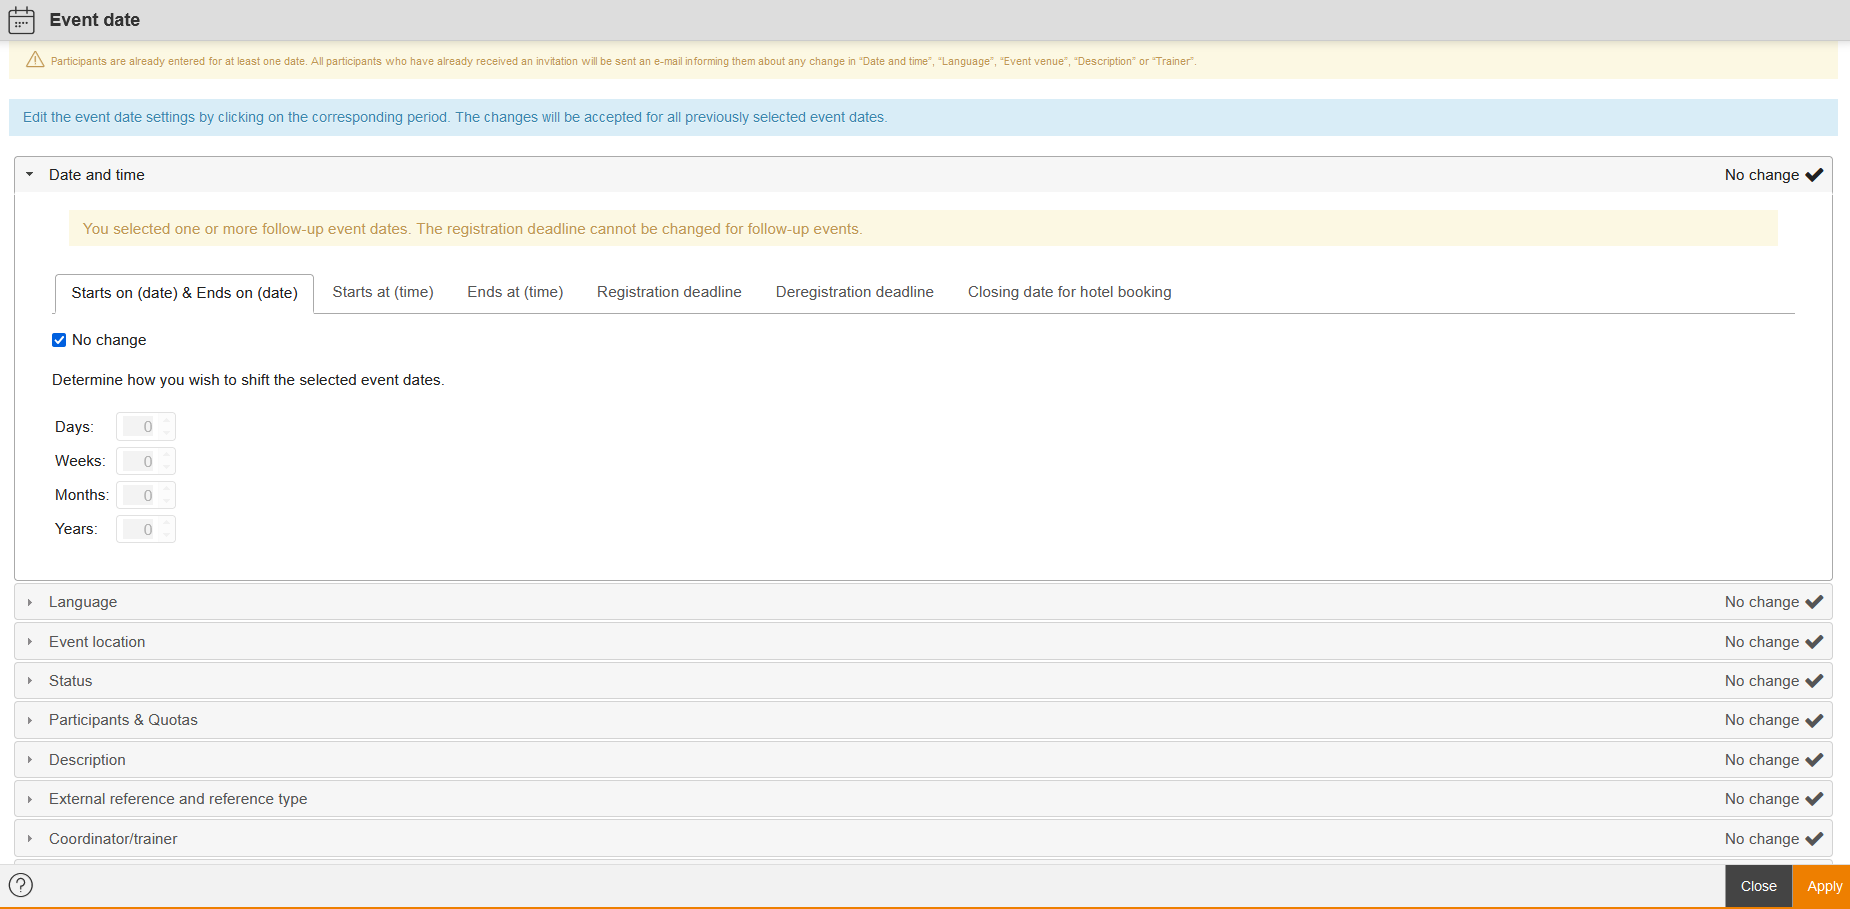
To edit event date groups via the mass processing function, set the check mark in front of the corresponding event date groups or event dates and click on the button Edit. The dialog window Event date for editing the event date groups opens (see screenshot).
Also you can copy the event date groups or event dates via the mass processing functions. Therefore you set the check mark in front of the corresponding event date groups or event dates and click on the button Copy. The dialog window Event date for editing and copying the event date groups or event dates opens.
Now you can change the event date groups regarding the following criteria by removing the check mark “No change” and doing the corresponding changes:
- Event date and time (starts on (date) and ends on (date), starts at, ends at, registration deadline, deregistration deadline and closing date for hotel booking)
- Language
- Event location (face-to-face session, virtual classroom)
- Status (change status manually to “Initiated” or “Active”)
- Participants & Quotas (minimum, maximum and waiting list)
- Description
- External reference and reference type
- Coordinator/trainer
- E-mail attachment
- Document list
- Price
- Billing data sets
- Event date costs
- Prices for members
- Copy of registration information
- Send attendance list
- Initiator
- User-defined fields
- IDD time
If you can’t change any criteria, you will get it displayed, for example: language at follow-up event dates.
Avendoo® API
Experienced authors with appropriate HTML/CSS and JavaScript skills can use the Avendoo® API (application programming interface) for the content of the event date table. So they can transfer certain parameters to an autonomous created design.
