Basics
Use
Clients act in Avendoo® as a classification system and as a distribution system of different visibilities and rights. To differ content client from user client allows a basic separation of the learning content from personal data of the learners as master data, learning progress or test result.
Functions
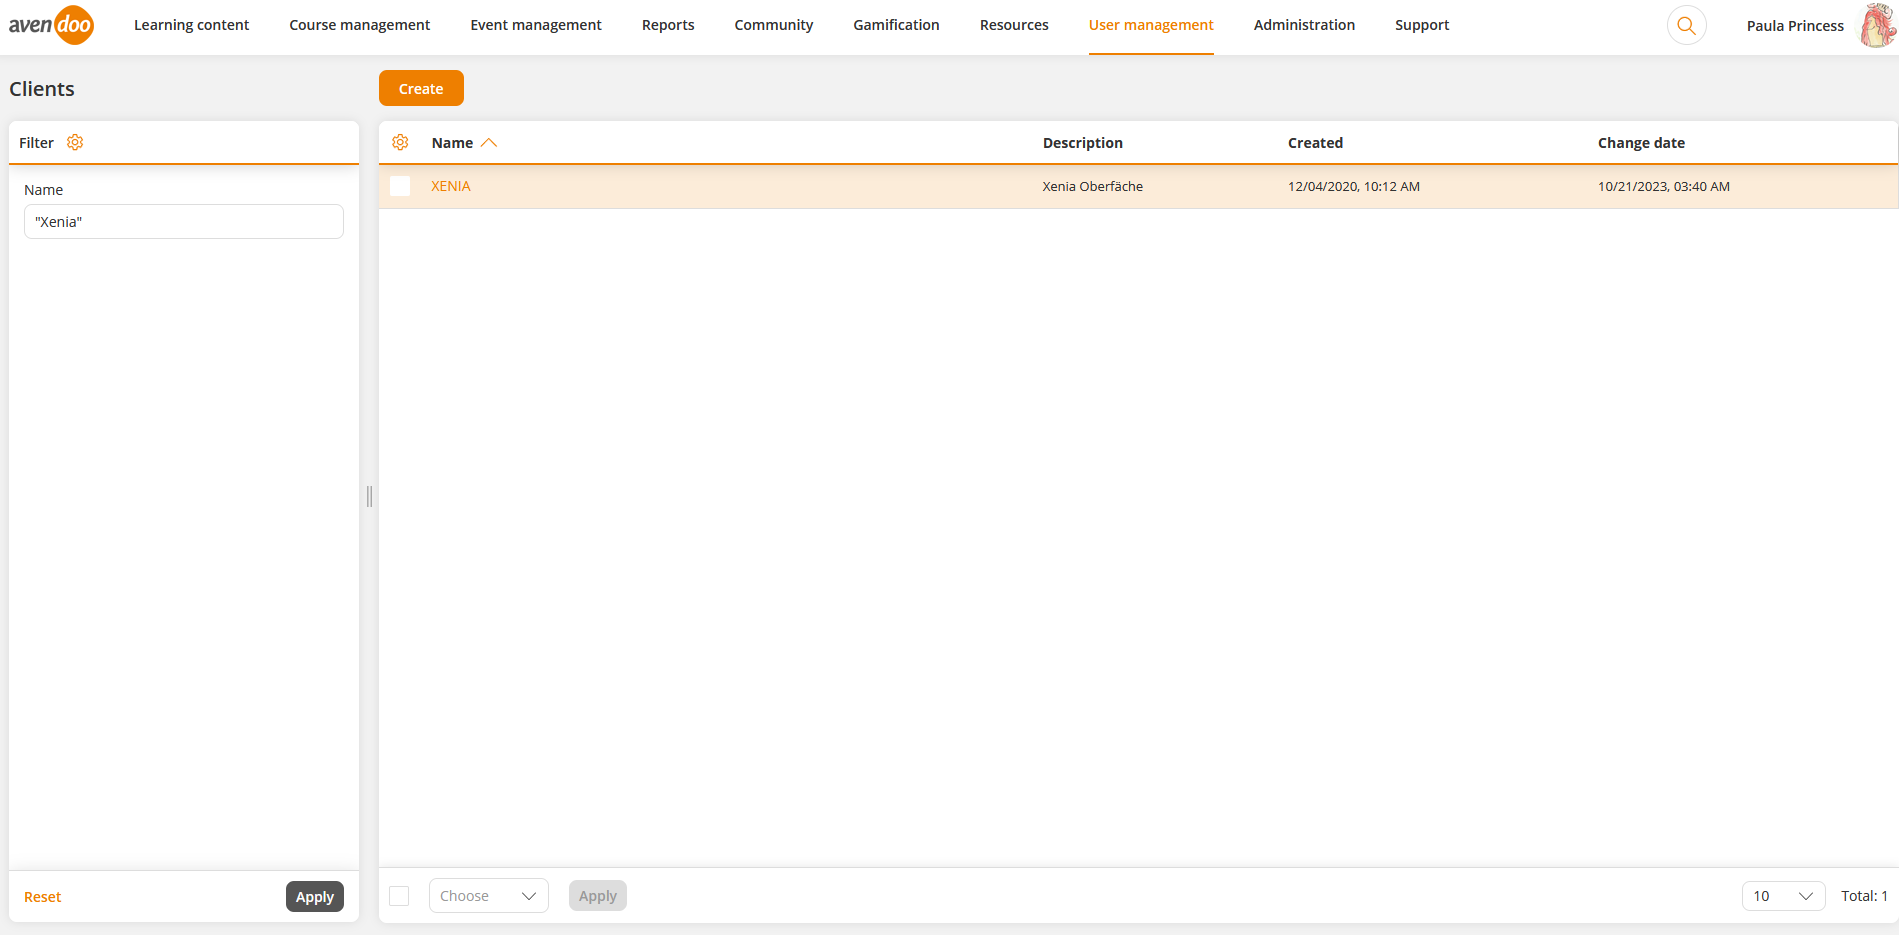
The overview table got the columns Name, Description, Created and Change date. If you click the table header you can Edit display and order of columns.
You can filter by the following criteria: Name and Window title.
There are the mass processing functions Copy and Delete for clients. More information about these functions you find under Clients: Mass processing functions.
The following functions are available via the context menu of the corresponding client title.
Variants of clients
A distinction is drawn between four clients in Avendoo®:
- User client (also named activation client)
If you want to separate the personal data of the user groups (as in Reporting and Community) and the access to data from authors, you choose different clients for the users. Furthermore, this option provides for simple handling of course activations and training plans plus appropiate design options. - Author client
To use a certain area for creating author accounts, you can use this variant. - Content client
If you want to separate multiple content developer teams for having an own content respository for each department, each team or each project for example, you choose different content clients. Furthermore you can configure different mail templates for events per content client. - Combination client
In this client you can create learning content as well as course activations and users in the same category structure. Therefore you use the same category structure. Basically, we recommend you not using combination clients as the separation of content and user data is not ensured.
If you have chosen the sub tab clients, you get a list of all created clients. On the left side you can filter for keywords to find a definite client faster. By clicking the name of a client the Client wizard opens.
Avendoo® API
Experienced authors with appropriate HTML/CSS and JavaScript skills can use the Avendoo® API (application programming interface) for the content of the event date table. So they can transfer certain parameters to an autonomous created design.
Create client
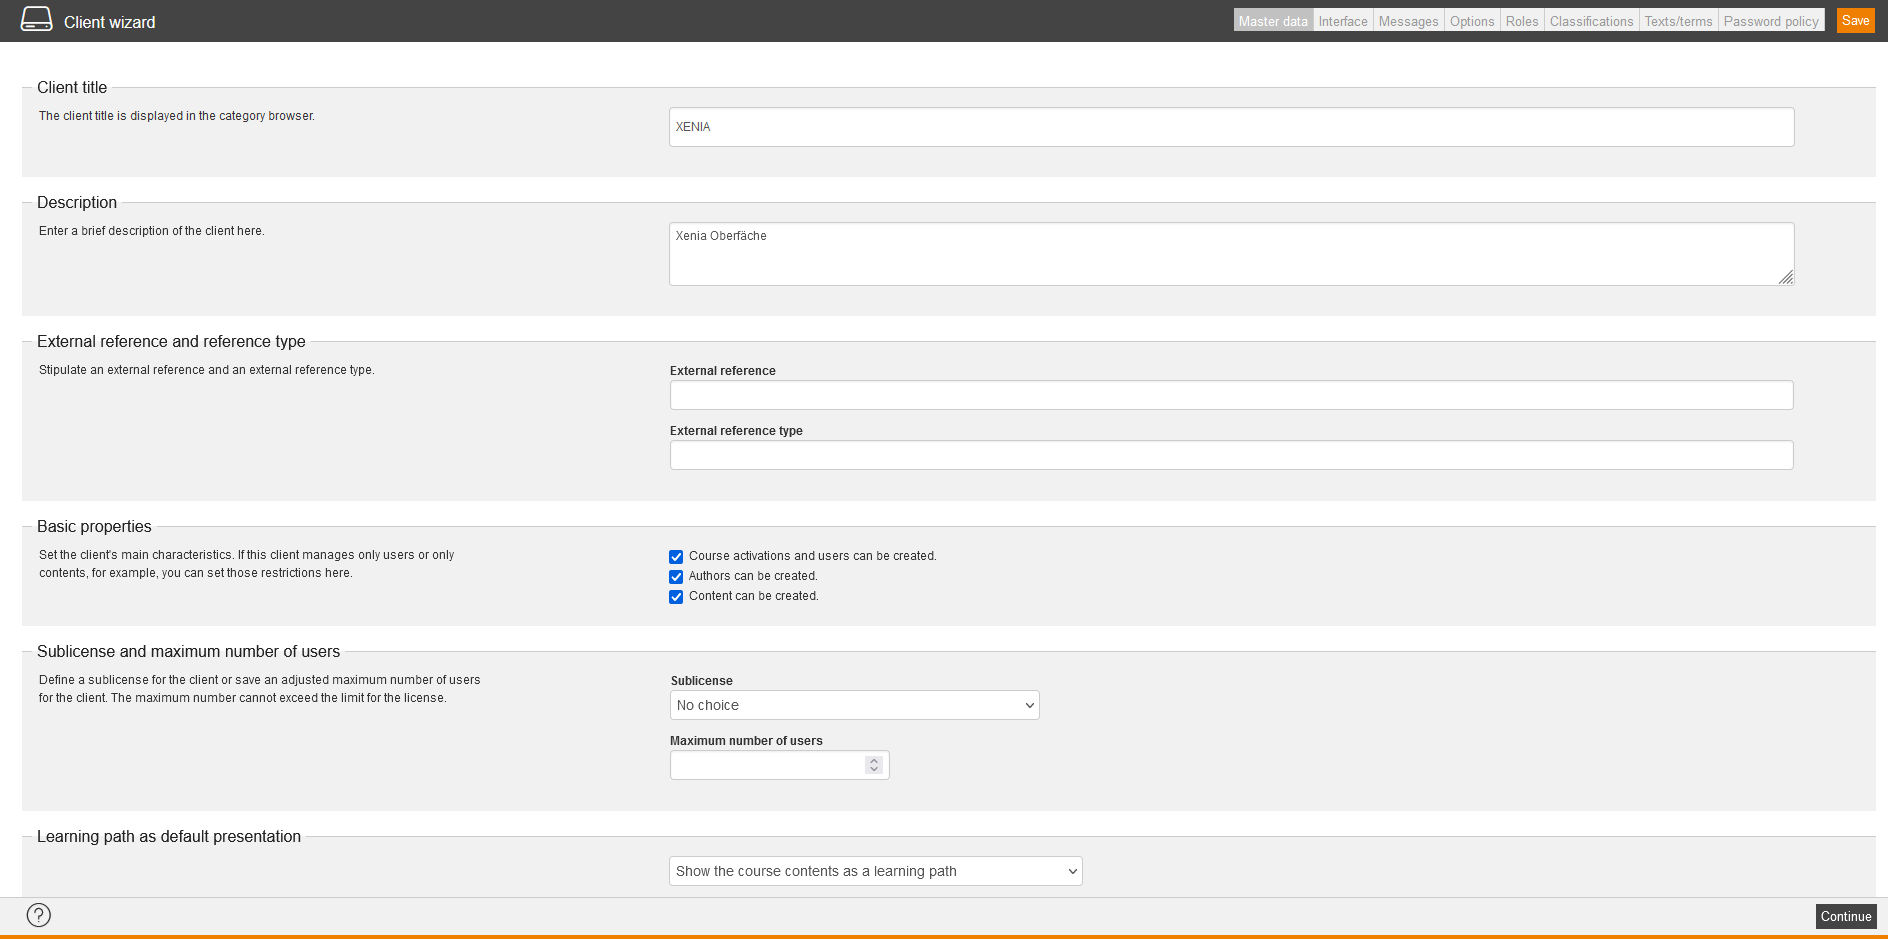
Master data
Client title
Enter a definite title for your new client.
Description
Enter the purpose or the content of the client for example.
External reference and reference type
Define an external reference and an external reference type for optimizing structure.
Basic properties
Define the basic properties. All checkboxes are set by default. If you deselect for example the checkboxes “Authors can be created” and “Course activations and users can be created”, you get an absolute content client.
Sub license and number of users at maximum
You can select the Sub license and you can define the adjusted number of users at maximum for the client. If you don’t select anything, the Avendoo® system license will be used.
You see the use of licenses on the widget Licenses on your Dashboard.
Learning path as default presentation
Define the basic presentation of your learning path. Choose between the up-to-date design of the learning path (with or without status text), the presentation as a table, the presentation as a vertical learning path or the presentation as a learning path with line breaks.
Interface
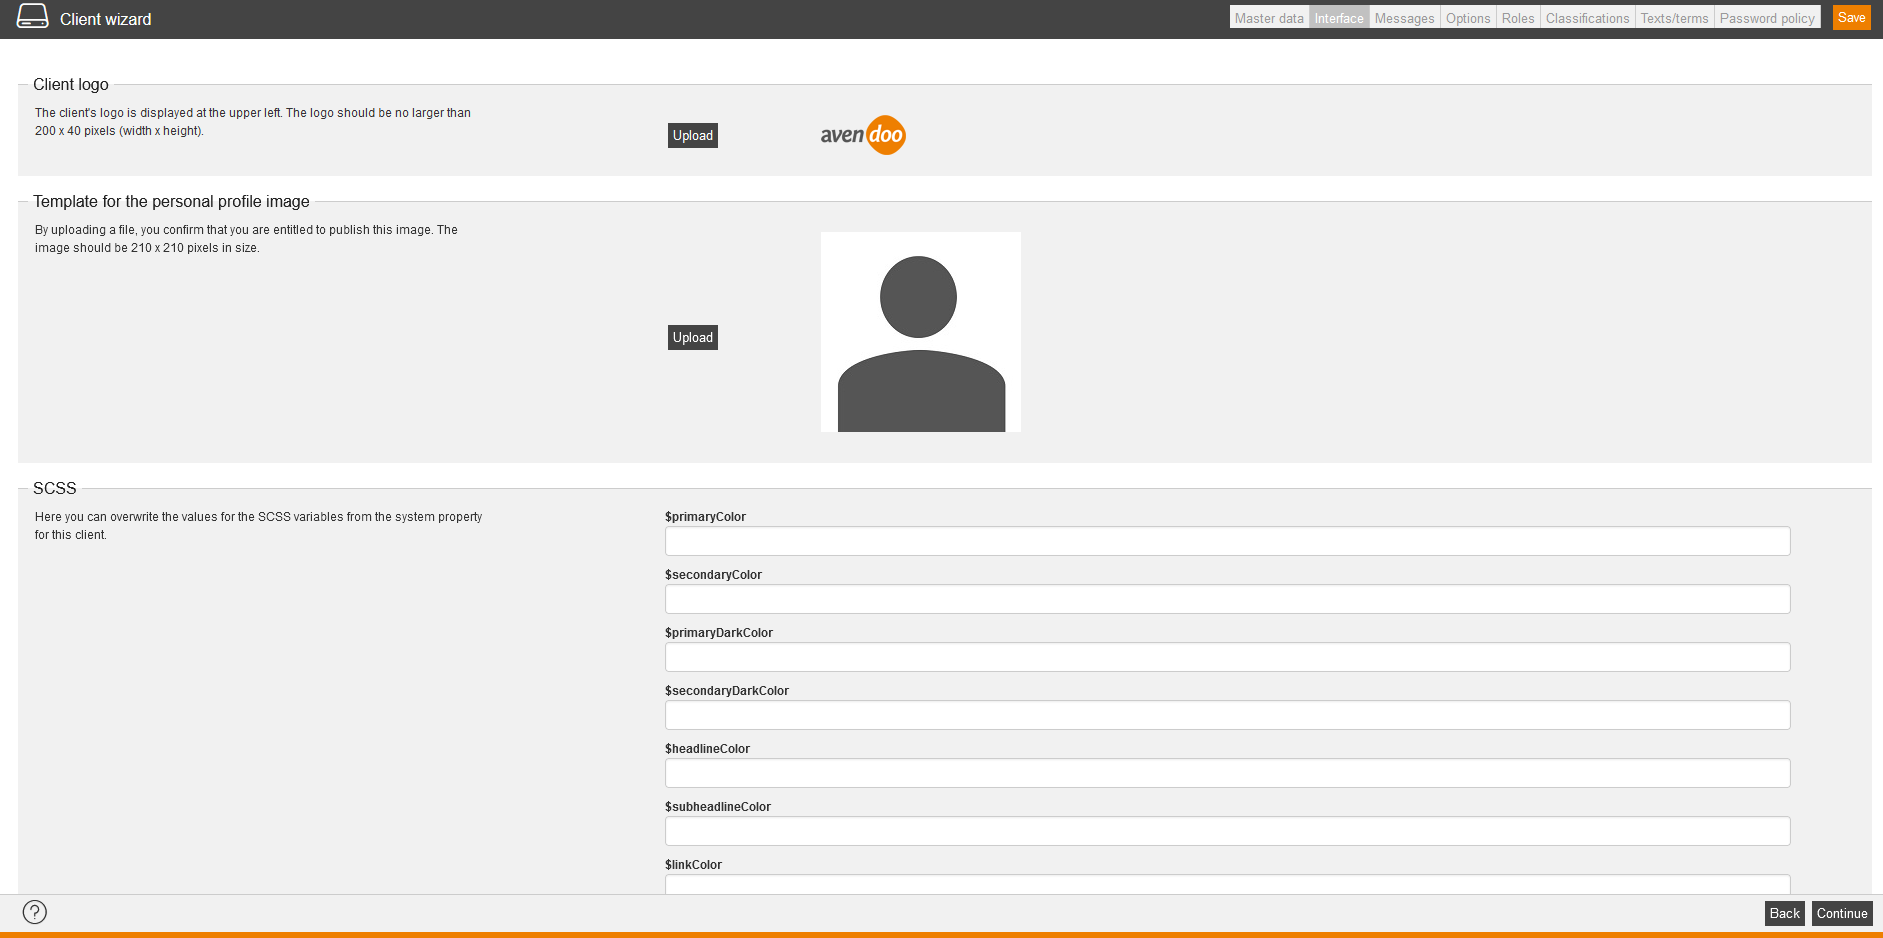
Client logo
Choose a logo for your new client.
Template for the personal profile image
By uploading a file, you confirm that you are entitled to publish this image. Therefore click on the button Upload. Note that the image should be 210 x 210 pixels in size.
SCSS
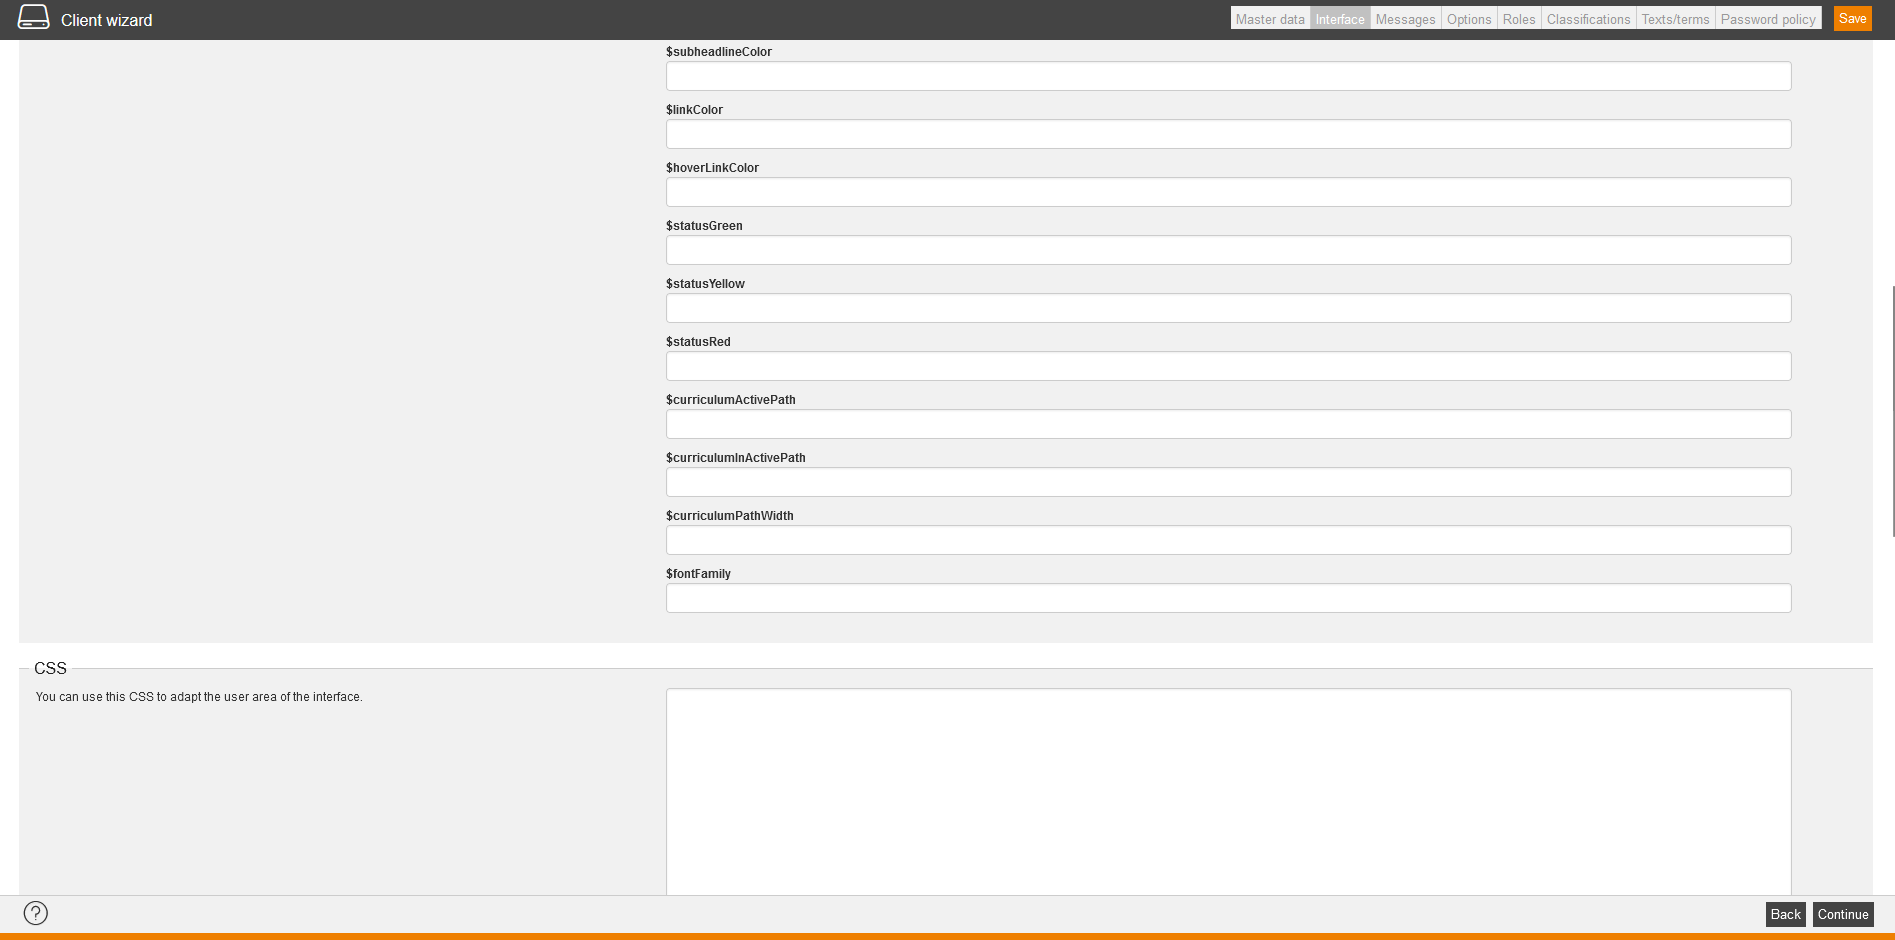
Here you can overwrite the values for the SCSS variables from the system setting “global.system.scss.global.variables” for this client. If you haven’t defined variables in the system setting “global.system.scss.global.variables”, this will be shown.
Further information about the system setting “global.system.scss.global.variables” you find here.
If you have CSS skills, you can configure and change the interface of the user area via CSS programming.
JavaScript
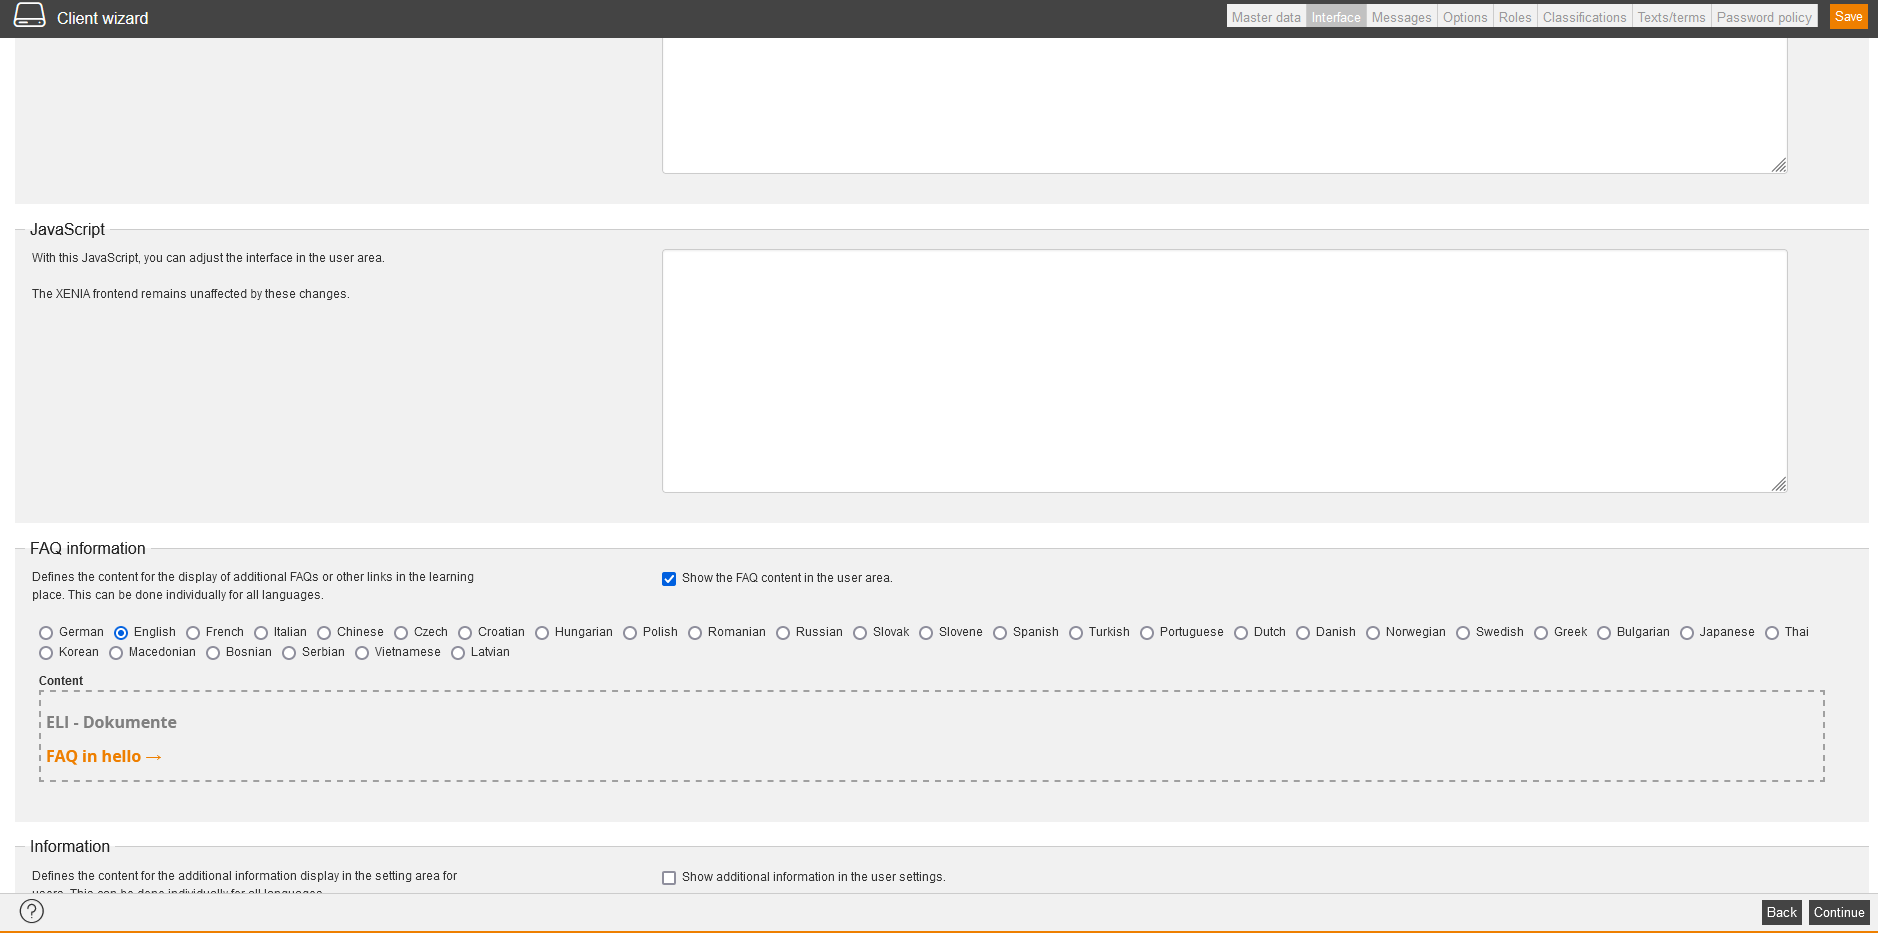
With this JavaScript, you can adjust the interface in the user area.
FAQ information
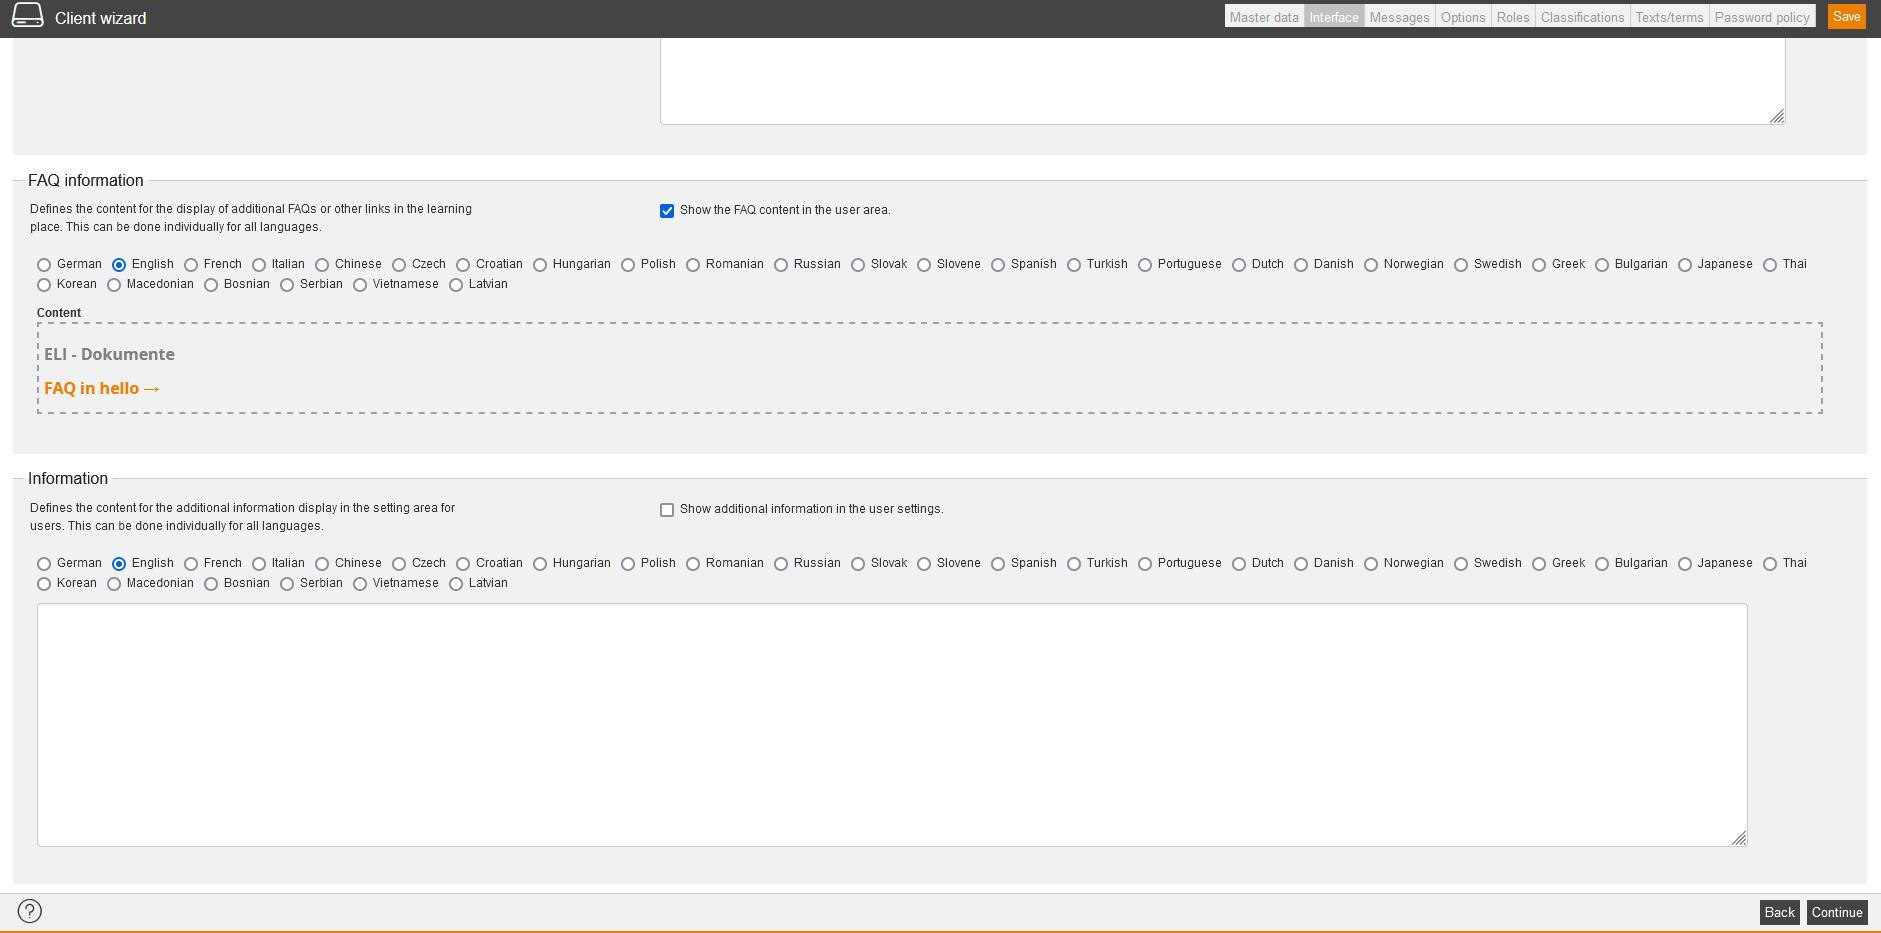
There is the possibility that a FAQ area for the learning place of the users is displayed. Select the checkbox to activate the FAQ area and then define the favoured content per language. You can create and edit the content by using the editor.
Information
To display an own content in the user settings on the tab Informations, select the checkbox “Show additional information in the user settings” and create content per language via HTML/CSS. Thus you can point to the internal support team or you can provide other internal information for example.
The Avendoo® product information is displayed on the tab by default.
Messages
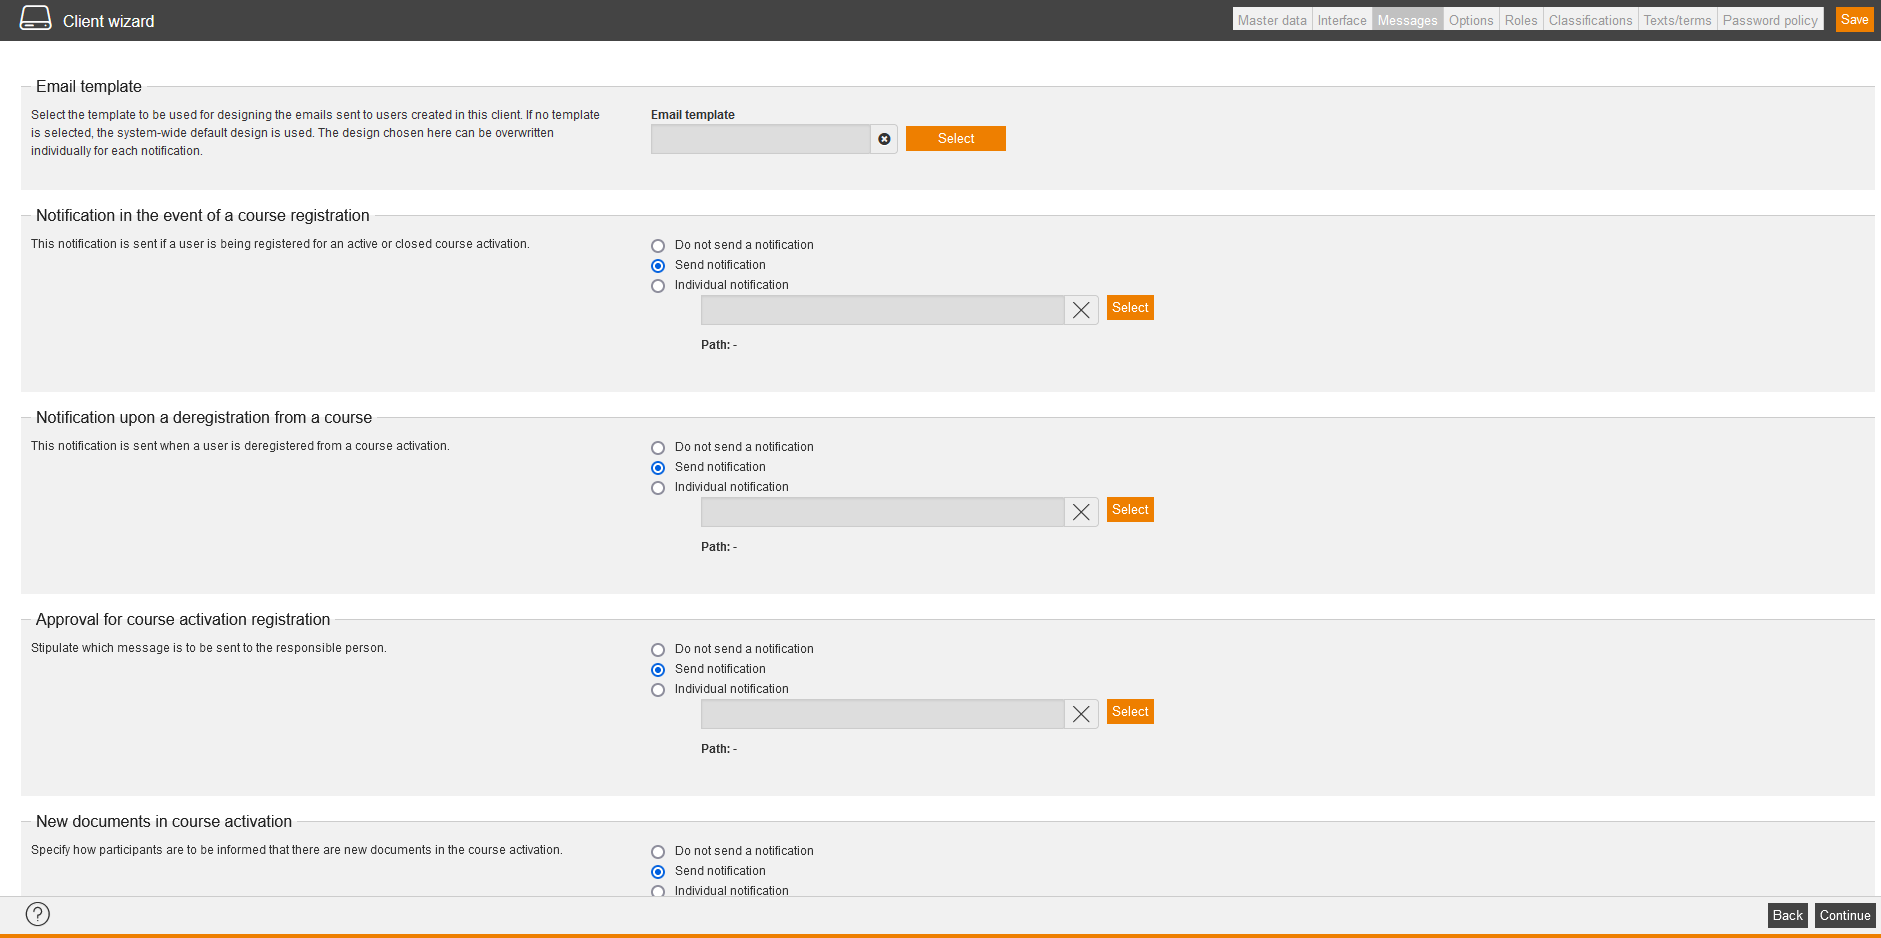
E-mail template
Select the template to be used for designing the emails sent to users created in this client by clicking on the button Select and confirming your selection. If no template is selected, the system-wide default design is used. The design chosen here can be overwritten individually for each notification.
Notification in the event of a course registration
This notification is sent if a user is being registered for an active or closed course. You can select Do not send a notification or Send notification or you click on the button Select and select the appropriate individual notification. Then the source path of the individual notification will be shown. Further information about creating an individual notification you find here.
Notification upon a deregistration from a course
This notification is sent if a user is being deregistered for an course activation. You can select Do not send a notification or Send notification or you click on the button Select and select the appropriate individual notification. Then the source path of the individual notification will be shown. Further information about creating an individual notification you find here.
Approval for course activation registration
Stipulate which message is to be sent to the responsible person. You can select Do not send a notification or Send notification or you click on the button Select and select the appropriate individual notification. Then the source path of the individual notification will be shown. Further information about creating an individual notification you find here.
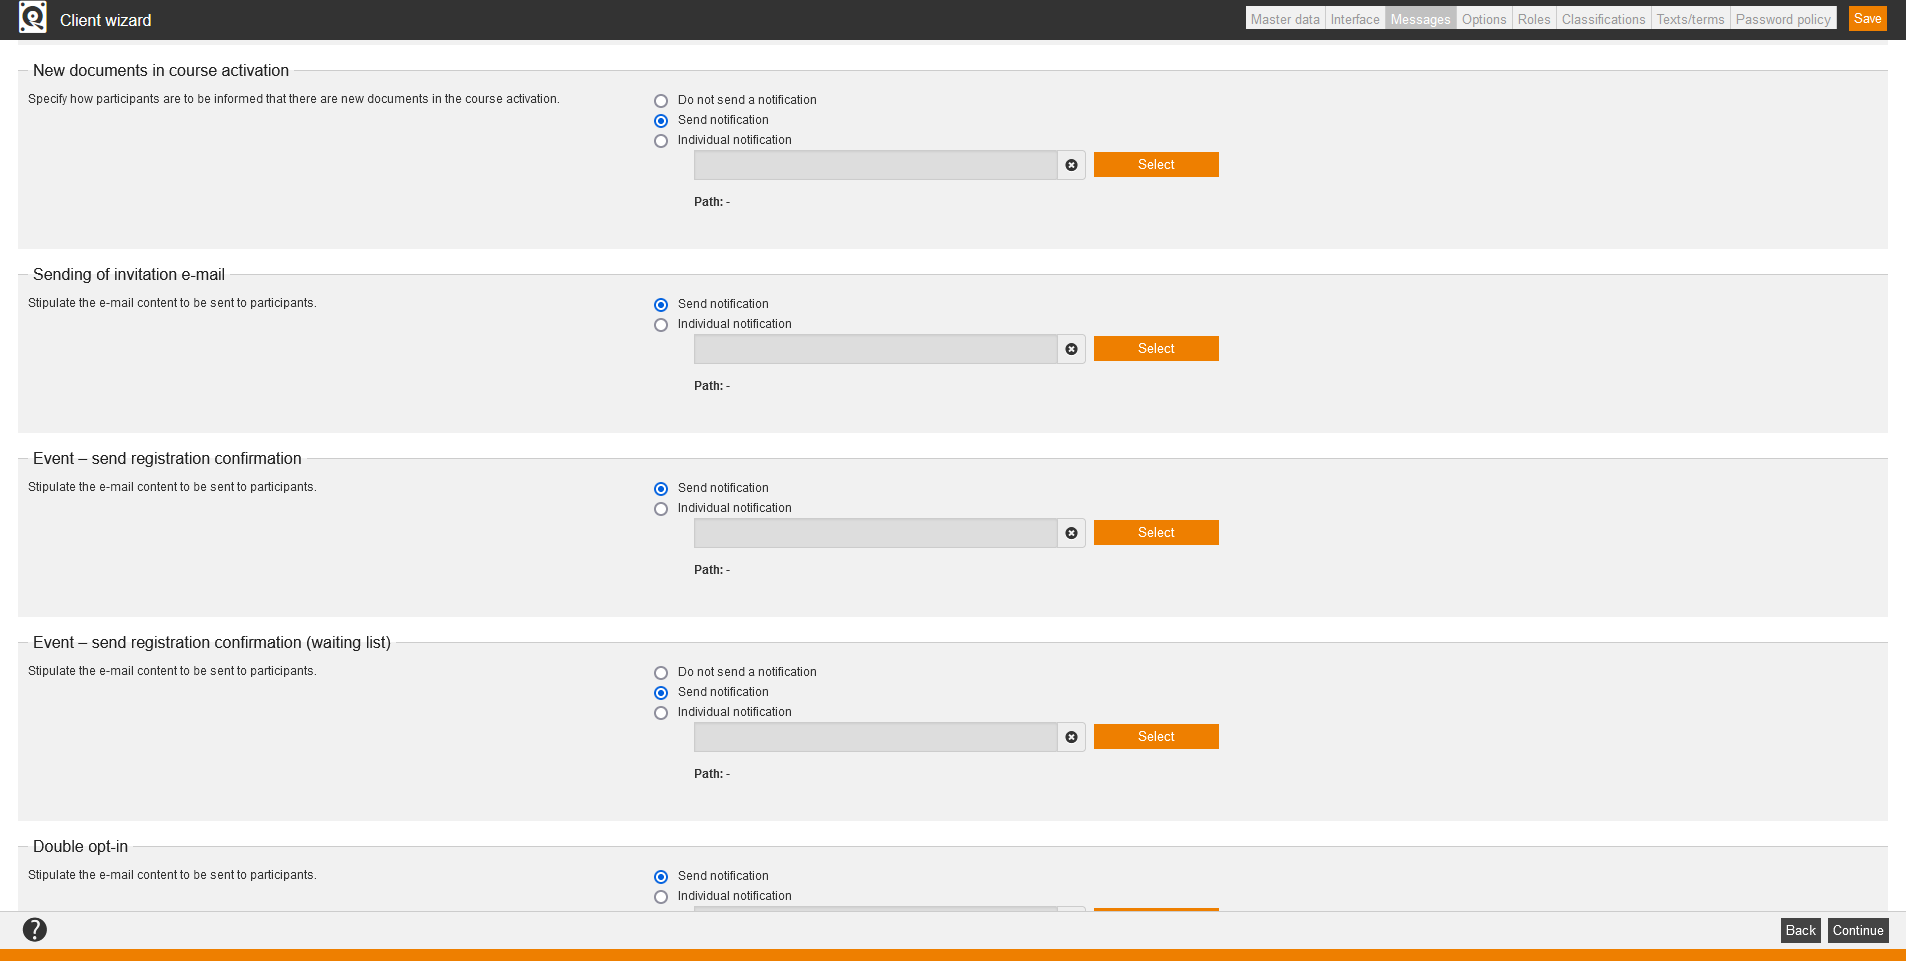
New documents in course activation
Specify how participants are to be informed that there are new documents in the course activation. You can select Do not send a notification or Send notification or you click on the button Select and select the appropriate individual notification. Then the source path of the individual notification will be shown. Further information about creating an individual notification you find here.
Sending of invitation e-mail
Stipulate the e-mail content to be sent to participants. You can select Send notification or you click on the button Select and select the appropriate individual notification. Then the source path of the individual notification will be shown. Further information about creating an individual notification you find here.
Event – send registration confirmation
Stipulate the e-mail content to be sent to participants. You can select Send notification or you click on the button Select and select the appropriate individual notification. Then the source path of the individual notification will be shown. Further information about creating an individual notification you find here.
Event – send registration confirmation (waiting list)
The registration confirmation (waiting list) will be sent independent from the invitation and the automatic registration confirmation. Stipulate the e-mail content to be sent to participants. You can select Do not send a notification, Send notification or you click on the button Select and select the appropriate individual notification. Then the source path of the individual notification will be shown. Further information about creating an individual notification you find here.
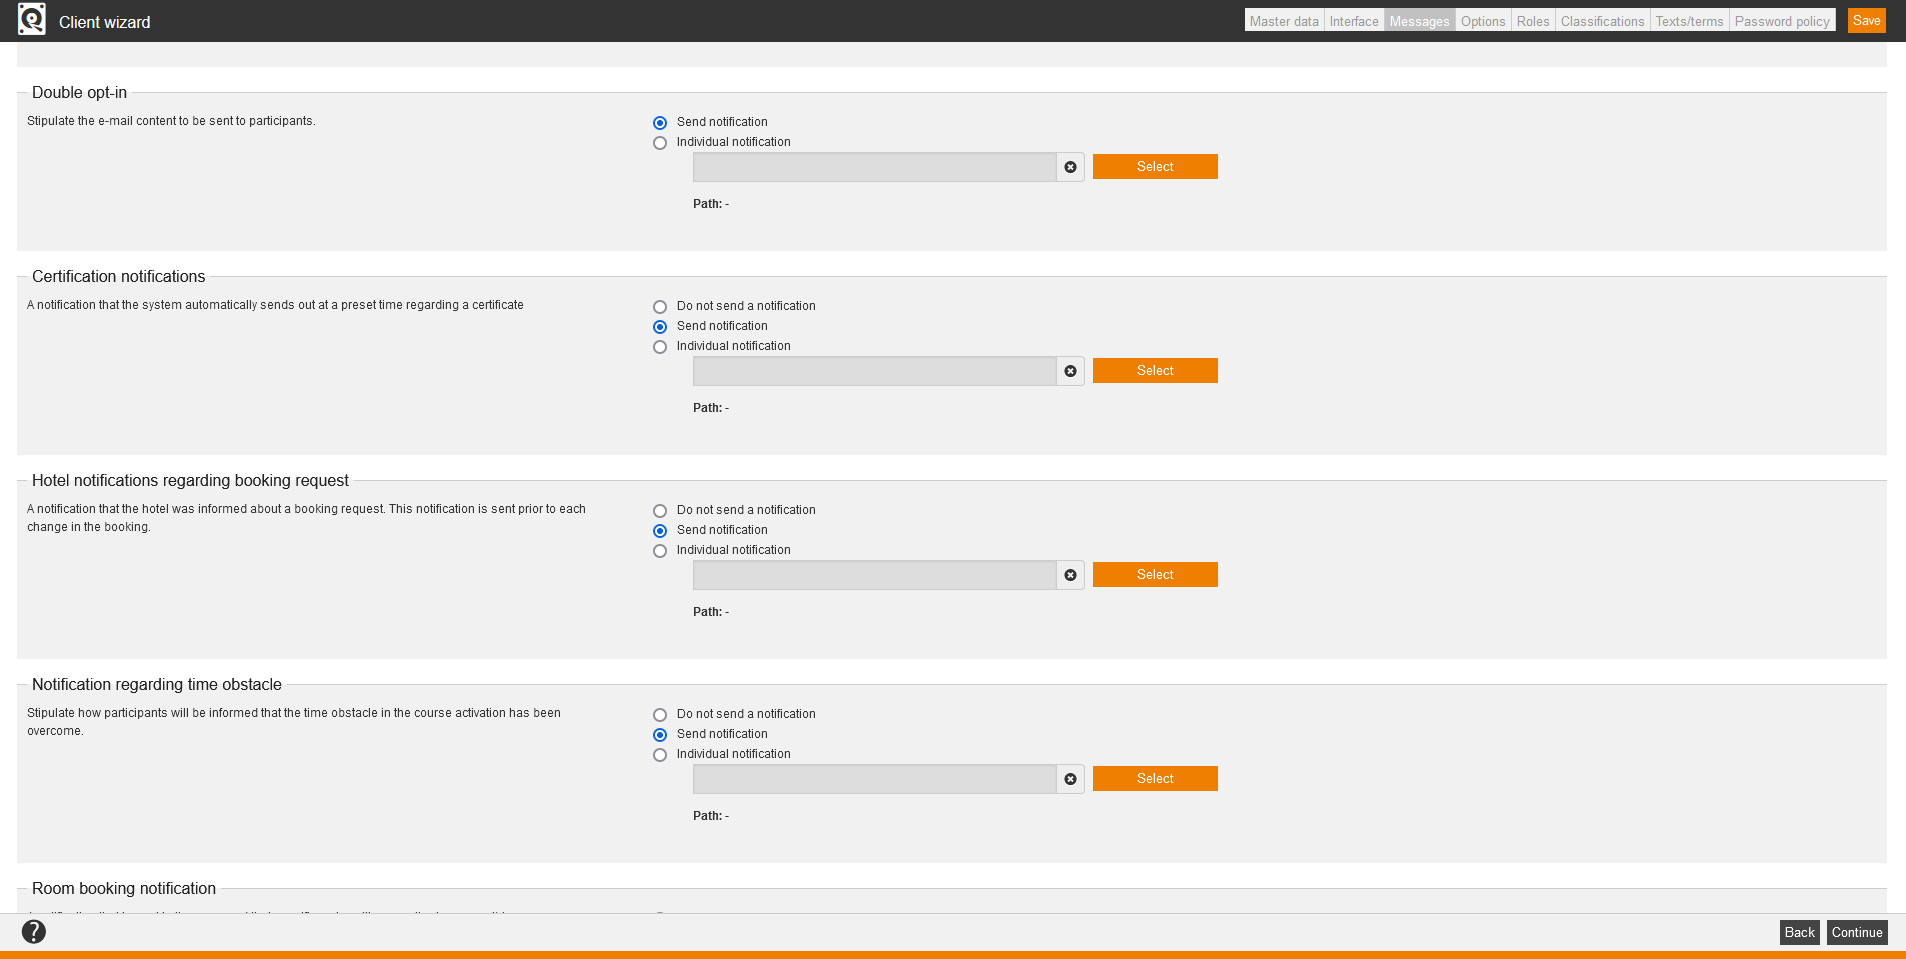
Double opt-in
Stipulate the e-mail content to be sent to participants. You can select Send notification or you click on the button Select and select the appropriate individual notification. Then the source path of the individual notification will be shown. Further information about creating an individual notification you find here.
Certification notifications
This notification is automatically sent by the system out at a preset time regarding a certificate. You can select Do not send a notification or Send notification or you click on the button Select and select the appropriate individual notification. Then the source path of the individual notification will be shown. Further information about creating an individual notification you find here.
Hotel notifications regarding booking request
This notification informs the hotel about a booking request. It is sent prior to each change in the booking. You can select Do not send a notification or Send notification or you click on the button Select and select the appropriate individual notification. Then the source path of the individual notification will be shown. Further information about creating an individual notification you find here.
Notification regarding time obstacle
Stipulate how participants will be informed that the time obstacle in the course activation has been overcome. You can select Do not send a notification or Send notification or you click on the button Select and select the appropriate individual notification. Then the source path of the individual notification will be shown. Further information about creating an individual notification you find here.
This notification is sent to the room and that specifies who will occupy it, where possible. You can select Do not send a notification or Send notification or you click on the button Select and select the appropriate individual notification. Then the source path of the individual notification will be shown. Further information about creating an individual notification you find here.
Task notification – Created
This is a notification which is sent to the task owner as soon as the task is created.
You can select Do not send a notification or Send notification or you click on the button Select and select the appropriate individual notification. Then the source path of the individual notification will be shown. Further information about creating an individual notification you find here.
Task notification – Due date
This is a notification which is sent to the task owner as soon as the task is due.
You can select Do not send a notification or Send notification or you click on the button Select and select the appropriate individual notification. Then the source path of the individual notification will be shown. Further information about creating an individual notification you find here.
Task reminder (participants)
This is a notification which is sent to the participant before the specified task duration comes to an end.
You can select Send notification or you click on the button Select and select the appropriate individual notification. Then the source path of the individual notification will be shown. Further information about creating an individual notification you find here.
Task reminder (summary)
This is a notification which is sent to the recipient before his or her specified task duration comes to an end.
You can select Send notification or you click on the button Select and select the appropriate individual notification. Then the source path of the individual notification will be shown. Further information about creating an individual notification you find here.
Escalation (participants)
This is a notification which is sent to the participant after the specified task duration has come to an end.
You can select Send notification or you click on the button Select and select the appropriate individual notification. Then the source path of the individual notification will be shown. Further information about creating an individual notification you find here.
Escalation (summary)
This is a notification which is sent to the recipient after the specified task duration has come to an end.
You can select Send notification or you click on the button Select and select the appropriate individual notification. Then the source path of the individual notification will be shown. Further information about creating an individual notification you find here.
IDD transmission error (only relevant in Germany)
This notification is sent to selected authors, if the IDD ID is unknown or inactive when the IDD times are sent to Gutberaten. You can select Do not send a notification or Send notification or you click on the button Select and select the appropriate individual notification. Then the source path of the individual notification will be shown. Further information about creating an individual notification you find here.
To define authors for notification, click on the button Add recipients and confirm your selection.
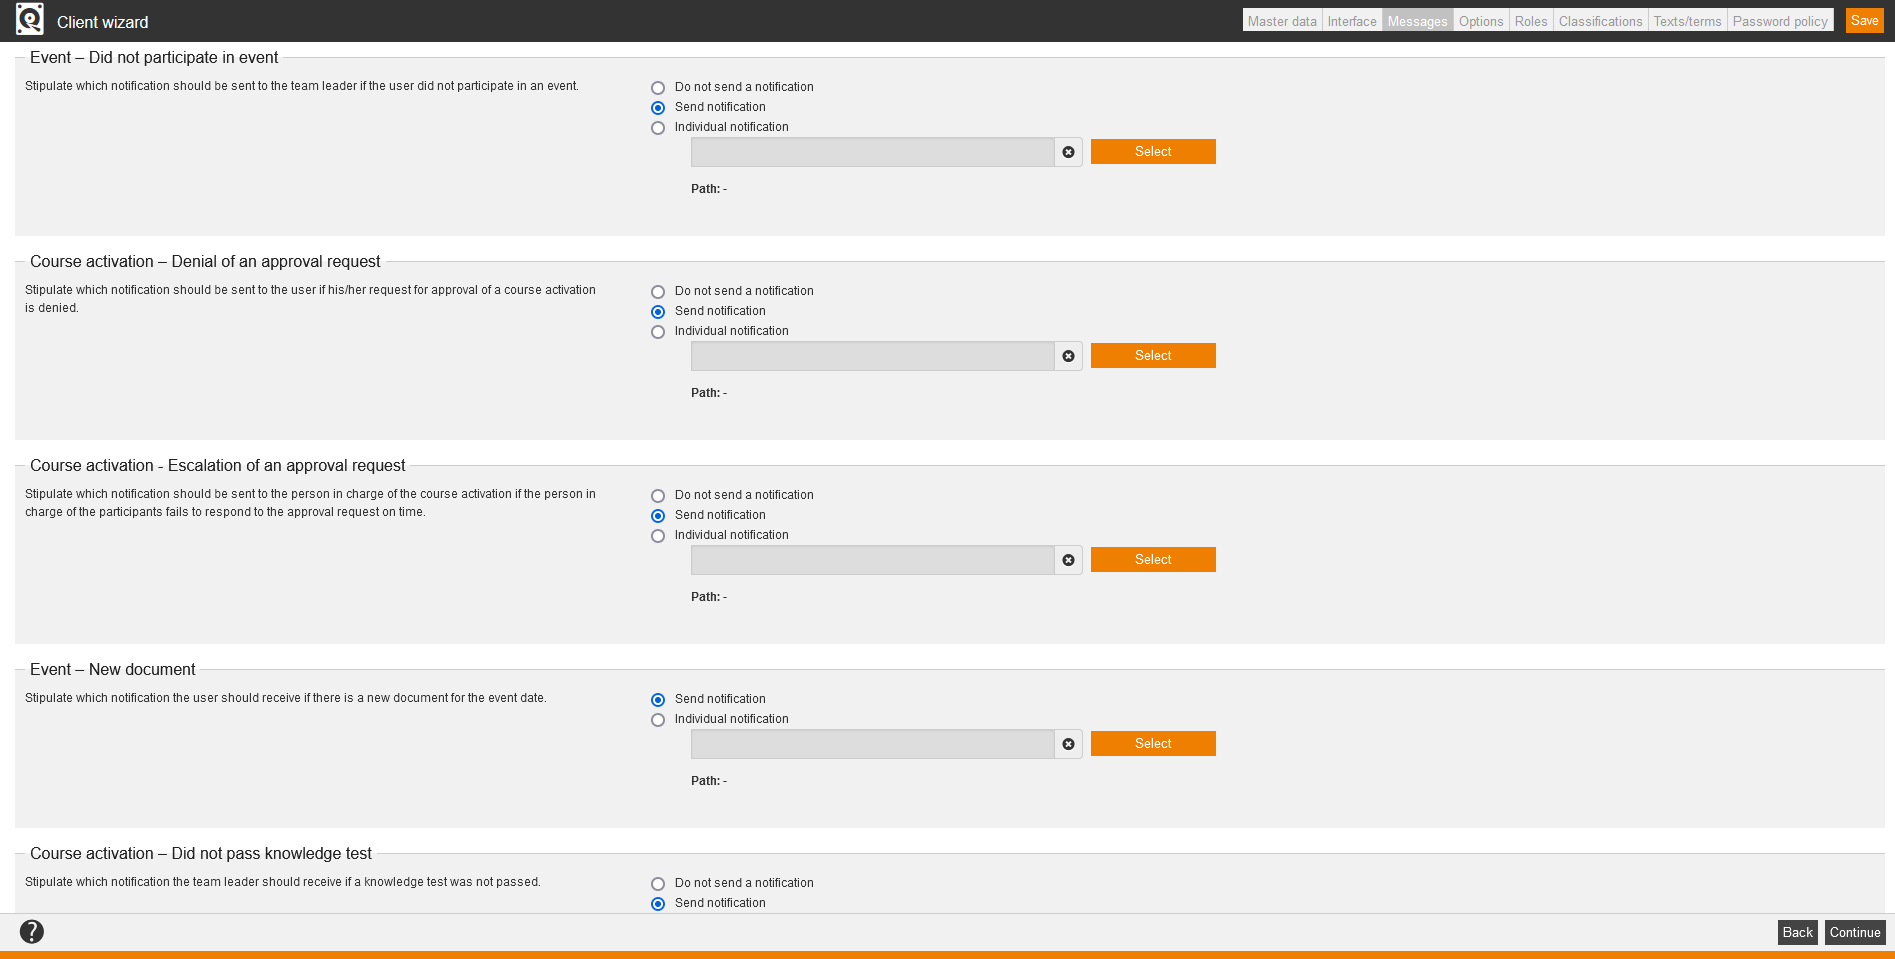
Event – Did not participate in event
Stipulate which notification should be sent to the team leader if the user did not participate in an event. You can select Do not send a notification, Send notification or you click on the button Select and select the appropriate individual notification. Then the source path of the individual notification will be shown. Further information about creating an individual notification you find here.
Course activation – Denial of an approval request
Stipulate which notification should be sent to the user if his/her request for approval of a course activation is denied.
You can select Do not send a notification or Send notification or you click on the button Select and select the appropriate individual notification. Then the source path of the individual notification will be shown. Further information about creating an individual notification you find here.
Course activation – Escalation of an approval request
Stipulate which notification should be sent to the person in charge of the course activation if the person in charge of the participants fails to respond to the approval request on time.
You can select Do not send a notification or Send notification or you click on the button Select and select the appropriate individual notification. Then the source path of the individual notification will be shown. Further information about creating an individual notification you find here.
Event – New document
Stipulate which notification the user should receive if there is a new document for the event date. You can select Send notification or you click on the button Select and select the appropriate individual notification. Then the source path of the individual notification will be shown. Further information about creating an individual notification you find here.
Course activation – Did not pass knowledge test
Stipulate which notification the team leader should receive if a knowledge test was not passed.
You can select Do not send a notification or Send notification or you click on the button Select and select the appropriate individual notification. Then the source path of the individual notification will be shown. Further information about creating an individual notification you find here.
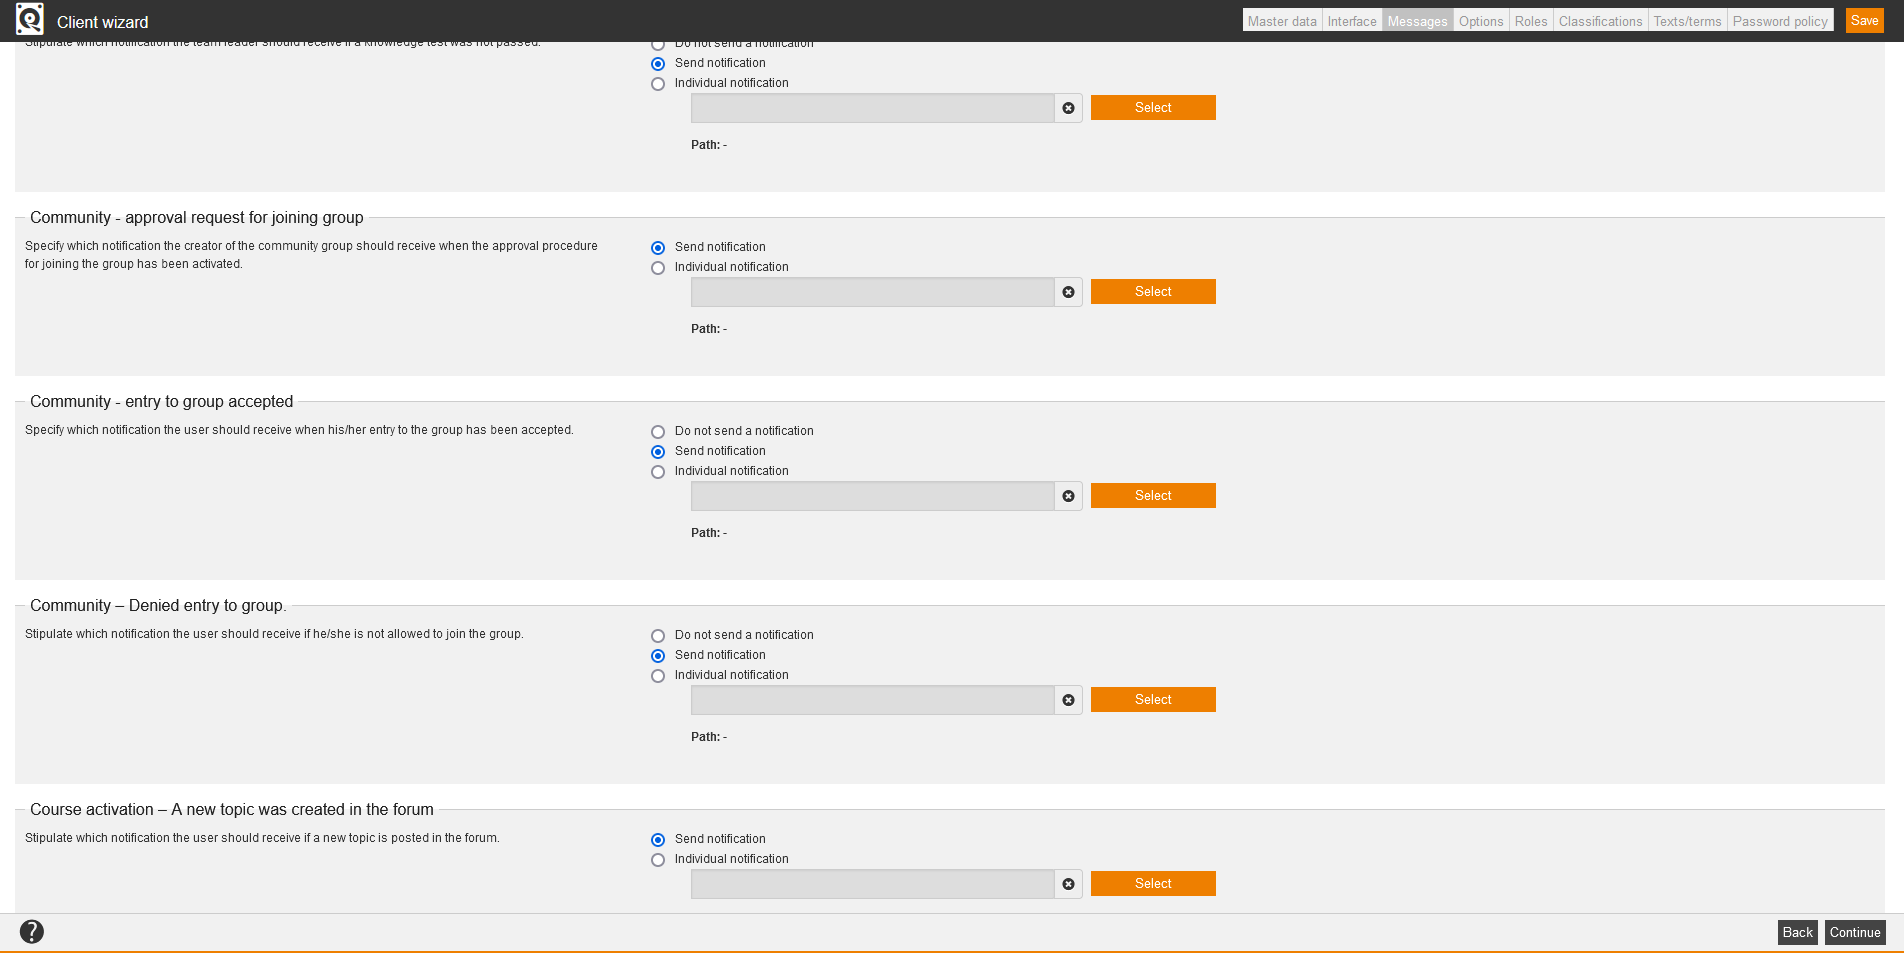
Community – approval request for joining group
Stipulate which notification the creator of the community group should receive when the approval procedure has been activated for joining the group.
You can select Send notification or you click on the button Select and select the appropriate individual notification. Then the source path of the individual notification will be shown. Further information about creating an individual notification you find here.
Community – entry to group accepted
Stipulate which notification the user should receive if his joining the group has been accepted.
You can select Do not send a notification or Send notification or you click on the button Select and select the appropriate individual notification. Then the source path of the individual notification will be shown. Further information about creating an individual notification you find here.
Community – Denied entry to group
Stipulate which notification the user should receive if he/she is not allowed to join the group.
You can select Do not send a notification or Send notification or you click on the button Select and select the appropriate individual notification. Then the source path of the individual notification will be shown. Further information about creating an individual notification you find here.
Course activation – A new topic was created in the forum
Stipulate which notification the user should receive if a new topic is posted in the forum.
You can select Send notification or you click on the button Select and select the appropriate individual notification. Then the source path of the individual notification will be shown. Further information about creating an individual notification you find here.
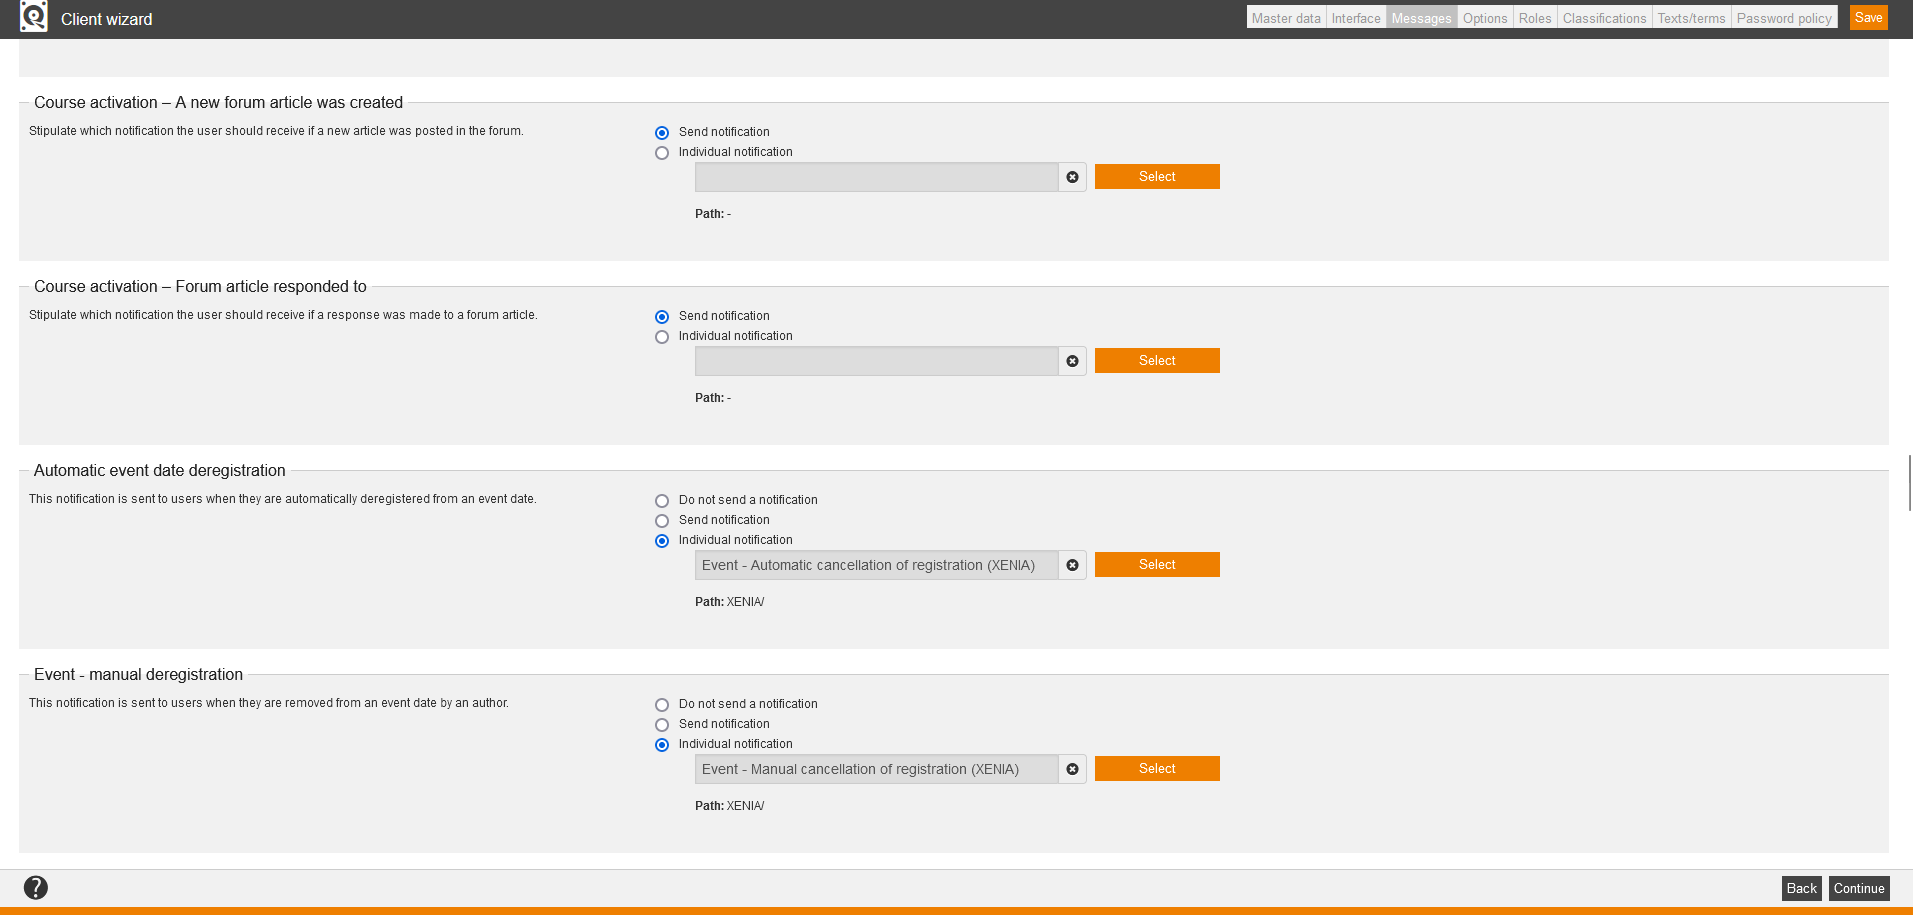
Course activation – A new forum article was created
Stipulate which notification the user should receive if a new article was posted in the forum.
You can select Send notification or you click on the button Select and select the appropriate individual notification. Then the source path of the individual notification will be shown. Further information about creating an individual notification you find here.
Course activation – Forum article responded to
Stipulate which notification the user should receive if a response was made to a forum article.
You can select Send notification or you click on the button Select and select the appropriate individual notification. Then the source path of the individual notification will be shown. Further information about creating an individual notification you find here.
Automatic event date deregistration
This notification is sent to users when they are automatically deregistered from an event date.
You can select Do not send a notification or Send notification or you click on the button Select and select the appropriate individual notification. Then the source path of the individual notification will be shown. Further information about creating an individual notification you find here.
Event – manual deregistration
This notification is sent to users when they are when they are removed from an event date by an author.
You can select Do not send a notification or Send notification or you click on the button Select and select the appropriate individual notification. Then the source path of the individual notification will be shown. Further information about creating an individual notification you find here
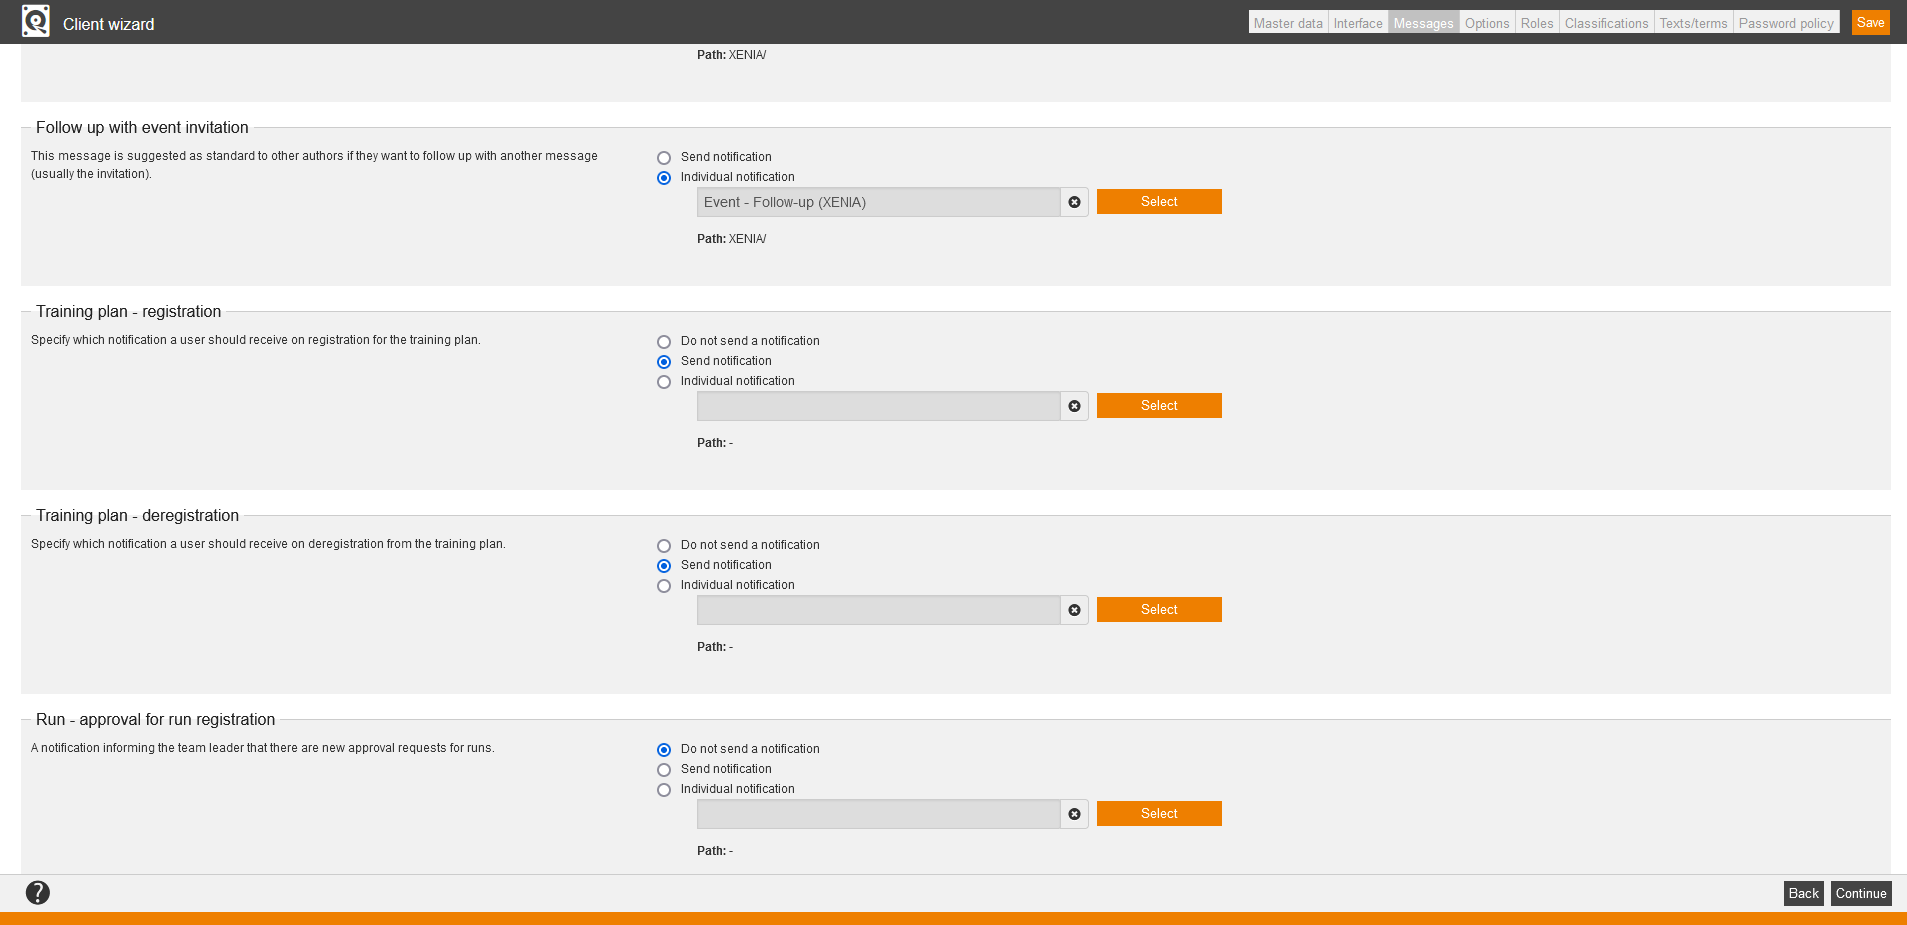
Follow up with event invitation
This notification is suggested as standard to other authors if they want to follow up with another notification (usually the invitation).
You can select Send notification or you click on the button Select and select the appropriate individual notification. Then the source path of the individual notification will be shown. Further information about creating an individual notification you find here.
Training plan – registration
Specify which notification a user should receive on registration for the training plan.
You can select Do not send a notification or Send notification or you click on the button Select and select the appropriate individual notification. Then the source path of the individual notification will be shown. Further information about creating an individual notification you find here.
Training plan – deregistration
Specify which notification a user should receive on deregistration from the training plan.
You can select Do not send a notification or Send notification or you click on the button Select and select the appropriate individual notification. Then the source path of the individual notification will be shown. Further information about creating an individual notification you find here.
Run – approval for run registration
This notification informs the team leader that there a new approval requests to runs.
You can select Do not send a notification or Send notification or you click on the button Select and select the appropriate individual notification. Then the source path of the individual notification will be shown. Further information about creating an individual notification you find here.
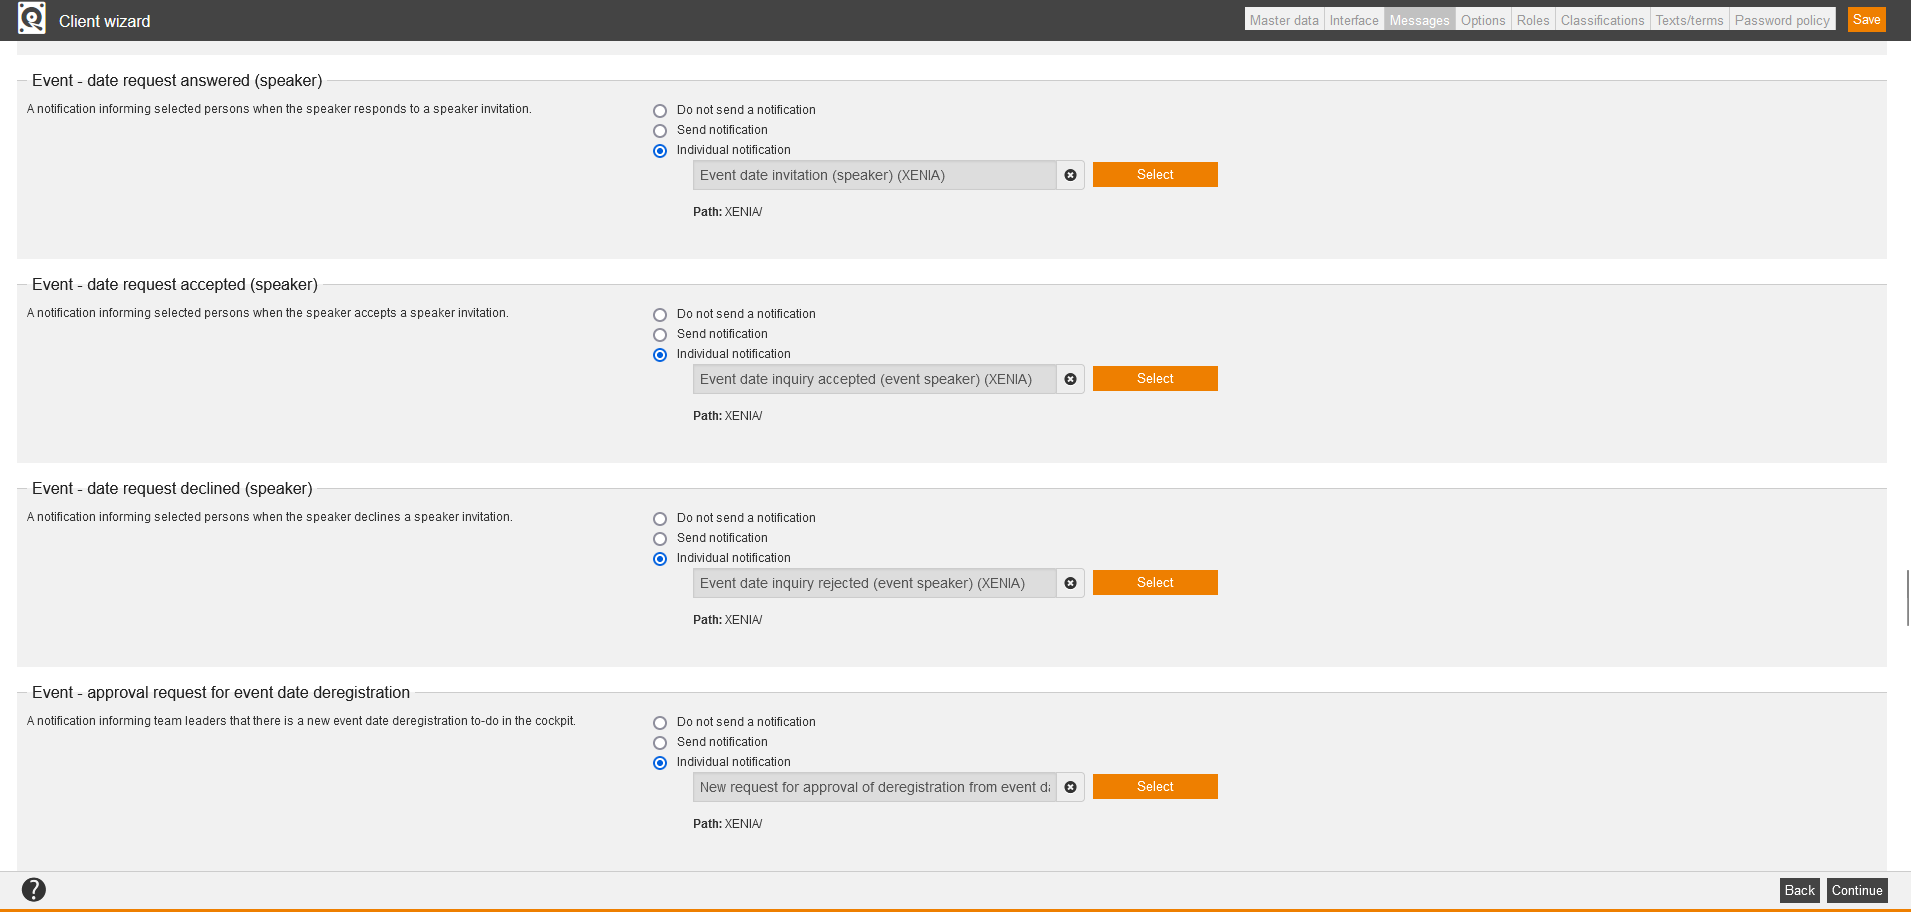
Event – date request answered (speaker)
This notification informs selected persons when the speaker responds to a speaker invitation.
You can select Do not send a notification or Send notification or you click on the button Select and select the appropriate individual notification. Then the source path of the individual notification will be shown. Further information about creating an individual notification you find here.
Event – date request accepted (speaker)
This notification informs selected persons when the speaker accepts a speaker invitation.
You can select Do not send a notification or Send notification or you click on the button Select and select the appropriate individual notification. Then the source path of the individual notification will be shown. Further information about creating an individual notification you find here.
Event – date request declined (speaker)
This notification informs selected persons when the speaker declines a speaker invitation.
You can select Do not send a notification or Send notification or you click on the button Select and select the appropriate individual notification. Then the source path of the individual notification will be shown. Further information about creating an individual notification you find here.
Event – approval request for event date deregistration
This notifications informs team leaders that there is a new event date deregistration to-do in the cockpit.
You can select Do not send a notification or Send notification or you click on the button Select and select the appropriate individual notification. Then the source path of the individual notification will be shown. Further information about creating an individual notification you find here.
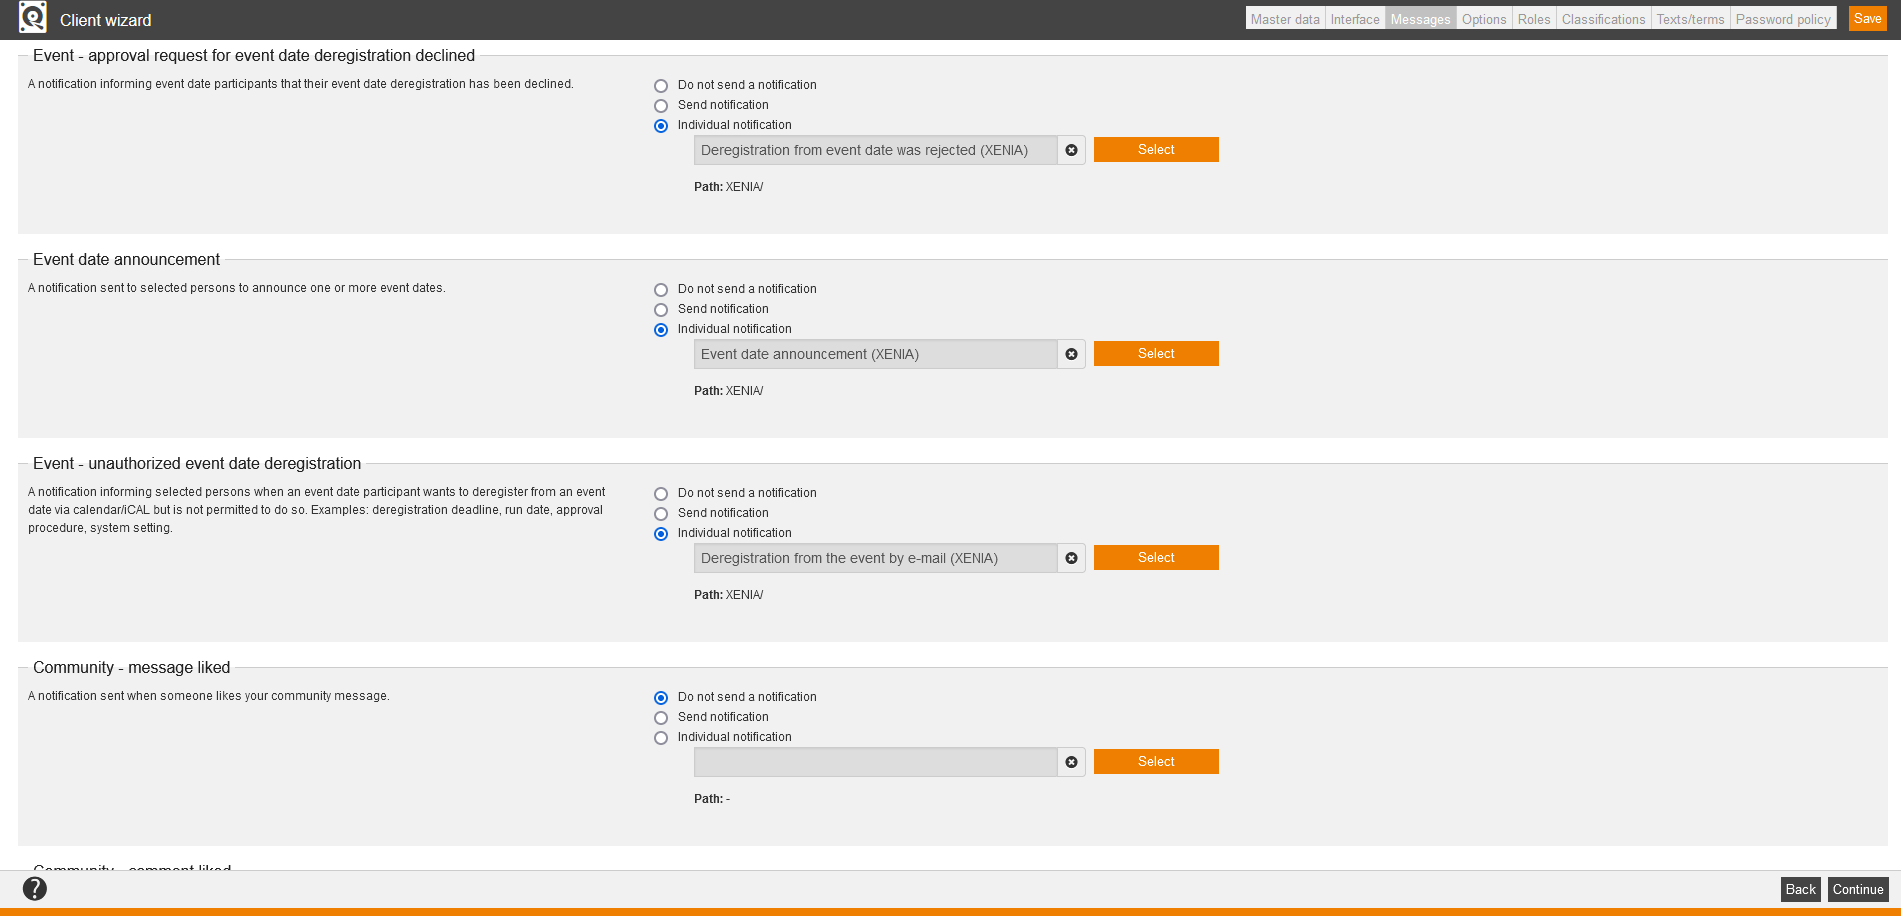
Event – approval request for event date deregistration declined
This notification informs event date participants that their event date deregistration has been declined.
You can select Do not send a notification or Send notification or you click on the button Select and select the appropriate individual notification. Then the source path of the individual notification will be shown. Further information about creating an individual notification you find here.
Event date announcement
This notification is sent to selected persons to announce one or more event dates.
You can select Do not send a notification or Send notification or you click on the button Select and select the appropriate individual notification. Then the source path of the individual notification will be shown. Further information about creating an individual notification you find here.
Event – unauthorized event date deregistration
This notification informs selected persons when an event date participant wants to deregister from an event date via calendar/iCAL but is not permitted to do so. Examples: deregistration deadline, run date, approval procedure, system setting.
You can select Do not send a notification or Send notification or you click on the button Select and select the appropriate individual notification. Then the source path of the individual notification will be shown. Further information about creating an individual notification you find here.
Community – message liked
This notification is sent when someone likes your community message.
You can select Do not send a notification or Send notification or you click on the button Select and select the appropriate individual notification. Then the source path of the individual notification will be shown. Further information about creating an individual notification you find here.
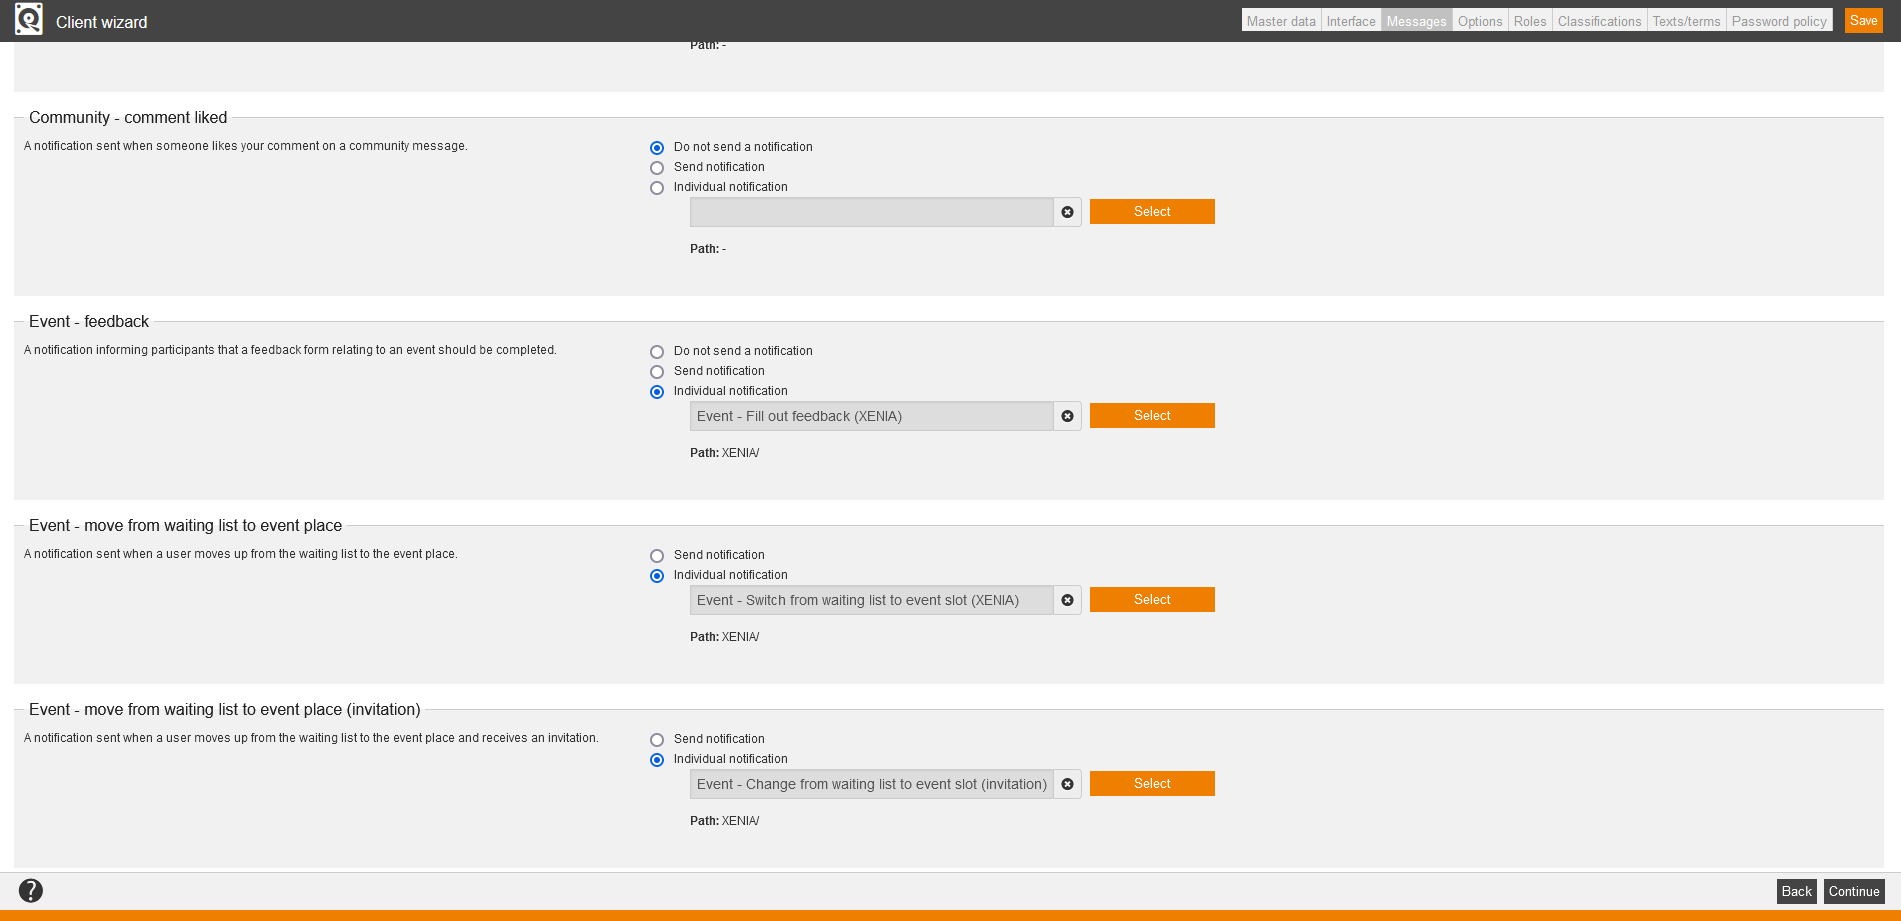
Community – comment liked
This notification is sent when someone likes your comment on a community message.
You can select Do not send a notification or Send notification or you click on the button Select and select the appropriate individual notification. Then the source path of the individual notification will be shown. Further information about creating an individual notification you find here.
Event – feedback
This notification informs participants that a feedback form relating to an event should be completed.
You can select Do not send a notification or Send notification or you click on the button Select and select the appropriate individual notification. Then the source path of the individual notification will be shown. Further information about creating an individual notification you find here.
Event – move from waiting list to event place
This notification is sent when a user moves up from the waiting list to the event place.
You can select Send notification or you click on the button Select and select the appropriate individual notification. Then the source path of the individual notification will be shown. Further information about creating an individual notification you find here.
Event – move from waiting list to event place (invitation)
This notification is sent when a user moves up from the waiting list to the event place and receives an invitation.
You can select Send notification or you click on the button Select and select the appropriate individual notification. Then the source path of the individual notification will be shown. Further information about creating an individual notification you find here.
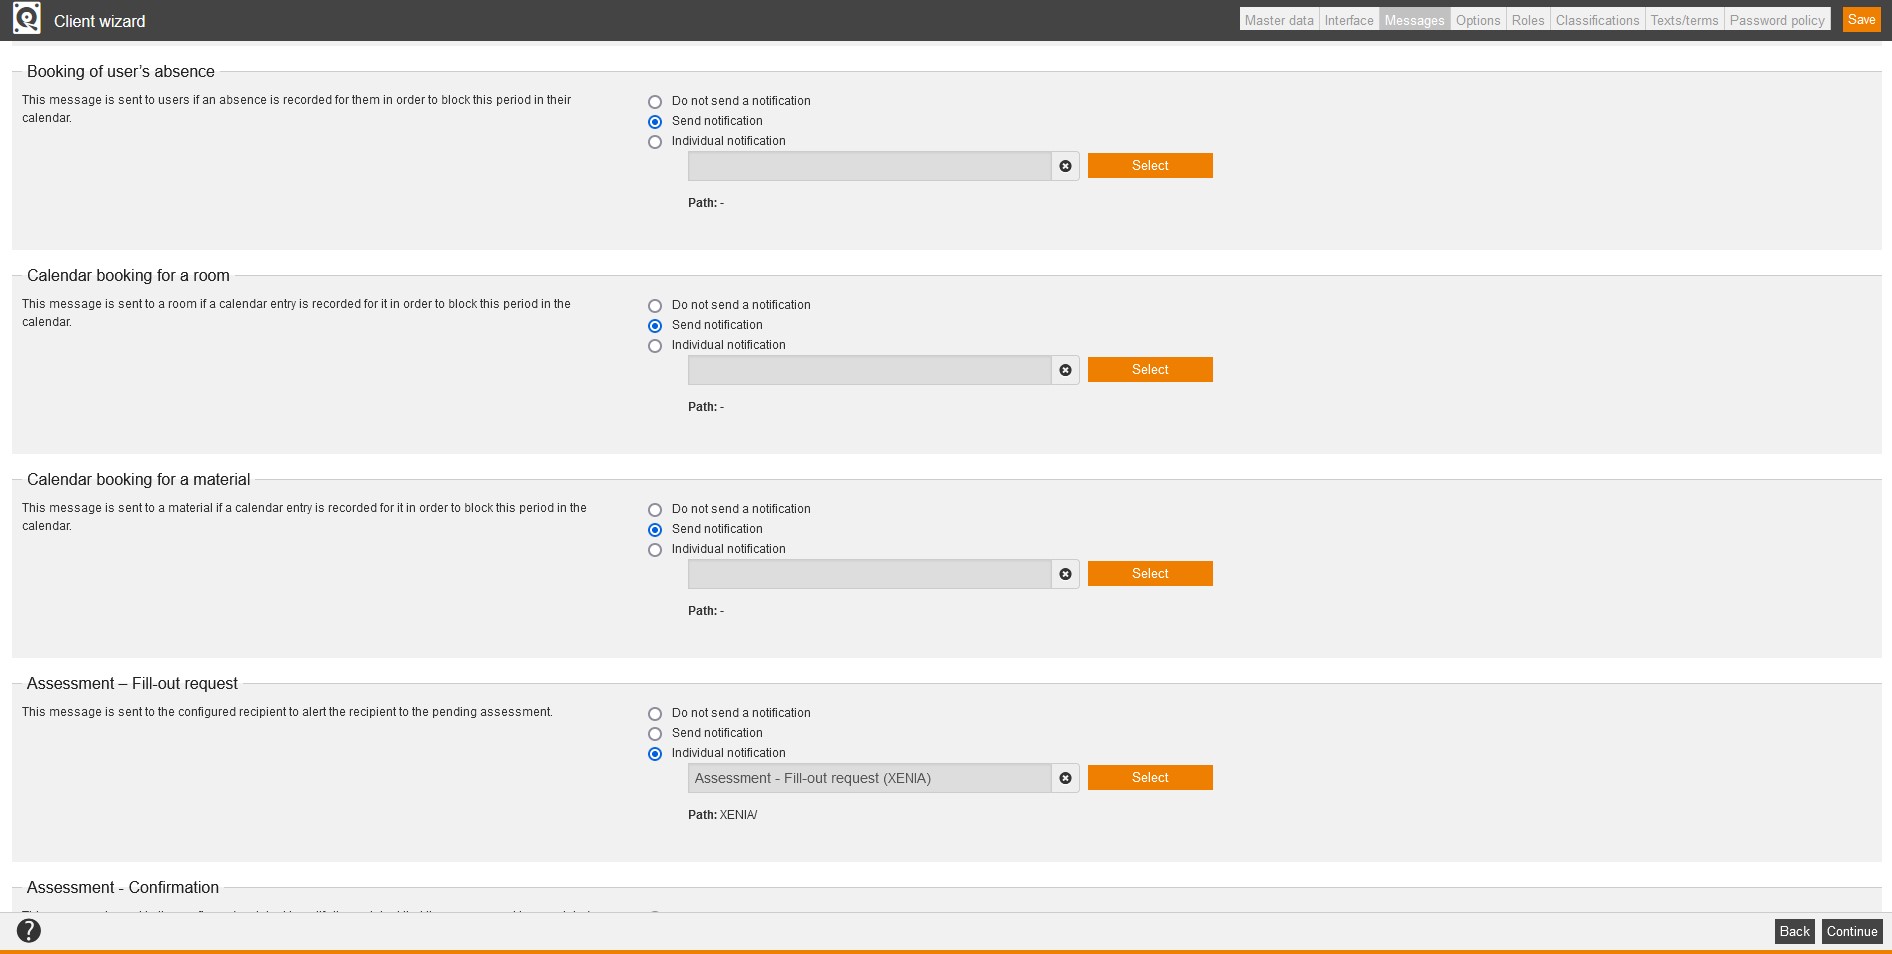
Booking of user’s absence
This notification is sent to a user when an absence was recorded for him to block this time period in his calendar.
You can select Do not send a notification or Send notification or you click on the button Select and select the appropriate individual notification. Then the source path of the individual notification will be shown. Further information about creating an individual notification you find here.
Calendar booking for a room
This notification is sent to a room when a calendar entry was recorded for it to block this time period in its calendar.
You can select Do not send a notification or Send notification or you click on the button Select and select the appropriate individual notification. Then the source path of the individual notification will be shown. Further information about creating an individual notification you find here.
Calendar booking for a material
This notification is sent to a material when a calendar entry was recorded for it to block this time period in its calendar.
You can select Do not send a notification or Send notification or you click on the button Select and select the appropriate individual notification. Then the source path of the individual notification will be shown. Further information about creating an individual notification you find here.
Assessment – Fill-out request
This notification is sent to the configured recipient to alert the recipient to the pending assessment.
You can select Do not send a notification or Send notification or you click on the button Select and select the appropriate individual notification. Then the source path of the individual notification will be shown. Further information about creating an individual notification you find here.
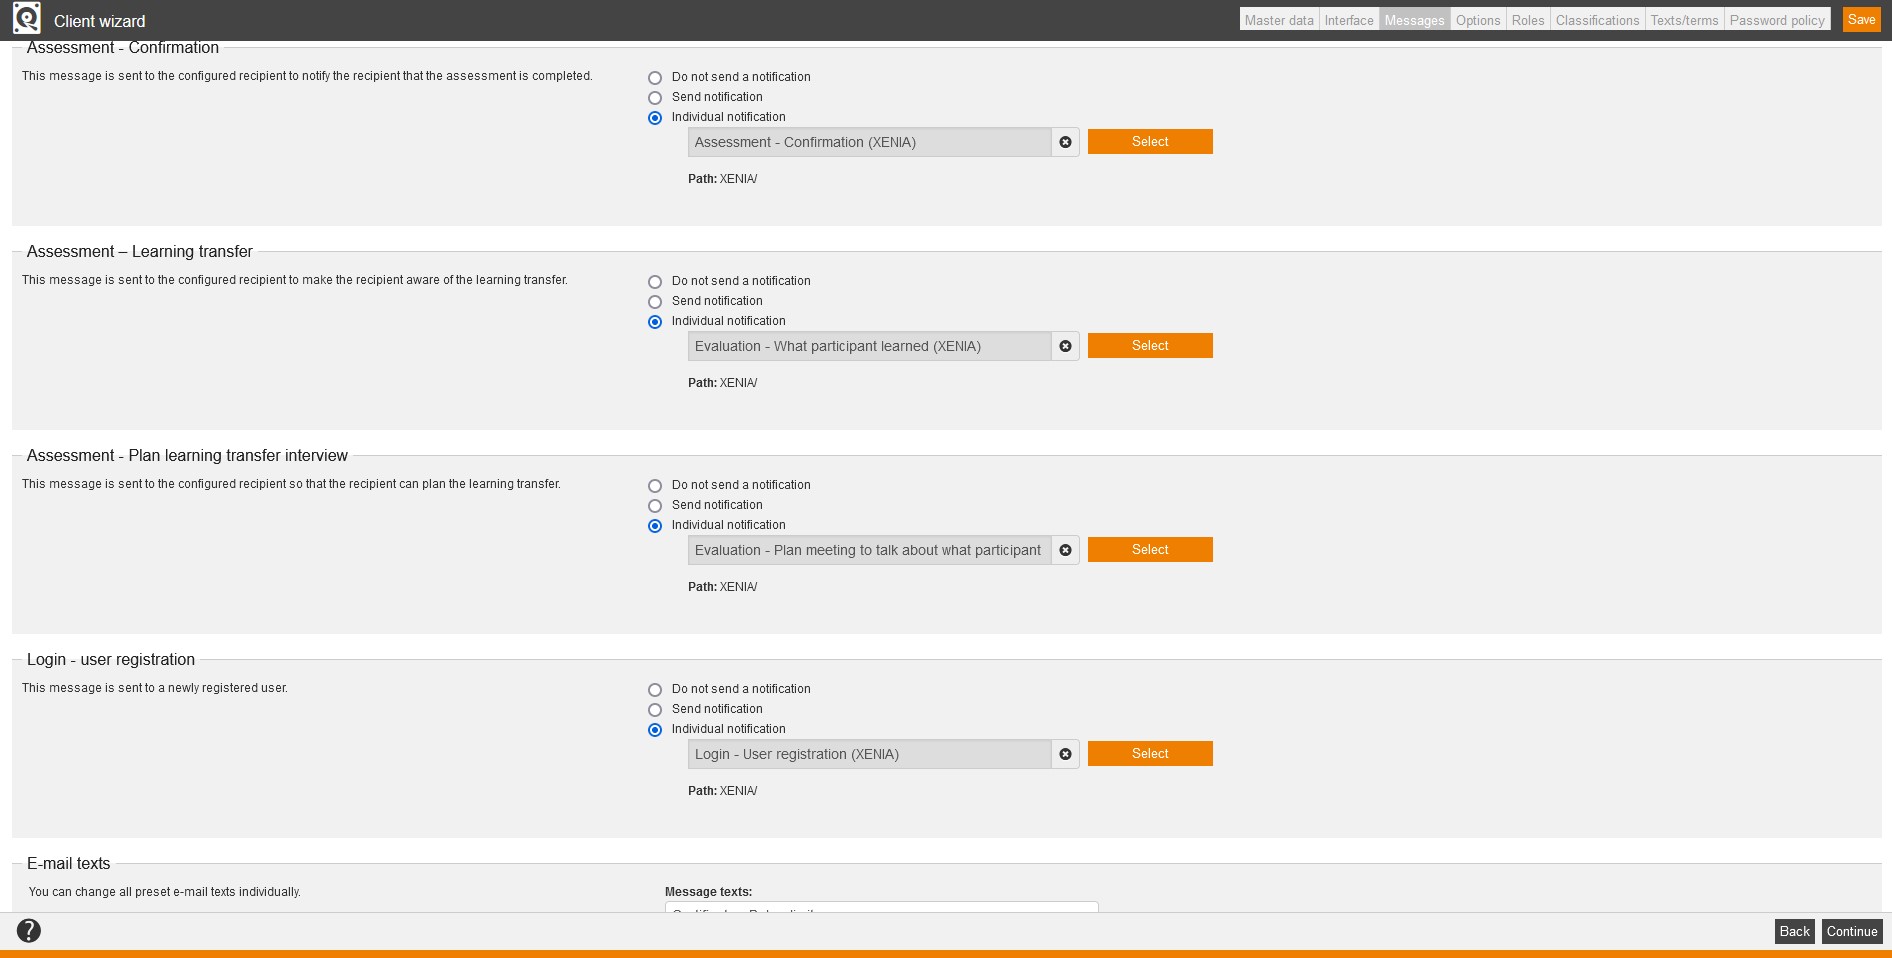
Assessment – Confirmation
This notification is sent to the configured recipient to notify the recipient that the assessment is completed.
You can select Do not send a notification or Send notification or you click on the button Select and select the appropriate individual notification. Then the source path of the individual notification will be shown. Further information about creating an individual notification you find here.
Assessment – Learning transfer
This notification is sent to the configured recipient to make the recipient aware of the learning transfer.
You can select Do not send a notification or Send notification or you click on the button Select and select the appropriate individual notification. Then the source path of the individual notification will be shown. Further information about creating an individual notification you find here.
Assessment – Plan learning transfer interview
This notification is sent to the configured recipient so that the recipient can plan the learning transfer.
You can select Do not send a notification or Send notification or you click on the button Select and select the appropriate individual notification. Then the source path of the individual notification will be shown. Further information about creating an individual notification you find here.
Login – user registration
This notification is sent to a newly registered user.
You can select Do not send a notification or Send notification or you click on the button Select and select the appropriate individual notification. Then the source path of the individual notification will be shown. Further information about creating an individual notification you find here.
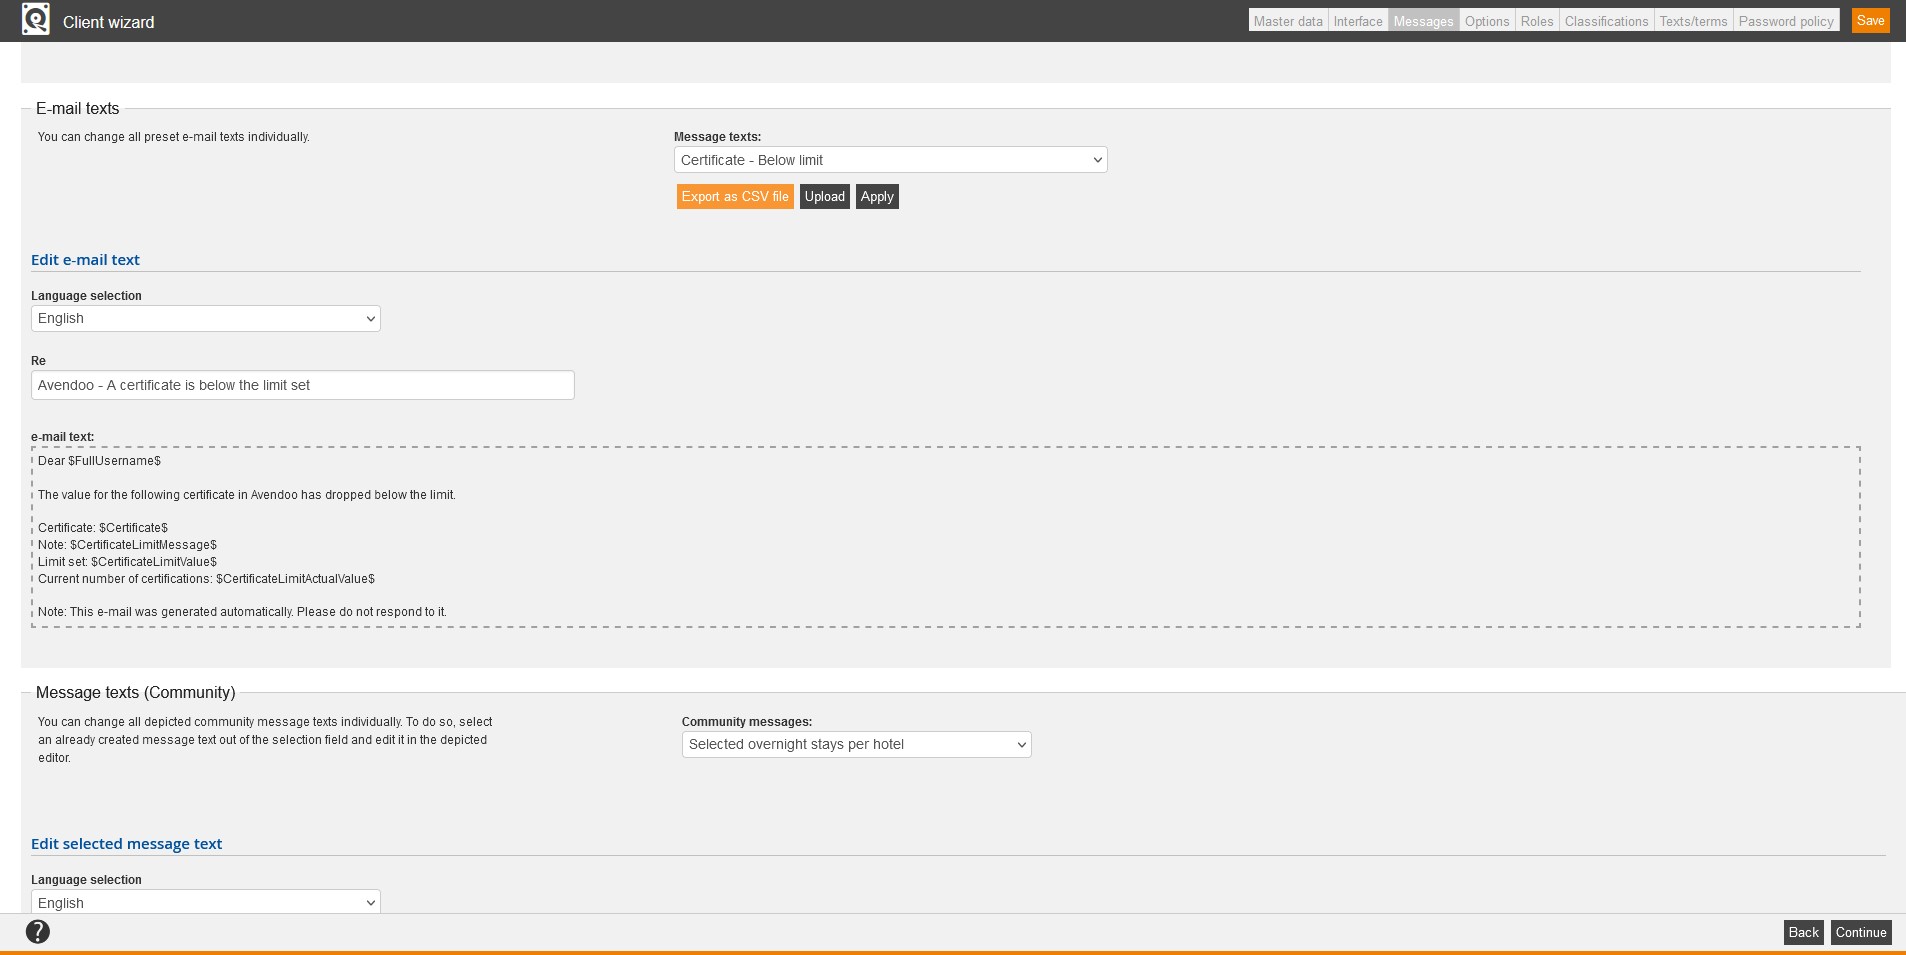
E-mail texts
In this section you find the standard templates of different e-mail texts. Under Message texts you find message texts regarding the topics Abo, Assessment, Certificate, Community, Course, Course assignment, Course blog, Course management, Essay question, Evaluation, Event, Forum, Knowledge test, Learning object, Login, NT account verification, Notification, Poll, Promotional action, Registration canceled, Tasks, Thank-you e-mail after the event and ePayment.
You can export these templates as CSV, upload new templates and edit existing e-mail texts.
Edit e-mail text
In this section you see the content of the corresponding e-mail template. The e-mail texts can be displayed in German, English, French and Italian. Furthermore you can edit these texts. For more information see Edit e-mail texts
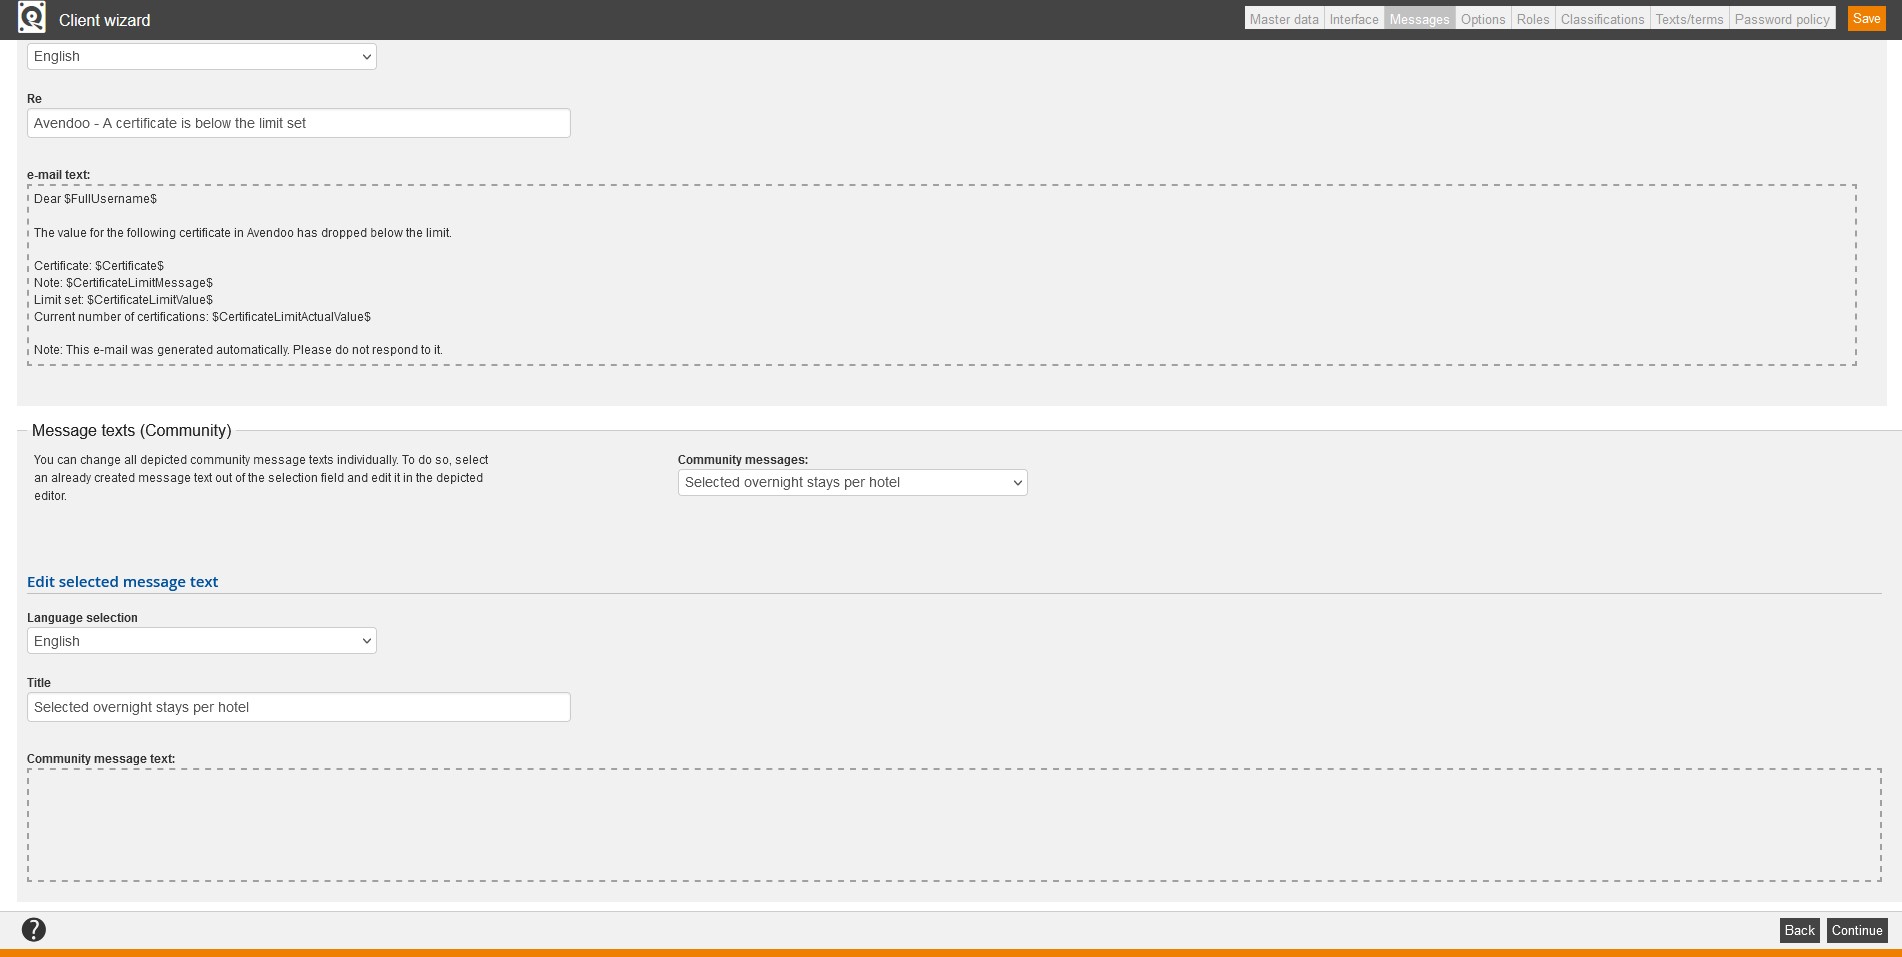
Message texts (Community)
You can edit the following community message texts:
- Selected overnight stays per hotel
- Catering details for event venues
To do so, select an already created message text out of the selection field, select the appropiate language selection if applicable, change the title if applicable and edit the message text in the depicted editor.
Options
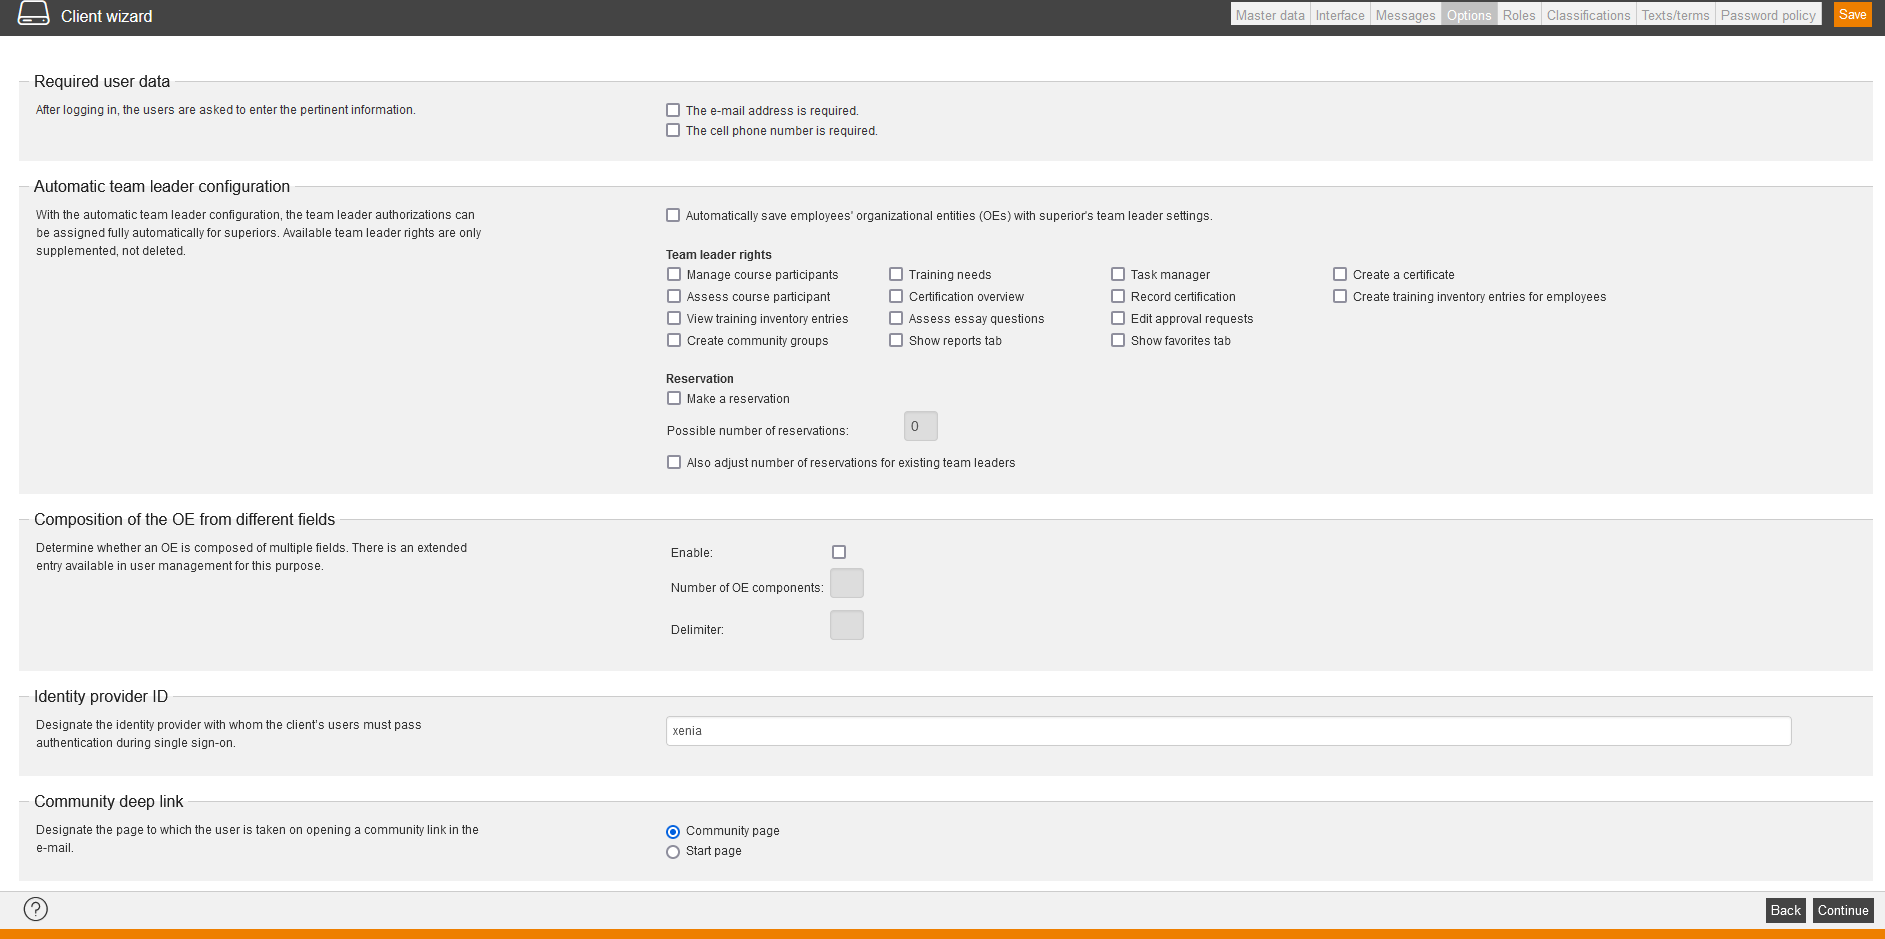
Required user data
Define if each user should have an e-mail address and if each user should have a cell phone number by selecting the corresponding checkboxes. If you have selected the checkboxes, these data of creating a user are required fields in this client.
Automatic team leader configuration
In this section you can assign the team leader configurations for superiors fully automatically. Superior is who is listed as superior in the user data of his or her employees. See Participant rules → Who is a superior?
You can automatically assign the appropiate organisational entities (OEs) of the employees to the superiors. Following you can only add the organisational entities, but you cannot delete them. This applies for the team leader permissions, too. The permissions you assign for the superiors, you can only add in the author backend.
The depth of the permission you can define per system parameter updateTeamleaderForUser.maxDepth.
Composition of the OE of different fields
By selecting the checkbox “Enable” you define the number of the OE components and the delimiter for these fields. There is an advanced entry of entering the OE in user management.
If the OE is built up of a constant number of components, which are separated by a well-defined delimiter, you can configure it in this section.
You can make an advanced entry of the OE for users created in this client by entering each component separate in the user wizard.
Identity provider ID
Designate the identity provider with whom the client’s users must pass authentication during single sign-on.
Community deep link
The so-called deep link is contained in a grouping mail for community messages. Select if the link leads to the community page or to the start page.
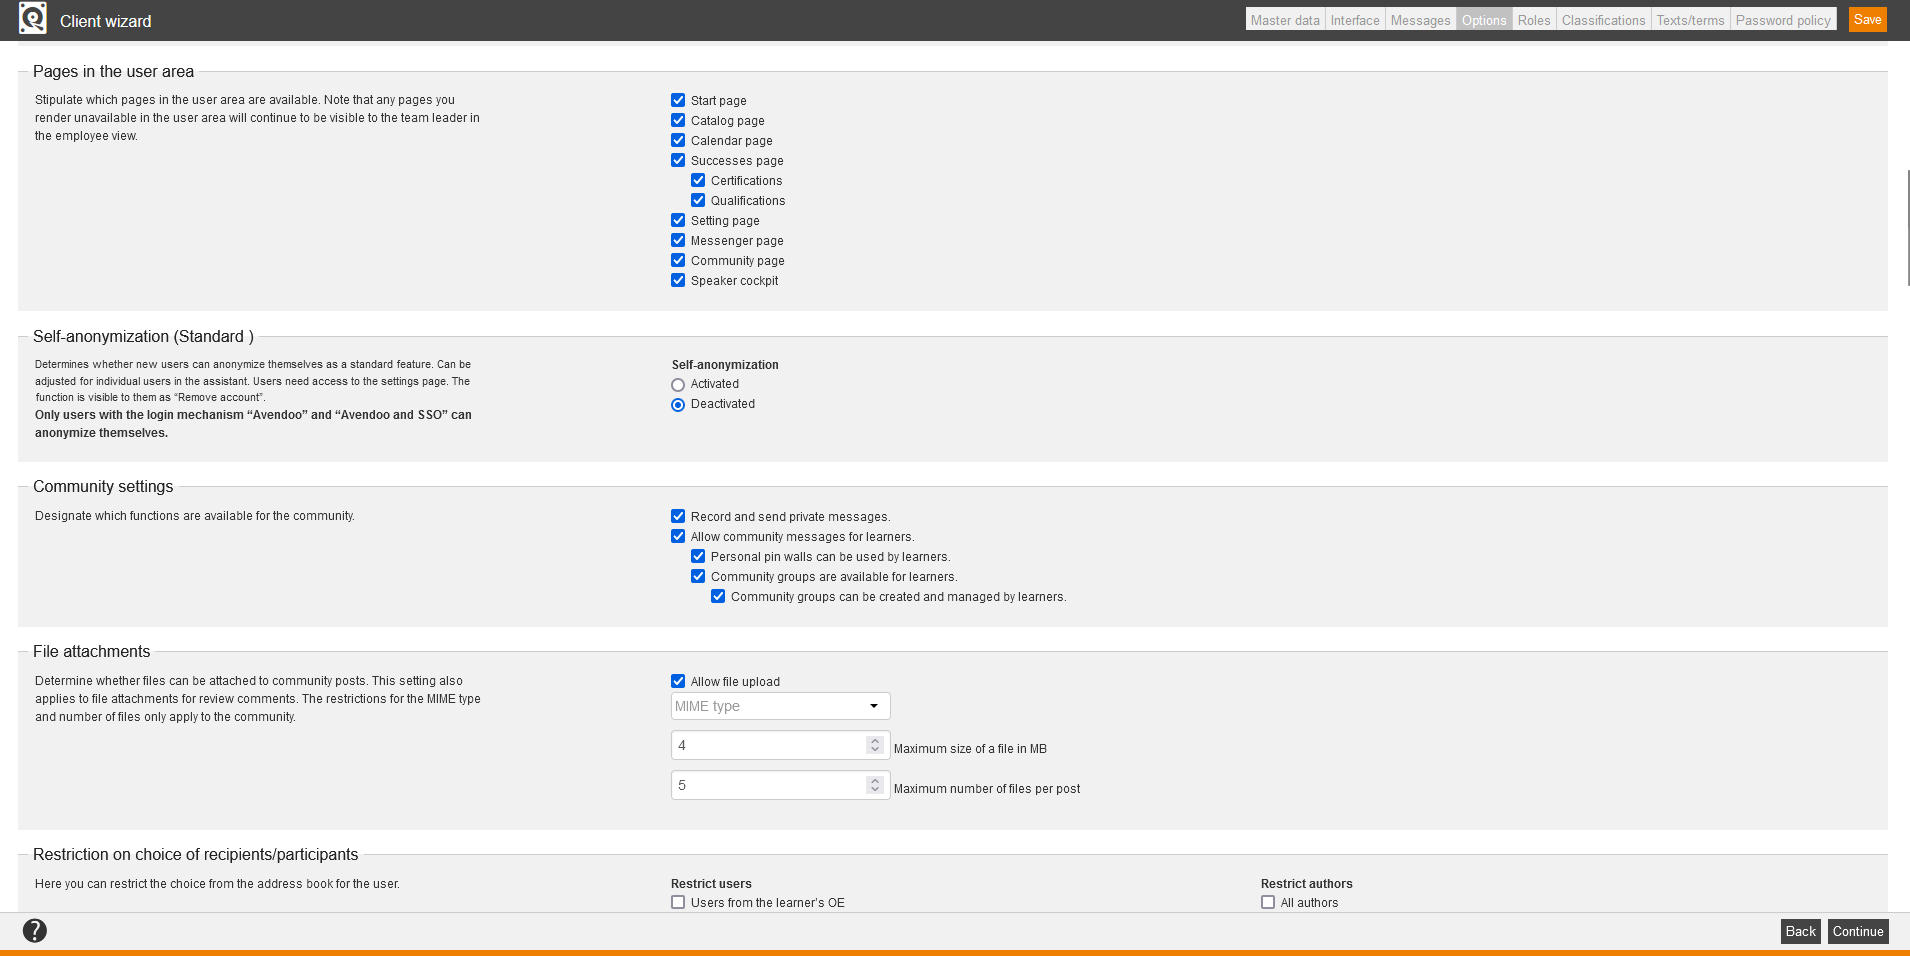
Pages in the user area
Define which pages are available in the user area:
- Start page
- Catalog page
- Calendar page
- Successes page
– You can deactivate the sub page “Certifications”.
– You can deactivate the sub page “Qualifications”. - Setting page
- Messenger page
- Community page
- Speaker cockpit
Self-anonymization (Standard)
If you want to activate the self-anonymization (in the standard it is deactivated), select Activated. By this you define, if new users can anonymize themselves by standard. You can adjust the self-anonymization in the User wizard.
Users need access to the page Settings and see the function as Remove account.
Community settings
The community includes functions, which you can define for the whole client in detail.
Learners and authors can record and send private messages if you select the first checkbox. Furthermore you can configure the functions of the community for learners. You can activate and deactivate community messages, personal pin walls and community groups for learners. Also you can define the option if learners can create and manage community groups.
File attachments
To allow users and team leaders to upload files in their community in the short messages, set the check mark Allow file upload. Per default this check mark is not set. If you’ve set this check mark, the selection of the MIME types and the entry for maximum size of a file (default: 4 MB) and the entry for maximum number of files (default: 5), which can be attached to a community short message, is shown. By this you can choose several MIME tpes via click in the drop-down menu. By clicking again you deactive your selection.
You define the MIME types, which are available here, in the system setting „system.mime.types“.
Further information about creating a community short message in the user and team leader area you find here.
Restriction on choice of recipients/participants
Define, which addresses from the address book are available for the user by selecting the following options:
Restrict users:
- Users from the learner’s OE
- Users from the learner’s region
- Users from the learner’s area
- Users from the learner’s group
- Employees visible only to their superiors and superiors, only to their employees
- Users who already had contact
Restrict authors:
- all authors
Community update
Define for new created users which functions are available for the community message by selecting the checkbox “Activate notification” (notification is a mail resuming unread messages). This option is valid for authors, too. Then you define after how many days the users get a mail resuming unread community messages. Furthermore you can select the checkbox “Activate important messages” if you want to send important messages on short notice independent of the chosen message interval.
Languages available for users
You can select the visible language from all displayed languages for each client. Furthermore you can define a default language which is set for the client.
User profile
Determine which user profiles are available in the user wizard.
The user profile ‘DEFAULT USER PROFILE’ is defined as the system standard.
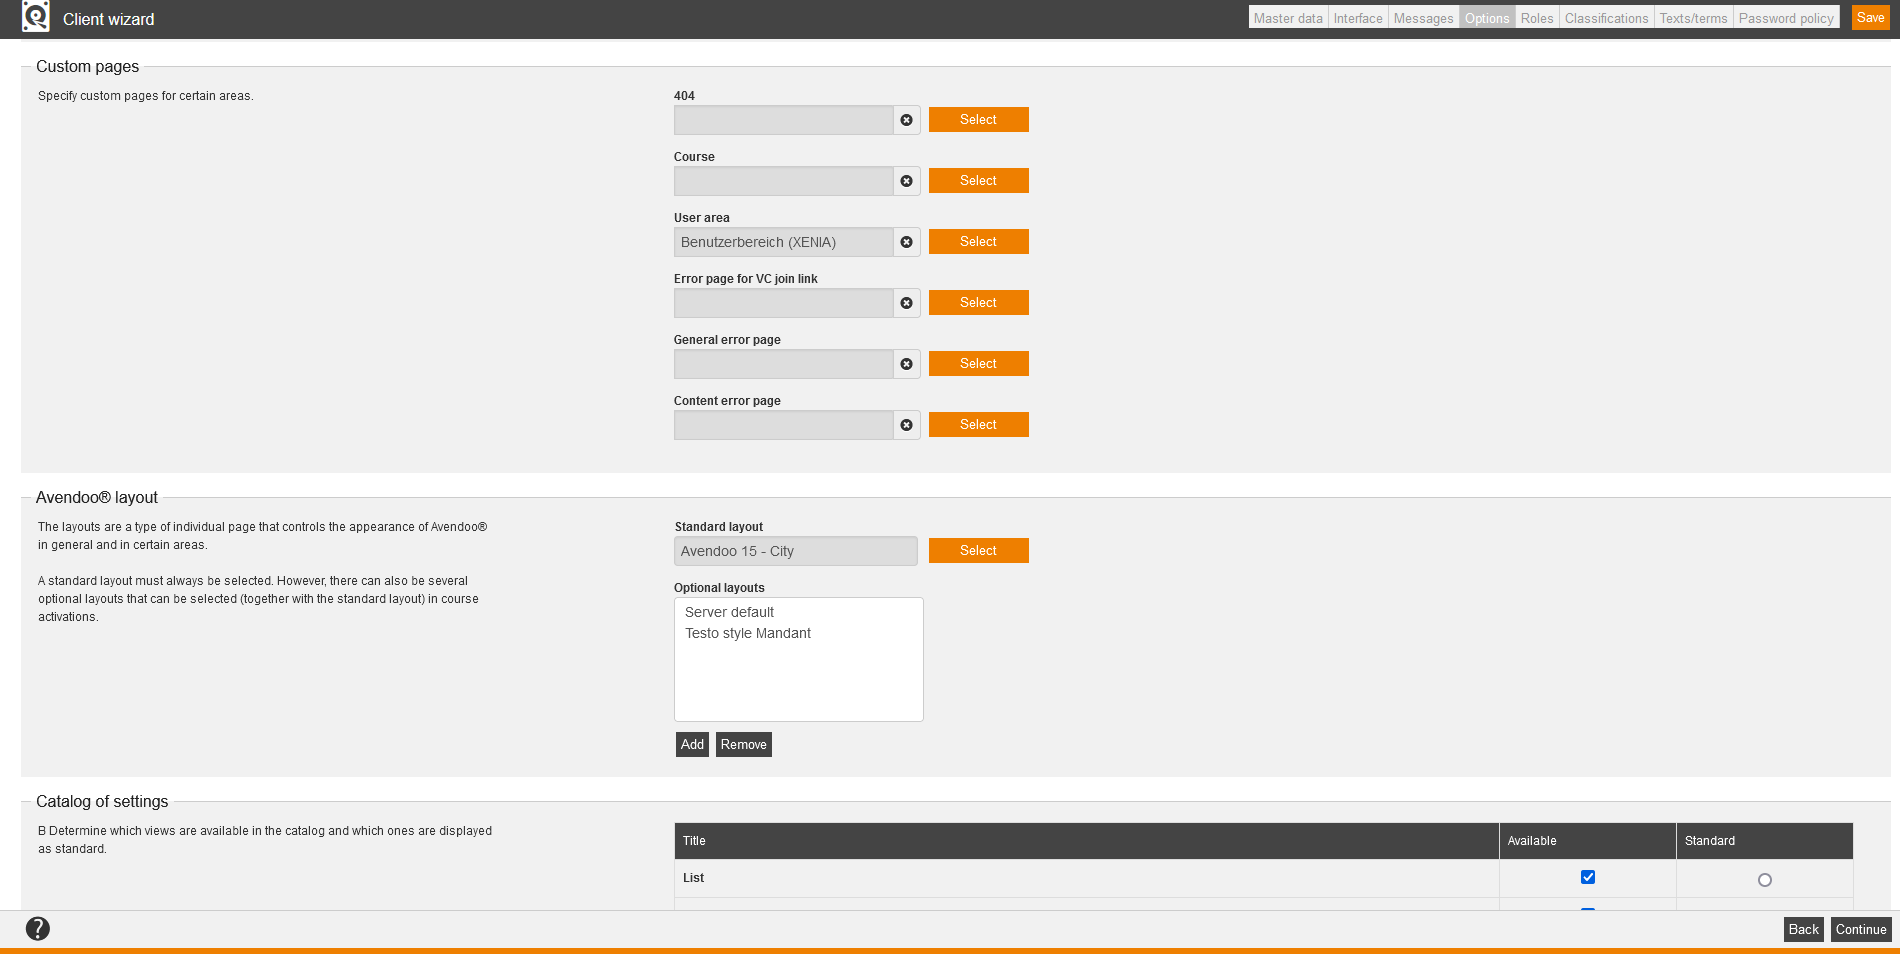
Custom pages
Specify custom pages for certain areas. Under 404 you select your favored custom page for the Not-found-error-page. Under Course you select your favored custom page for the course. Under User area you select your favored custom page for the user area. Under Error page for VC join link you select your favored custom page as error page for VC join link. Under General error page you select your favored custom page as general error page. Under Content error page you select your favored custom page which is shown if a user wants to open a remote content which doesn’t exist anymore. You find further information about the custom page of the user area here.
Avendoo® layout
The layouts are a type of individual page that controls the appearance of Avendoo® in general and in certain areas.
A standard layout must always be selected, which you can change if applicable via the button Select. However, you can also select one or more several optional layouts via the button Add. If applicable you can remove these again. These optional layouts and the standard layout you can select in course activations.
You find further information about the custom page of the the Avendoo® layout here.
Filter settings
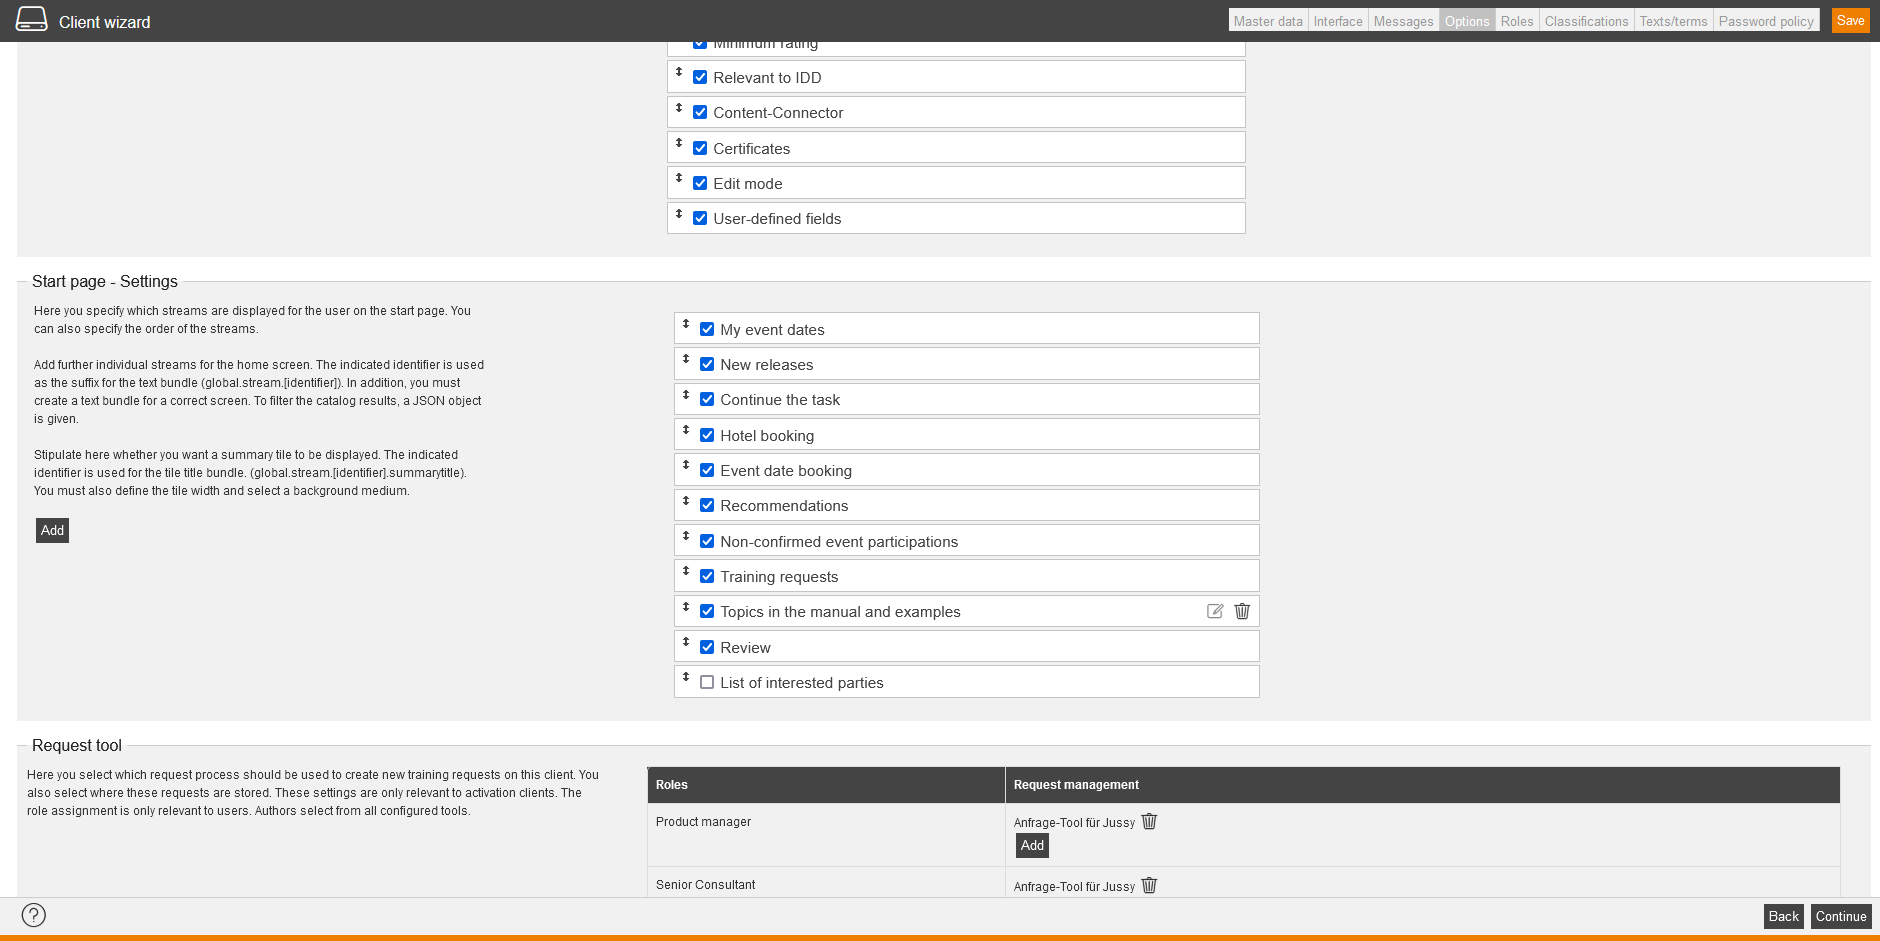
Define if Avendoo® should display the catalog filter by selecting the checkbox “Filter activated”. Furthermore you can define which catalog filter are to be shown by selecting the appropiate checkbox. Define the order of the catalog filter by using drag and drop. You can select the following filters:
- Title/teaser (set default on activating the filter/s)
- Learning format
- City
- Suggested locations
- At the latest, dates in
- Time period
- Status
- Classification
- Approval
- Qualification
- Language
- Language for the event date
- Minimum rating
- Relevant to IDD
- Content-Connector
- Certificates
- Edit mode
- User-defined fields
You select the standard view and visibility of the single views under Catalog of settings.
Start page – settings
Here you can define the displayed streams and their order for the user on the start page in the new frontend. Select the following standard streams by setting a check mark:
- My event dates
- New releases
- Continue the task
- Hotelbooking
- Event date booking
- Recommendations
- Non-confirmed event participations
- Training requests
- Review
You find further information about the standard streams and how to define individual streams on the page “Define individual streams for displaying on the start page” and detailed information about the standard streams on the page “Start”.
Additionally, you can define that summary tiles and special tiles such as the IDD tile are displayed even if the associated stream has no content.
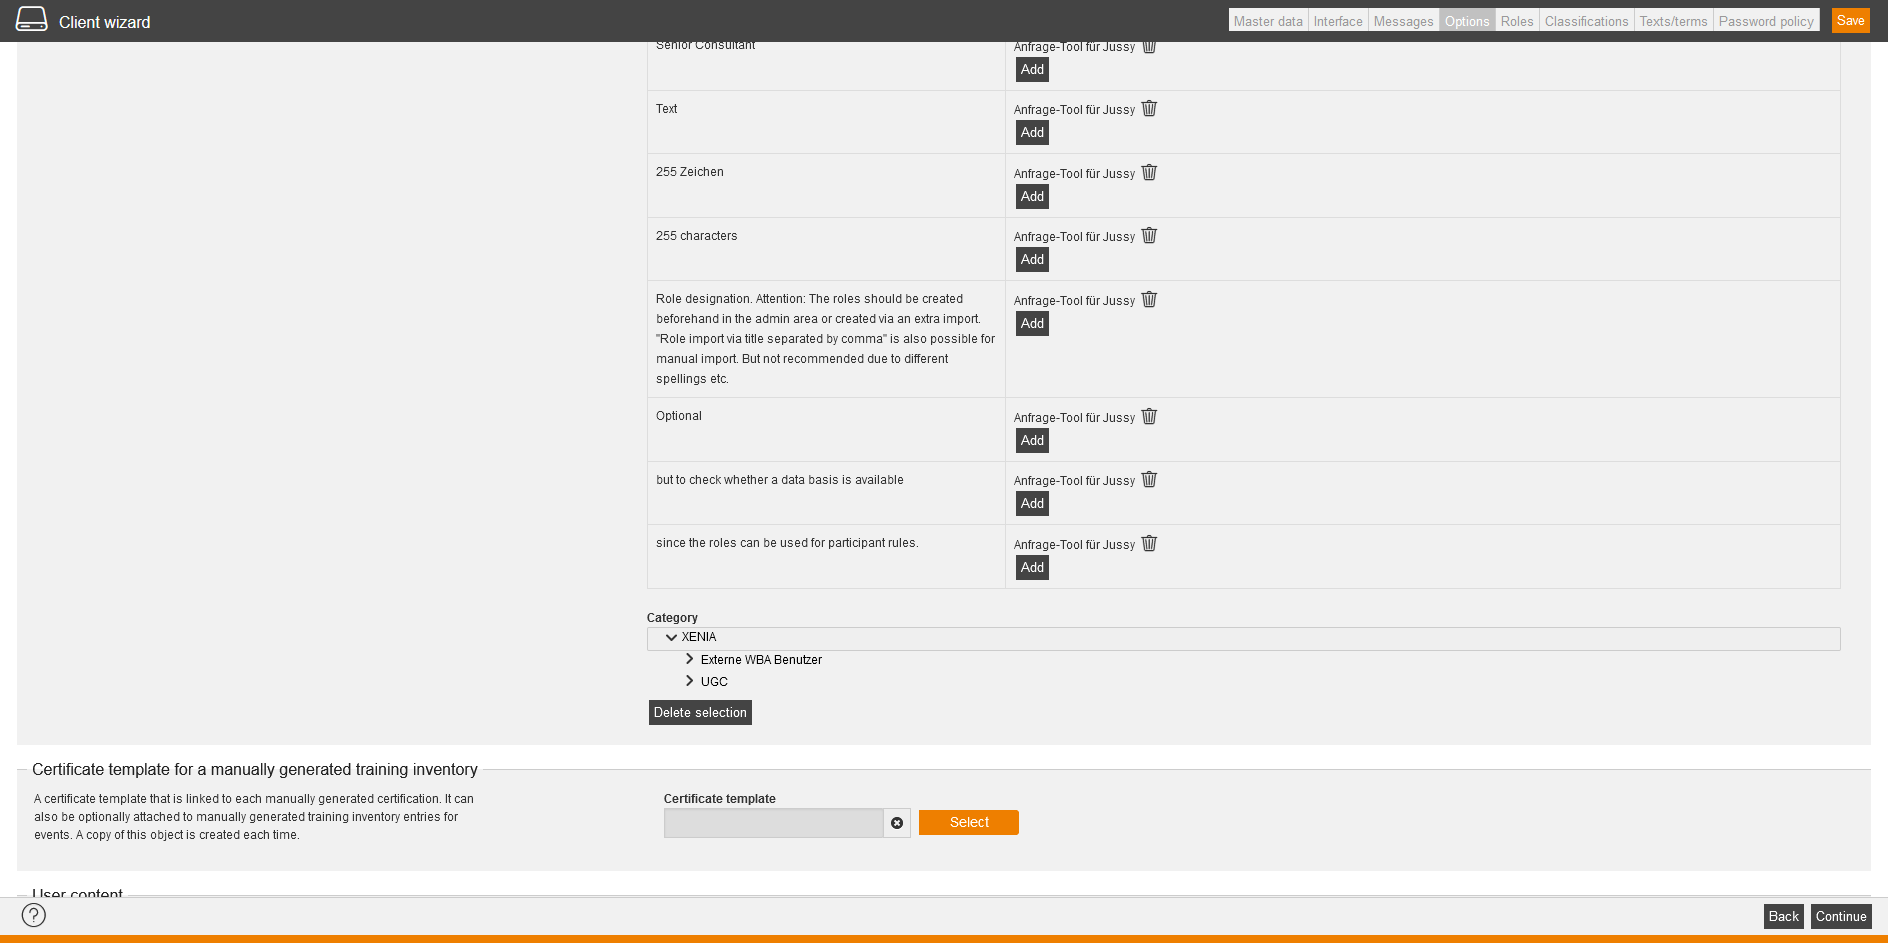
Request tool
Here you select which request process should be used to create new training requests on this client. You also select where these requests are stored. Only when you’ve selected the category the request tool can be used for frontend users.
Certificate template for a manually generated training inventory
To choose a certificate template, click on the button Choose, select the appropriate certificate template and confirm with the button Select.
This selection is prerequisite that team leaders and user can enter certifications and training inventory entries in one step. Further information you find here.
User Content
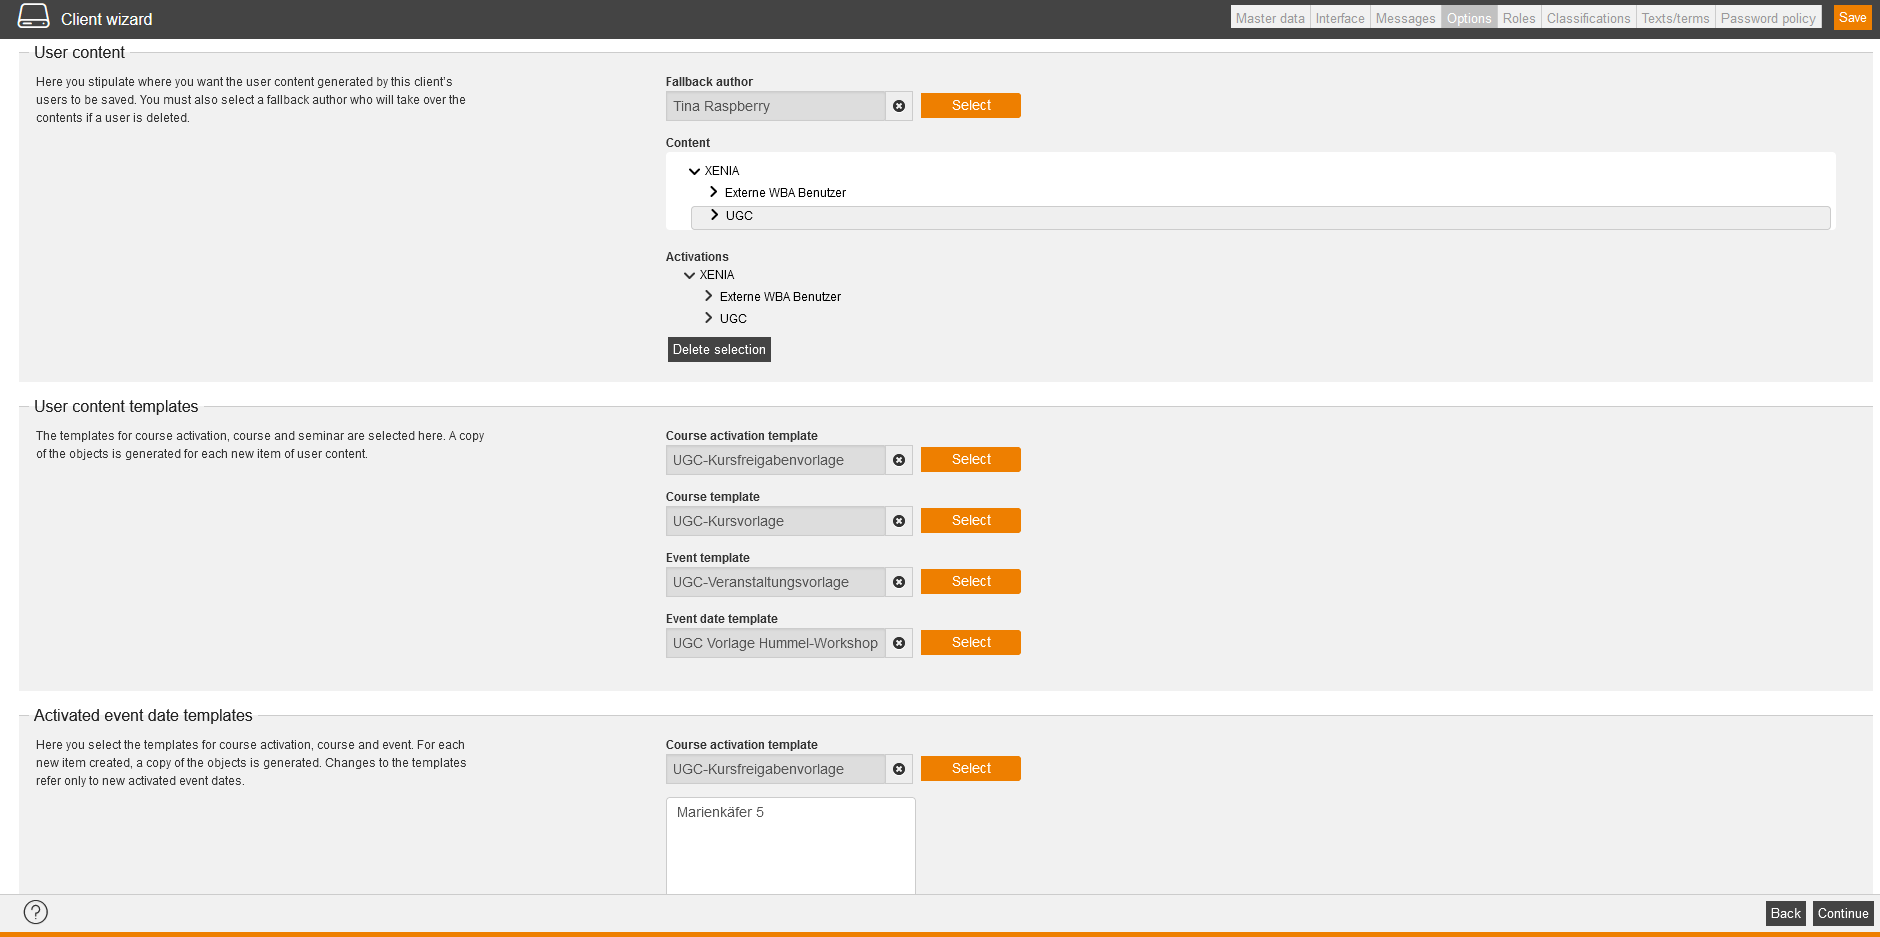
Define, where the user content, which is created by the users of this client, should be saved. Therefore select the corresponding storage location under Content and Activations. Via click on the storage location and the button Delete selection you delete the selection.
Furthermore you have to select an author, which takes the content, when a user is deleted. Therefore click on the button Select besides Fall back author and confirm your selection. If needed you remove the fallback author via click on x.
User content templates
Here you select the templates for course activation, course and event. A copy of the objects is generated for each new item of user content. To select user content templates you click in each case on the button Select and confirm your selection. If required you remove the selected templates by clicking on the x.
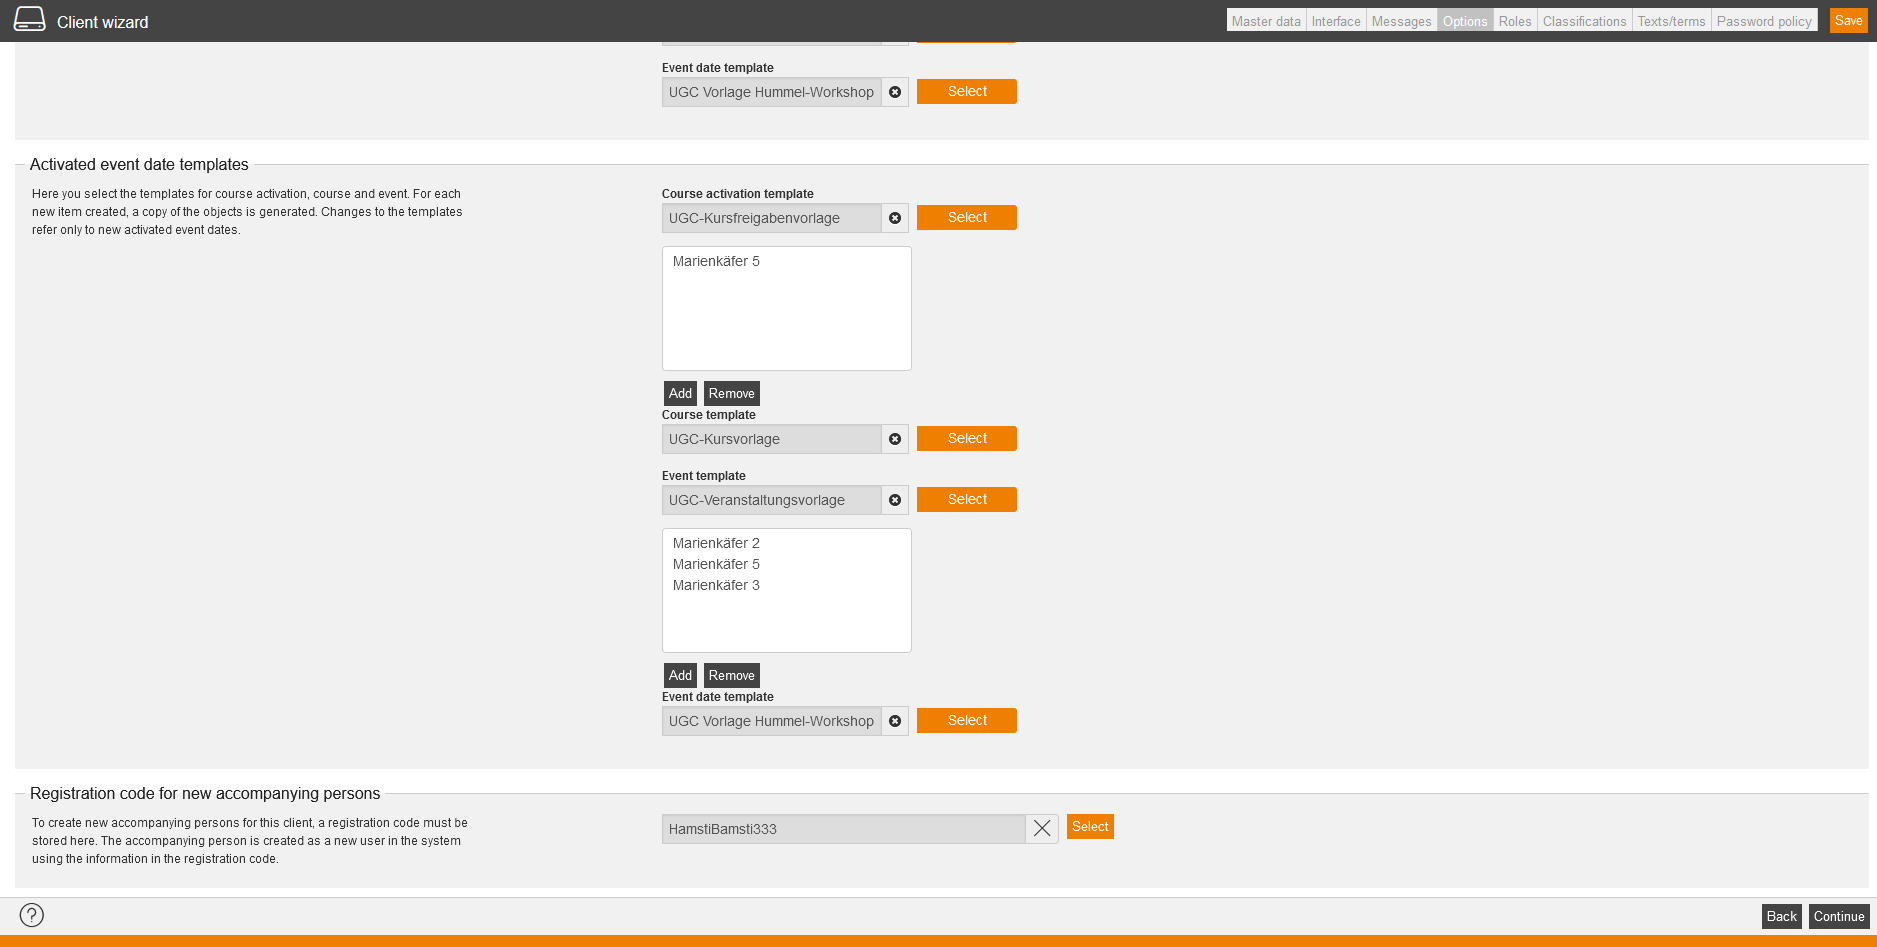
Activated event date templates
Select the favored template for the course activation, course, event and event date. You can select between all course activations, courses, events and event dates.
You can select several course activation and event templates by clicking the button Add and confirming your selection. By marking the course activation or event template and then clicking the button Remove, you remove this one from the list.
Further information about creating event dates for users under My content at the Learning place you find here.
Roles
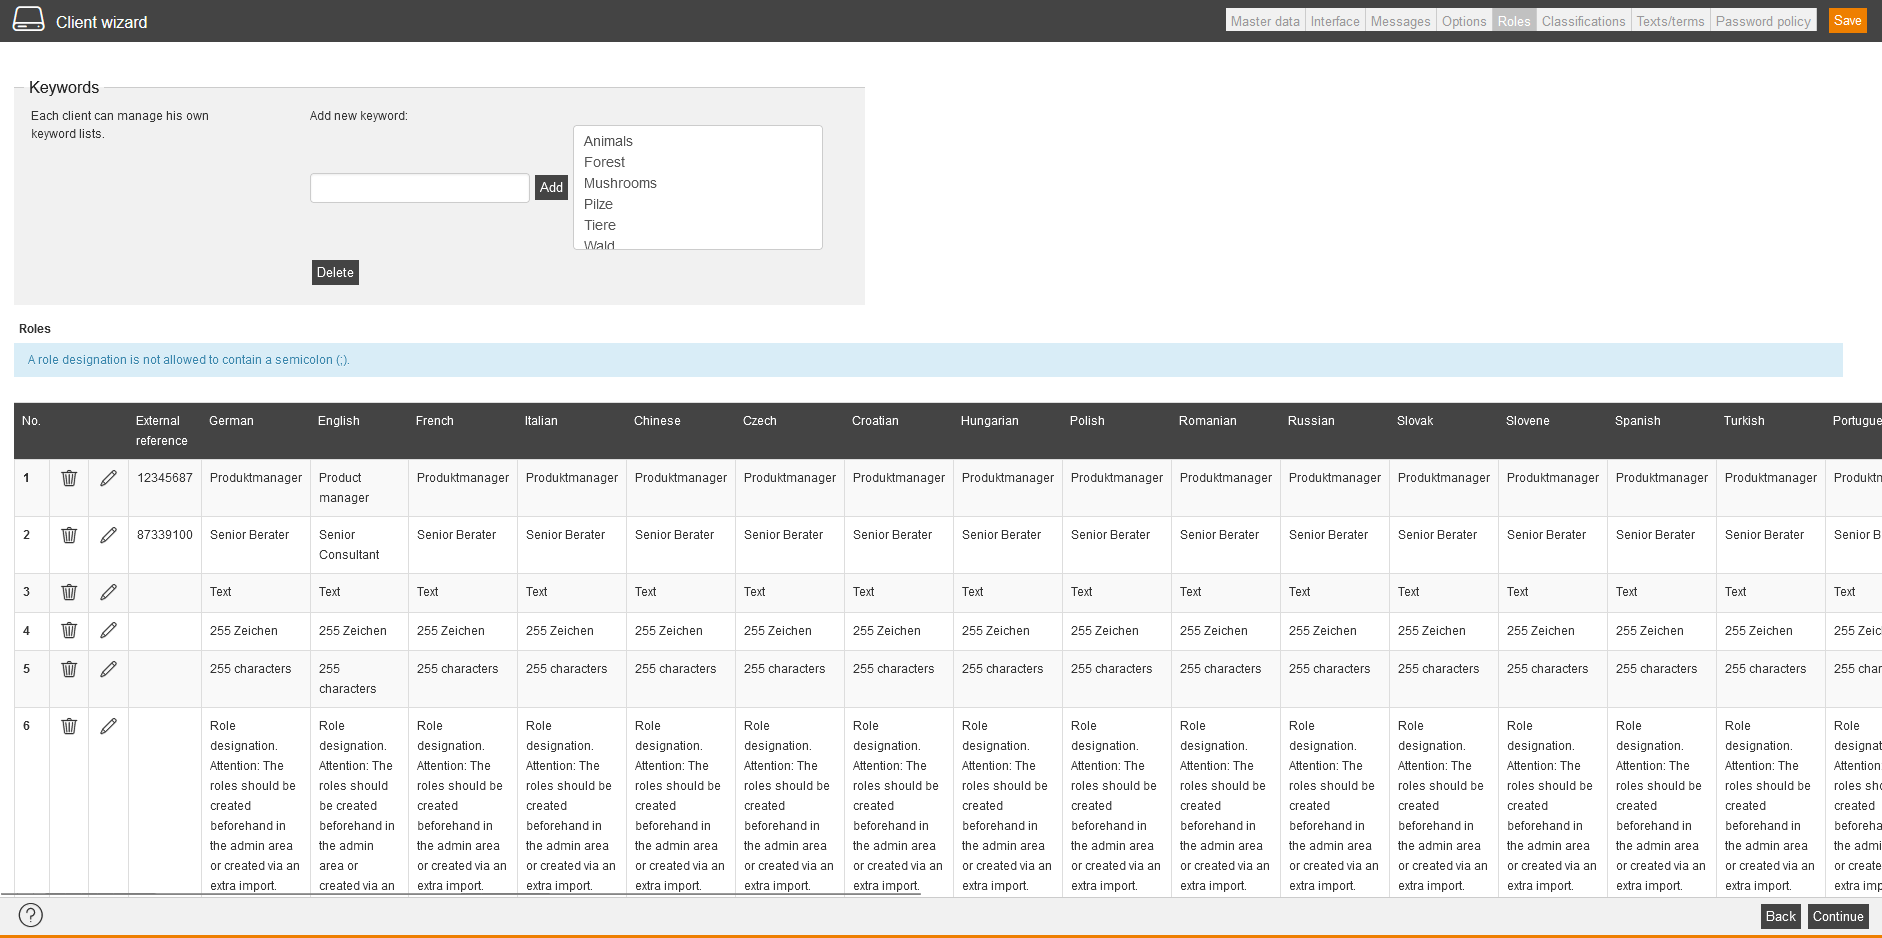
On this tab you can add keywords and role to your client.
Keywords
You can enter and add keywords which can be assigned on this client to different questions. These keywords simplify searching for certain learning content and arrange objects topically together. Therefore you can choose questions with a certain keyword in knowledge tests for example.
Authors with specific rights can create keywords, too.
Roles
Create roles for your new client by clicking New. A new window opens. Then you enter the description of the new role in your favoured languages. Later on you can assign the roles to the appropiate users in the user management. Typical roles are for example the coach for communication or the product manager. These roles can be a prerequisite for filling in an evaluation or feedbacks for example.
Classifications
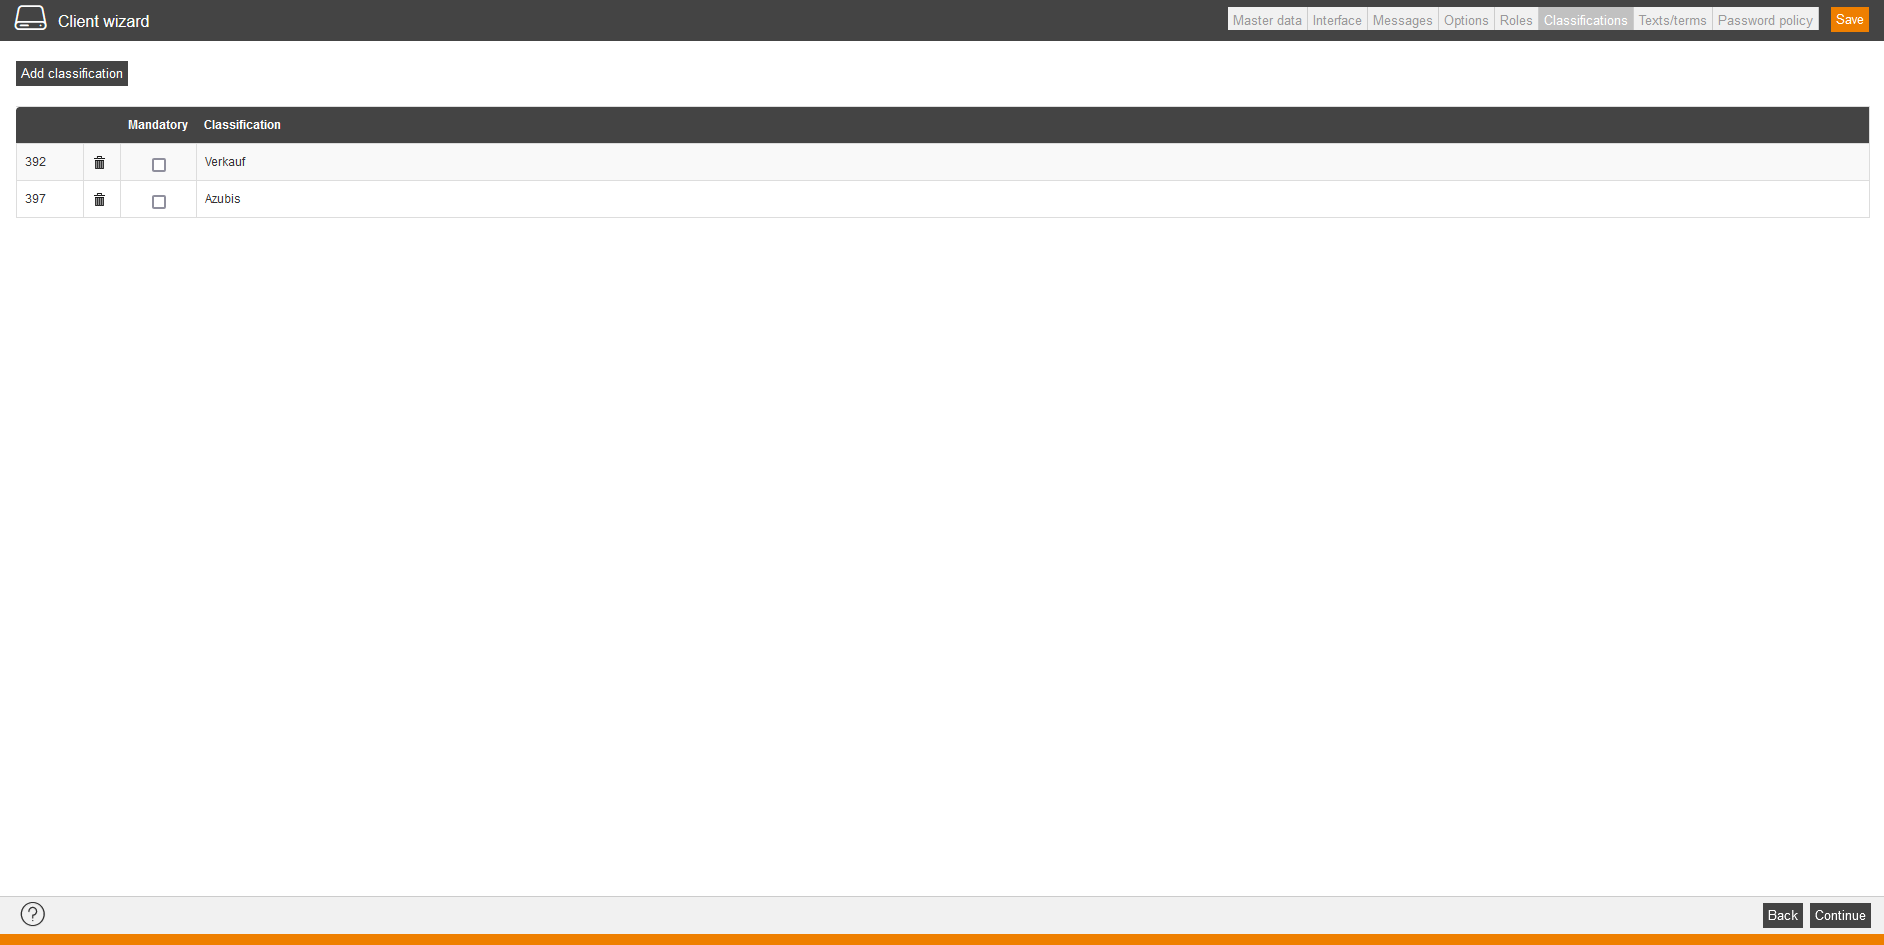
If you have created classifications, they are available as classification filter in the browser area for the user. Likewise authors can filter the course activations of this client via classifications.
To add a classification, click on the button Add classification, set a check mark in front of the appropriate classification and confirm your selection by clicking on the button Select.
If you want the appropriate classification as mandatory selection in the Course activation and Training plan wizard, set the check mark Mandatory in the appropriate line of the added classification.
If applicable you can delete the added classification via click on the recycle bin in the appropriate line. Note that all assignments to course activations and certificates are deleted, too.
Finally you click on the button Save.
The report “Course activations of a client” is available in the reporting. This report includes all course activations depending on the client with the classifications which are created in the client.
If you want to create or edit classifications or classification values, you can do this in the Classification wizard.
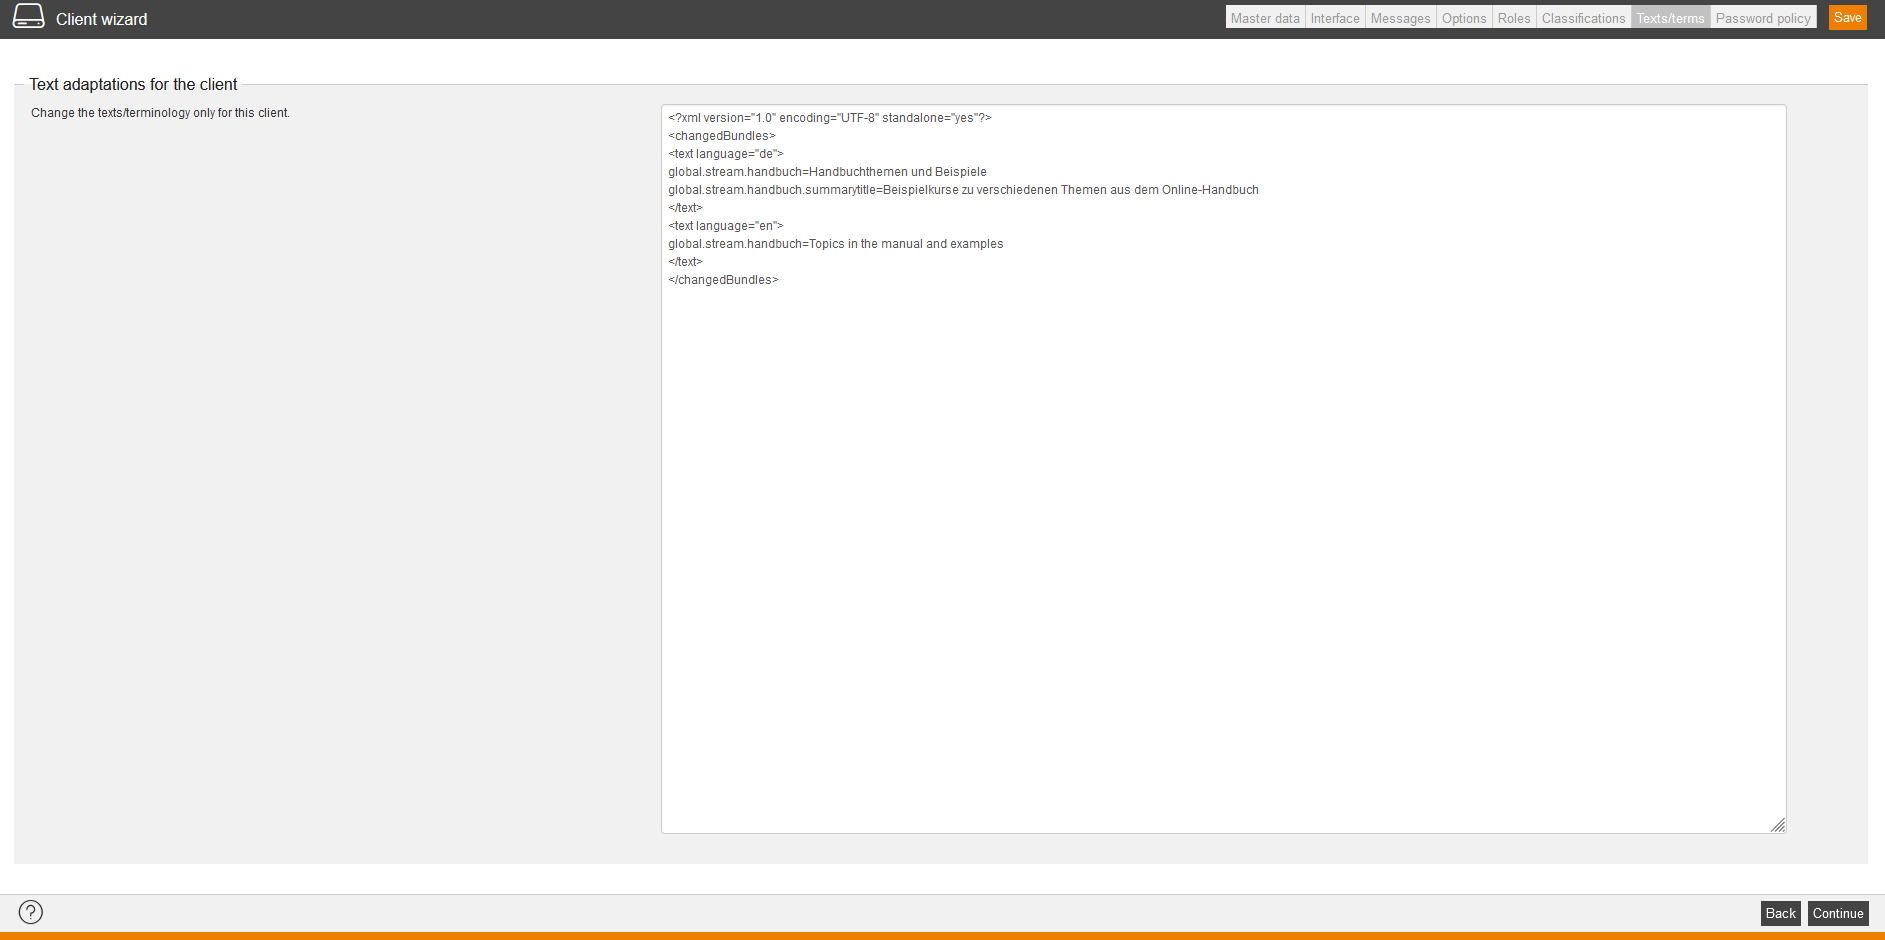
Texts/terms
On this tab you can make text adaptations for a certain client and a certain language.
Password policy
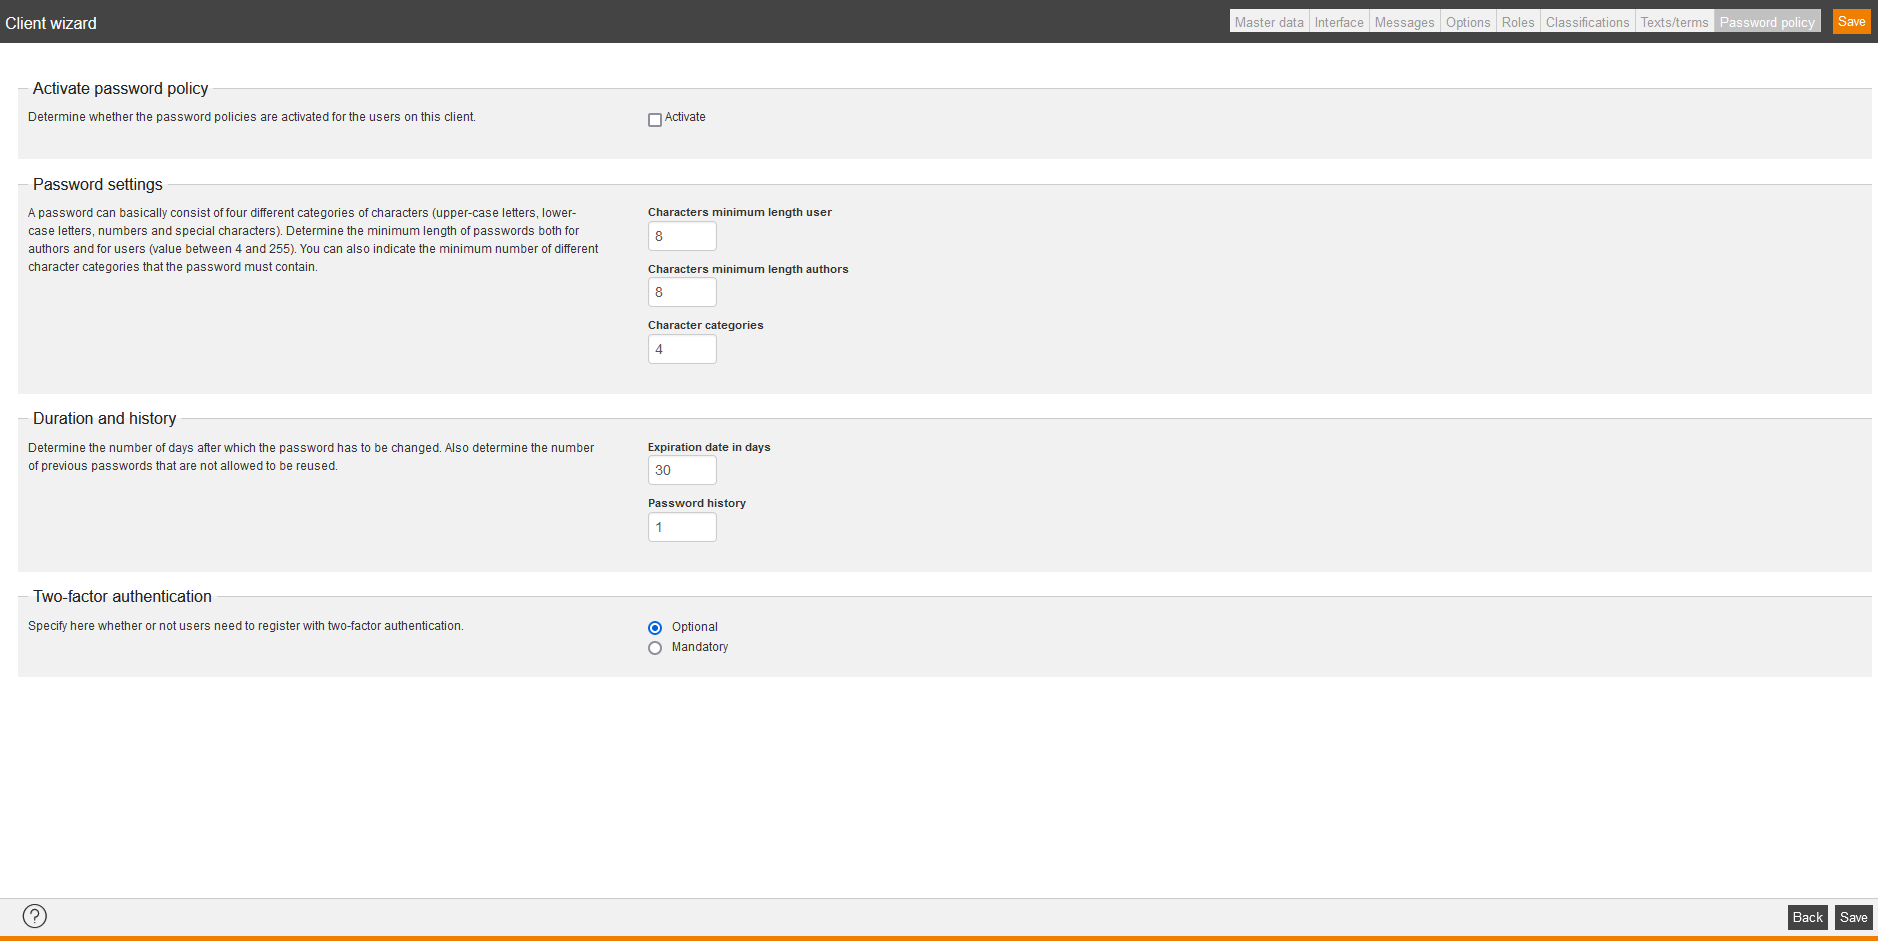
You can activate the password policy and you can define the password character categories and the password duration.
A password policy stands for a rule which generates passwords. Administrators and authors can define which password policy should apply.
You can activate the Password policy on clients. This is:
- The new password may not match the already expired password.
- The user name may not used as password. Exception is the Import user wizard.
- An expiration time period can be set to update passwords constantly.
- A password can basically consist of four different categories of characters (upper-case letters, lower-case letters, numbers and special characters).
- The minimum length of the password for users and authors can be defined separately.
Further a generator for secure password was created.
Activate password policy
Select the checkbox “Activate” if you want to define that in this client the password policy is activated for users.
Password settings
Characters minimum length user
Enter the number of characters which the password for users should have minimum. It has to be a valuee between 4 and 255.
Characters minimum length authors
Enter the number of characters which the password for authors should have minimum. It has to be a value between 4 and 255.
Character categories
There are basically four character categories: upper-case letters, lower-case letters, numbers and special characters. Enter the number of character categories that the password must contain.
Duration and history
Expiration date in days
Enter the number of days after which the password has to be changed.
Password history
Enter the number of previous password that are not allowed to be reused.
Two-factor authentication
Specify here whether or not users need to register with two-factor authentication. Select between the following options:
- Optional or
- Mandatory.
You find information about activating the two-factor authentication in the user frontend on the page „Settings in the user frontend“.
You find information about activating the two-factor authentication in the author backend on the page „Preferences in the author backend“.
You can deactivate the two-factor authentication in the corresponding Author assistant or User wizard on the sub tab Master data of the tab Master data.
As soon as you use the function “Change user” you have to enter the two-factor code if you switch to a user with activated two-factor authentication.
