
Basics
Knowledge tests resume questions and tasks in a fixed or random order. They serve, placed on the learning path, as exercise or exam. Note that you can create individual texts depending on the test result on the End page of the knowledge test via Avendoo® Move.
In the overview (learning content → knowledge tests) you see all already existing knowledge tests. If you click on the title, you get to the appropiate Knowledge test wizard. Via click on the national flag you get to the preview of the user. Furthermore you see the owner of the knowledge test and the creation date.
You can filter by the following criteria: Title, Language, Include subcategories, To be translated by me, ID and Serial number.
There are the mass processing functions Copy, Move, Delete, Change status, Export and Define translator for knowledge tests. More information about these functions you find under Knowledge tests: Mass processing functions.
The following functions are available via the context menu of the corresponding knowledge test title.

Create knowledge test
Master data
Title
Enter a significant title for the knowledge test. It is shown on the learning path.
Teaser
The teaser appears on the learning path as supplementary information about the knowledge test.
Language
Determine the main language for the knowledge test. If the knowledge test is to be accessible in multiple languages, it must be translated in the translation area.

Metadata
Valid from
Select a date, if the knowledge test has an appropriate validity.
Valid until
Select a date, if the knowledge test has an appropriate validity.
Version
Enter a version description, if the knowledge test has a version.
Note
Enter if applicable some notes for the knowledge test.
Expected processing time
Enter a value for the expected processing time in the format “hh:mm” regarding the knowledge test. How Avendoo® will transfer the expected processing time to the learning path depends on the configuration in the Course wizard on the tab Course content under General characteristics of the knowledge test.
Qualifications
Determine which qualifications should be awarded by this learning content upon completion in the course. For this, the learning content must be configured accordingly in the Advanced characteristics of the knowledge test on the tab Course content in the Course wizard.
To assign the qualifications via this knowledge test on completing the course to the participant, click the button Add and select the corresponding qualification. If you’ve maintained the qualification group and the qualification scale, you see the corresponding scale values in a drop-down menu (see screenshot).
If required you can remove the qualification via the button Remove. Note that you consider if the course completion is already done by the participant.

Parameters
Default settings
Type
Define which knowledge test type you want. Afterwards you can filter in reports via type.
Learners can repeat exercises and exams as often as they please or exercises and exams are restricted. This configuration you do on the learning path.
Question answered
Stipulate whether the correction of an item should be shown while the user is doint the test and if so in what form:
- Do not show answer
- Learner can select himself
- Show answer only if an incorrect answer was given
- Always show the answer
Navigation
Determine what navigation functions the learner has at his/her disposal:
- Show quick navigation
- Allow questions to be remembered and skipped
Display settings
Stipulate whether the learners should be allowed to see the points they have earned while doing the knowledge test.
Points, time & access code
Set the point mode you wish to use for assessing the question in the knowledge test.
For further information and examples regarding the point system click on the button below:
Grading key
You can use the grading scale to depict the results of the knowledge test as a grade. Save the grading scale under Resources -> grading scale.
Time limit
Indicate the maximum time allowed for taking the knowledge test.
To activate the time limit for the appropiate knowledge test, set the check box “Activate processing time limit”. Then you enter the time limit in the format hh:mm:ss. Avendoo® shows this time limit on the end page of the appropiate knowledge test. If the time limit is exceeded, the attempt of the knowledge test gets the status “Failed”. Depending on how many attempts are configured in the preferences of the appropriate knowledge test the user can do as many attempts as configured.
Add an access code to restrict access to the knowledge test. By doing so, you guarantee that learners can only start this test if they have the code. Application example: joint on-site test.
This input is optional.
By setting the check box Activate, Avendoo® sends a notification to the user as soon as he/she has passed the test.


Start page
The start page appears when the knowledge test is opened. It is optional and serves the purpose of providing information before the knowledge test starts. You can provide information to the learner regarding the working. Define by setting the check box, if the starting page should be shown when the knowledge test opens.
On this tab is Move integrated, for designing the layout of the start page of a knowledge test . To create a new start page, click on the +tile (see first screenshot). Then the Move editor opens. You can sort already existing design templates by the criteria Creation date and Title. Also you can search them by using the activated toggle Status “In Progress”.
To open the HTML editor click on the arrow down which is on the +tile, and then choose HTML editor. A new dialog window of the HTML editor opens (see second screenshot). There are the function CSS/JS and the editor available. Furthermore you can reset the page.
Available variables
![]() For creating a knowledge test you get various variables in the editor. Via variables chosen content is automatically inserted:
For creating a knowledge test you get various variables in the editor. Via variables chosen content is automatically inserted:
- $CourseTitle$ = Title of the course
- $ObjectCertification$=Link to the certificate, if the course is passed
- $ObjectTeaser$=Teaser of the knowledge test
- $ObjectTitle$=Title of the knowledge test
- $Serial$=Serial number of the knowledge test
- $UserCountry$ = Country of the registered user
- $UserDivision$ = Division of the registered user
- $UserFirstname$ = First name of the registered user
- $UserGroup$ = Group of the registered user
- $UserLastname$ = Last name of the registered user
- $UserOe$ = Organizational unit (OU) of the registered user
- $UserRegion$ = Region of the registered user
- $UserSex$ = Gender of the registered user
Example
Enter a title of the knowledge test by inserting a Title Move.
To make a title more concrete by using a sub title you can use the Move Title and text.
Give the learner some information about the content of the knowledge test by using an introduction via the Text Move. Criteria which should be fulfilled are useful information for the learner to know when the knowledge test is passed.
Important note: You can select the background colors as you like. Via the List Move you can give information about the duration of the test, you can list the number of attempts and you can show the existing passing grade for example.


Compilation
Knowledge test questions
- Add
Opens the selection dialog for questions. Select a category and then select the favored questions.
- Delete
Deletes the question, which you have marked.
- Up / Down
Moves the position of the marked question in the knowledge test.
Order
Determine the order of the questions. Select between the following options:
- Fixed order of questions
- Random order of questions (if applicable enter the number of knowledge test questions, which should be considered)
You have to select Random order of questions, to see the selection of key words. You maintain the key words in the highest category of the category tree and then you assign them to the corresponding knowledge test questions.
Select according to key word
If there are keywords entered for the single knowledge test question, you see them listed.
To select your favored keywords, set the check mark in front of the appropriate keyword. If you select only one keyword, there will be shown a share of 100 %. If you select a second keyword for example, the question share will be calculated correspondingly, this means each keyword becomes a share of 50 %. Since version 17.44 you can’t adjust the Share in % anymore. It’s shown only as information (see second screenshot).
In the column Available you see the number of available knowledge test questions with this keyword, for example 2. In the column Selected you see the number of the selected knowledge test questions with this keyword, for example 1. Via the + or – button you can increase or decrease this number. Thus the question share will be adjusted.
You add keywords in the appropriate knowledge test question on the tab Parameters of the appropriate Knowledge test wizard, for example Wizard for multiple choice/single choice question in knowledge test. Further information about creating keywords you find here. Furthermore you find information about editing keywords here.
Choice of questions
Add the questions and determine their order. The order is ignored if there are knowledge tests with random question order.
Intermediate pages
Intermediate pages can contain hints and information during the knowledge test. To add an intermediate page, do the following steps:
- Mark a question.
- Click on the button Add before or Add after below Intermediate page.
- Enter a title for the intermediate page.
- Enter the text and design your intermediate page.
- Define the display settings: Show intermediate page before or after the marked question.
For adding an intermediate page, click first on an existing question to activate the section “Intermediate page”.
- Add before/after
Opens the edit mode for the intermediate pages. Choose a design template, enter title and text and define the position in the knowledge test.
- Edit
Opens the edit mode for intermediate pages. You can edit title, content and position of the intermediate page.
- Delete
Deletes the question, which you have marked.


End page
On the tab “End page” you define how an assessment is shown to the learner at the end of the knowledge test. If you want to show a grade as result, choose a grading scale before on the tab “Parameter”. Each single result and the total result are shown percentaged additionally as default.
To use an evaluation tool, click on the appropriate icon and move the elements to the favored position. Already used elements you can move and position via drag and drop.
On this tab is Move integrated, for designing the layout of the end page of a knowledge test . To create a new end page, click on the +tile (see first screenshot). Then the Move editor opens. You can sort already existing design templates by the criteria Creation date and Title. Also you can search them by using the activated toggle Status “In Progress”. You can create individual texts depending on the test result via Avendoo® Move.
Example: You can configure the Text Move via the characteristic Conditional display to show the text only if the Knowledge test has been Passed and the Display size is Desktop (see third screenshot). If the knowledge test has been failed, you add another Text Move with the Conditional display Knowledge test is Failed (see fourth screenshot). You can configure this conditional display for each Move on the end page of the knowledge test.
To open the HTML editor click on the arrow down which is on the +tile, and then choose HTML editor. A new dialog window of the HTML editor opens (see second screenshot).
The following functions are available:
Furthermore you can reset the page.
Available variables
![]()
For creating a knowledge test you get various variables in the editor. Via variables chosen content is automatically inserted:
- $BreadCrumb§= visualizes a click path
- $CourseTitle$ = Title of the course
- $ObjectCertification$=Link to the certificate, if the course is passed
- $ObjectTeaser$=Teaser of the knowledge test
- $ObjectTitle$=Title of the knowledge test
- $ObjectTypeTitle$= Title of the object type on the learning path
- $SecondTitle$= Recipient’s title
- $Serial$=Serial number of the knowledge test
- $showUsedTime$= the time spent in the format hh:mm:ss
- $showReachedPoints$= the points achieved in the format – X out of Y points (percentage %)
- $showNeededPoints§= the points required in the format – X points (percentage %)
- $Title$= Form of address for the recipient
- $UserCountry$ = Country of the registered user
- $UserDivision$ = Division of the registered user
- $UserFirstname$ = First name of the registered user
- $UserGroup$ = Group of the registered user
- $UserLastname$ = Last name of the registered user
- $UserOe$ = Organizational unit (OU) of the registered user
- $UserRegion$ = Region of the registered user
- $UserSex$ = Gender of the registered user


Preview mode
To see how the current question is shown on mobile devices, there are five preview modes and the current edit mode available. The pixel width is based on average values. The pixel height is individually well adapted for the dialog window. Choose first a responsive layout and then the preview mode will be shown correctly.
Display on the smartphone (Landscape format, width: 480px)
Display on the tablet (Portrait format, width: 800px)
Display on the tablet (Landscape format, width: 1000px)
Display on the PC monitor (width: 1200px)
Text area
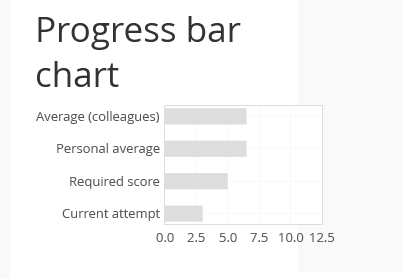
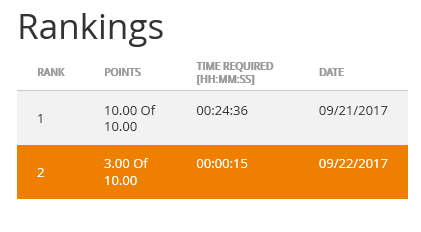
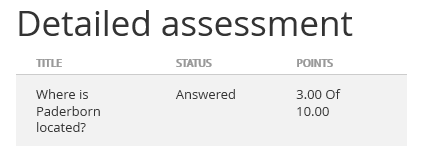
Via editor you can create and format a text area for the end page of your knowledge test. Via the icon ![]() you can position the favored evaluation tools directly in the text area. In the opening dialog window you get different options for the width of the chosen evaluation tool (Progress bar chart, Summary, Rankings or Details). Define the width by selecting an appropriate value or define an individual width by selecting Individual and entering an value.
you can position the favored evaluation tools directly in the text area. In the opening dialog window you get different options for the width of the chosen evaluation tool (Progress bar chart, Summary, Rankings or Details). Define the width by selecting an appropriate value or define an individual width by selecting Individual and entering an value.
Evaluation tools
If you choose Details as evaluation tool for example you get further settings. Click on the gearwheel in the lower area to get further setting options shown (Overview of the individual question results or Overview and repeated display of the questions).
The progress bar chart shows the learner his/her knowledge test result in relation to his colleagues (average). Furthermore the personal average is shown, if the knowledge test type exercise was chosen, and the required score and the points of the current attempt.

Notification about passing (e-mail to user)
A noticification will be sent to the user, if he/she has passed the knowledge test. This is meaningful, if the knowledge tests contain essay questions.
Responsive layouts
For an optimum display of your knowledge test even on mobile devices various responsive layouts are available.
To adopt your favored layout into the edit mode, click on the appopriate layout. Only after this the display is adapted in the preview mode.
Reset page
Via click on this icon the existing content is deleted and you can start again.
Avendoo® API
Experienced authors with appropriate HTML/CSS and JavaScript skills can use the Avendoo® API (application programming interface) for the final page. So they can transfer certain parameters to an autonomous created design.
Practical example
Translation of knowledge tests
If you’ve saved a knowledge test, you can switch from this tab via the link Go to translation area (see first screenshot) to the Translation management, without translating all new.
You can also switch to the translation area if you click on the icon for translation management of the corresponding knowledge test listed in the table.
You can use during the translation the function Change translator responsible to define a certain translator for a language version (see second screenshot). When the responsible translator switches into the list view for knowledge tests, he/she can use also the filter To be translated by me. Then this list is filtered by these objects, to which the author account was defined as responsible translator.
Furthermore you can use the mass processing function Define translator in the menu underneath the list view or table of knowledge tests.
You got also the widget Outstanding translations, which you can use as author who translates. This widget lists all objects, for which you’re defined as responsible translator and if the translation isn’t finished. Click the title of the knowledge test in this widget and you get directly to the object for making your ToDo list of outstanding translations. You select this widget on the Dashboard via +, then the dialog window opens Add new widget and you select it on the tab Tools for daily work.
