Import users
You need for a user import a CSV file als basis. You can download this template via the report Dynamic CSV export – A client’s users.
If you want to configure a check for forbidden characters in phone numbers, just see under Checking phone numbers for forbidden characters.
Import settings
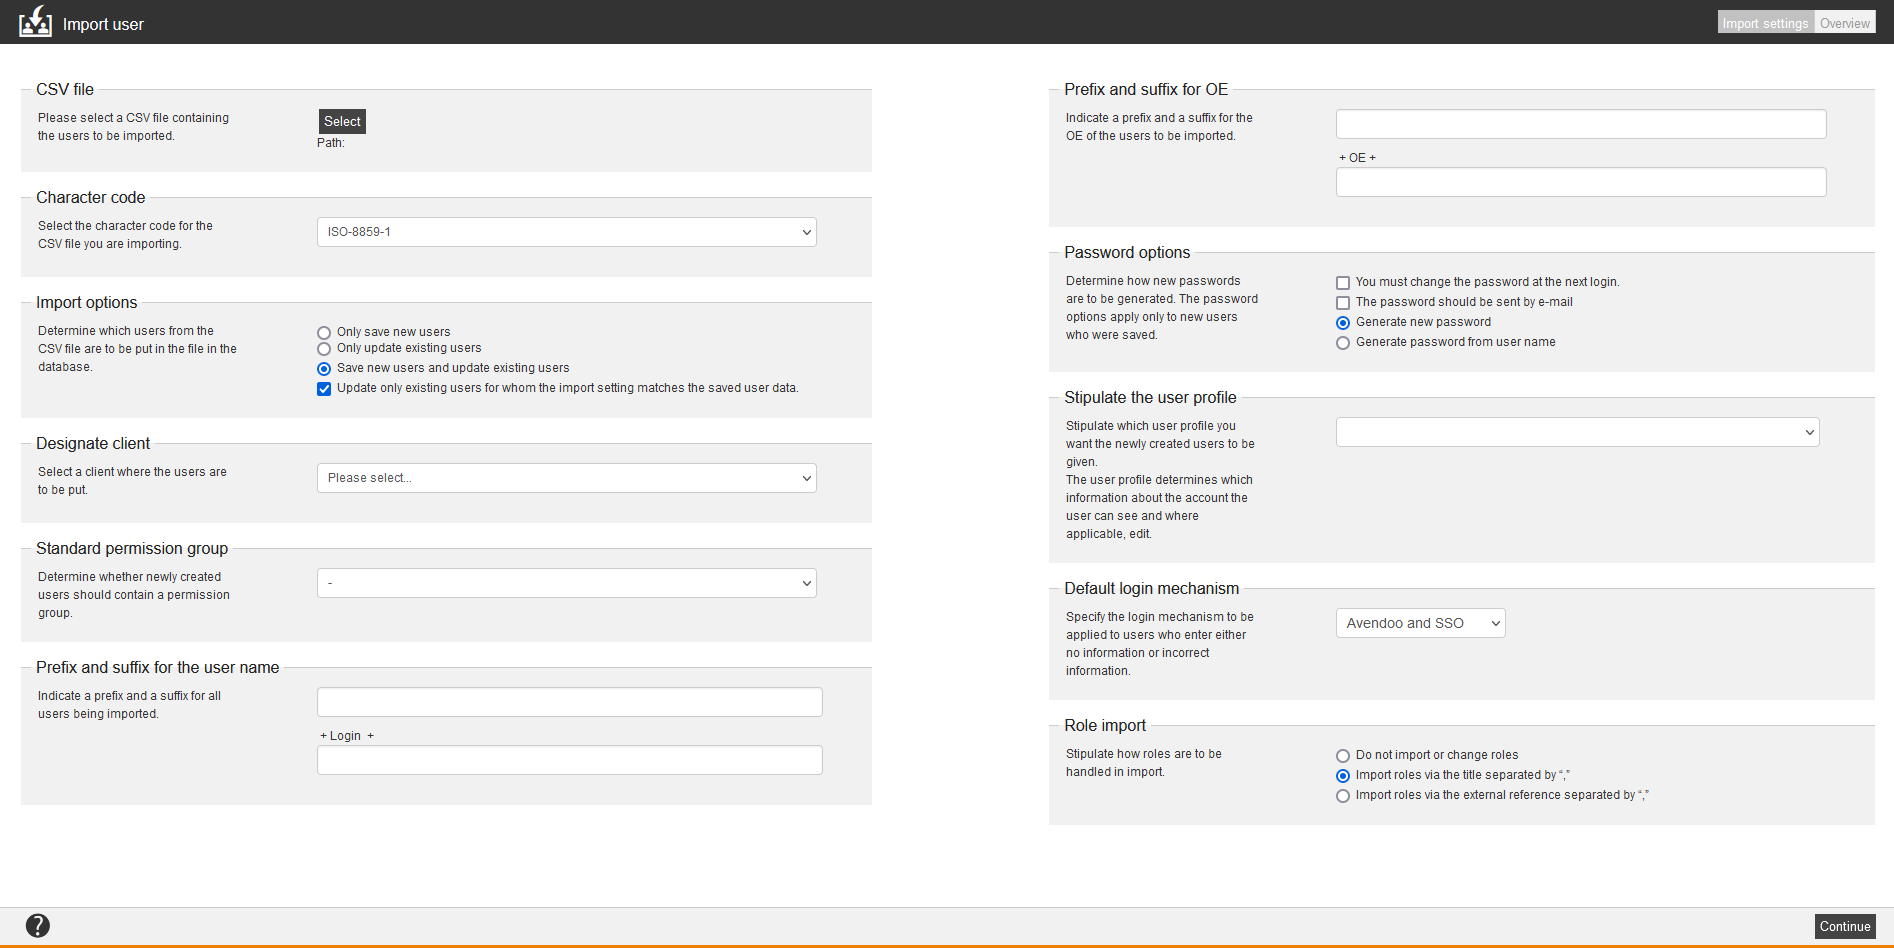
CSV file
Please select a CSV file containing the users to be imported via the button Select.
Character code
Choose the character code. This should be normally ISO-8859-1. If you recognize on the tab Overview, that special characters weren’t transferred correctly, change to UTF-8.
Import options
Via the import options you define, if only new users should be created, existing should be updated or if both options should be done.
Further you can define by setting an appropriate check box, if only existing users, at which the import setting agrees with the save user data, should be updated. If you haven’t selected this option, also existing users are updated, who have other import settings for example or were created manually.
Designate client
Select a client where the users are to be put. There is no default for the client.
Standard permission group
Determine whether newly created users should contain a permission group.
Prefix and suffix for the user name
This is an automatic generation of the user name. The prefix is a fixed string, which is set before the login in the CSV. The suffix is a fixed string, which is set after the login. You can use both or none of them of these login supplement for the user name.
Prefix and suffix for OE (OU)
Indicate a prefix and a suffix for the OE of the users to be imported. See prefix and suffix for the user name.
Password options
You can define, if the users have to change their password at the next/first registration or if they should receive the initial password via e-mail (the e-mail address of the CSV file is used). The option Generate new password created a random password. The option Generate password from user name sets the password as user name. The password options apply only to new users who were saved.
Stipulate the user profile
Stipulate which user profile you want the newly created users to be given.
The user profile determines which information about the account the user can see and where applicable, edit.
Default login mechanism
Specify the login mechanism to be applied to users who enter either no information or incorrect information.
- If you want to define the registration (login) via the Avendoo® start page by entering user name and password or via Single Sign On, choose the option Avendoo and SSO.
- If you want to define the registration (login) only via the Avendoo® start page by entering user name and password, choose the option Avendoo.
- If you want to define the registration (login) only via Single Sign On and defining that the user cannot register manually via the Avendoo® start page, choose the option SSO.
Role import
Stipulate how roles are to be handled in import:
- Do not import or change roles
- Import roles via the title separated by “,”
- Import roles via the external reference separated by “,”
Overview
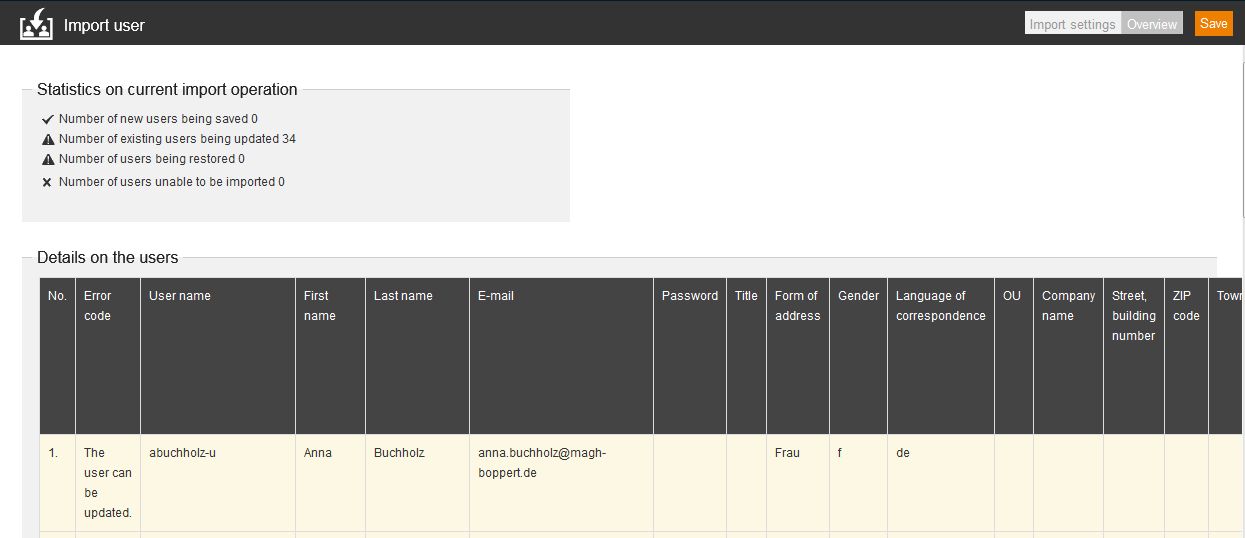
Statistics on current import operation
These statistics gives you a quick overview of the performed import.
Example
- Details on the users
In this table you see all user data of the users, which you want to import.
- Error code
The column error code is green or red. It depends on if the user could be imported or couldn’t be imported.
- Red marked
This can be caused by: The user is already as author in the system or the user is already in another client.
- Green marked
The import of the user is possible - If the number of characters of 255 per column is exceeded, you get a feedback.
Below the table you can export the data via click on the appropriate button (CSV Export (UTF-8) or CSV Export (ISO-8859-1)).
Error codes
| Code | Short description |
|---|---|
| 0 | Import is possible |
| 1 | Update is possible |
| 2 | Recovery is possible |
| 3 | Import was succesful |
| 4 | Update was succesful |
| 5 | Recovery was successful |
| 6 | No licence |
| 7 | Double login |
| 8 | Incomplete data |
| 9 | E-mail address is incorrect |
| 10 | User name is incorrect |
| 11 | Gender is incorrect |
| 12 | Language is incorrect |
| 13 | Wrong number |
| 14 | Wrong client for import |
| 15 | Not imported, only created |
| 16 | Not imported, only updated |
| 17 | Expiration date in wrong format |
| 18 | User is tutor |
| 19 | Double HR login (CSV) |
| 20 | Double HR login (data base) |
| 21 | Incomplete data caused by system setting |
| 22 | Field 9 is not unique |
| 23 | Double login (CSV, old) |
| 24 | Update with client is possible |
| 25 | Recovery with client is possible |
| 28 | Double Identity Provider (CSV) |
| 29 | Incomplete Identity Provider (CSV) |
| 30 | Double Identity Provider (data base) |
| 31 | Double External reference and reference type (CSV) |
| 32 | Double External reference and reference type (data base) |
| 33 | Incomplete External reference (CSV) |
| 34 | Equal sign at the beginning |
| 35 | Field got wrong encoding |
| 36 | Double personnel number (CSV) |
| 37 | Identifiere is not unique |
| 38 | IDD is not unique |
| 39 | IDD is in use |
| 40 | Column too long |
| 41 | No change |
| 42 | Value is not allowed |


